TM policy is a set of instructions or parameters by which we want the Compliance Planet to monitor transaction(s). The TM policy group creation process in the Compliance Planet Anti-Money Laundering/Core Banking Finance software is designed to be dynamic, allowing users to set custom flows and parameters.
Steps to creating “New Policy” from POLICY GROUP are described below.
STEP 1: From the app store, click “DIGITAL FINANCIAL CRIMES SURVEILLANCE” and select change status as in Fig. 5.1b below.
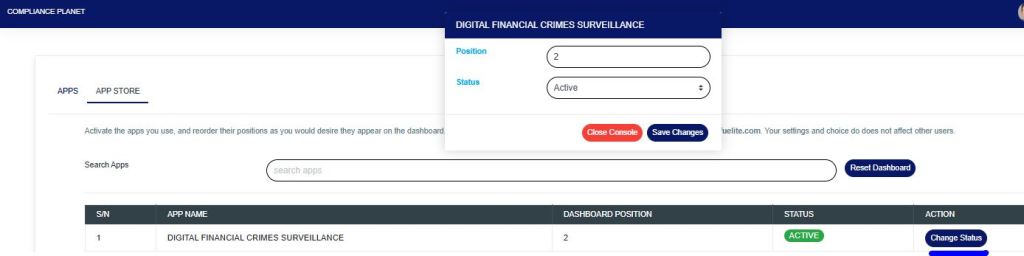
From the window, change status to “ACTIVE” as in Fig. 5.1.1b below.
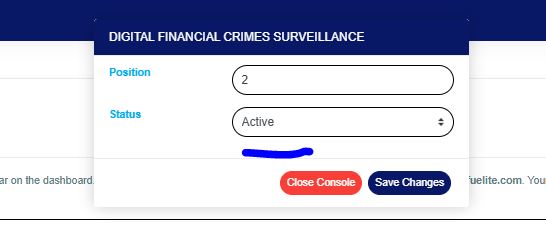
FIG 5.1.1b
The app would be reflected in the “APP dashboard” as shown in Fig. 5.1.2b below.
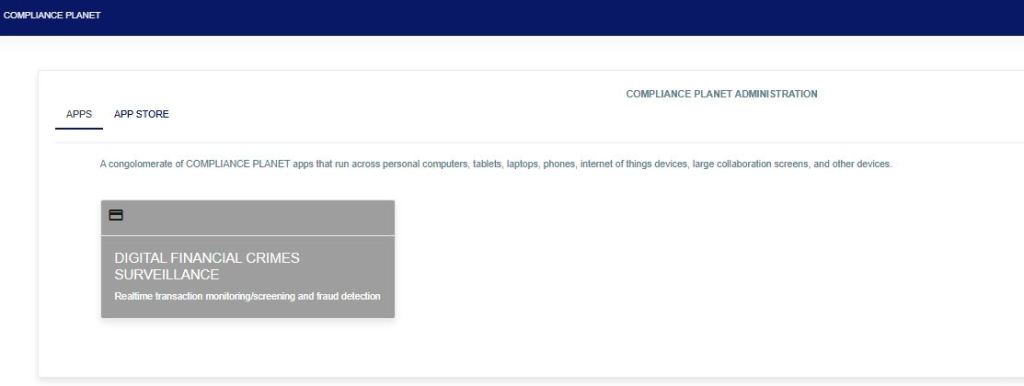
FIG 5.1.2b
STEP 2: Click on “DIGITAL FINANCIAL CRIMES SURVEILLANCE” and the app displays the menu page that shows different graphical representations as in Fig. 5.1.3b below.
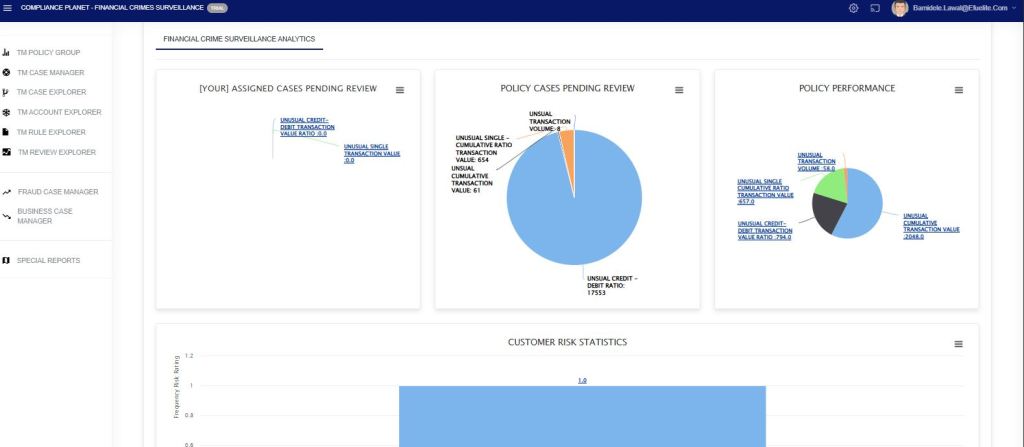
FIG 5.1.3b
From the left-hand side, the first menu “TM POLICY GROUP” displays all the policy categories as shown in fig.5.1c
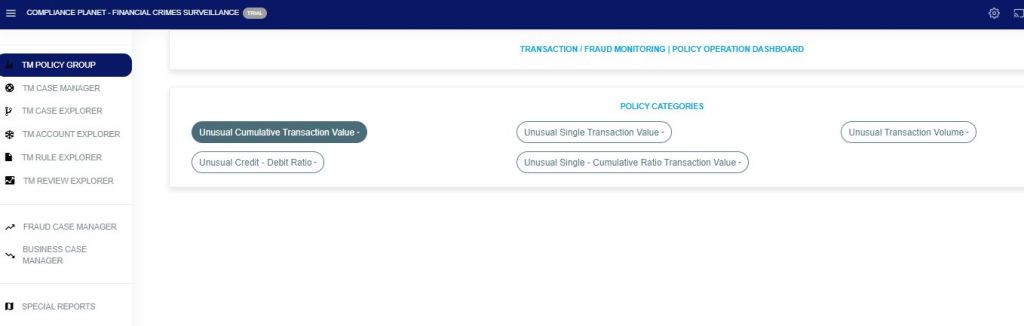
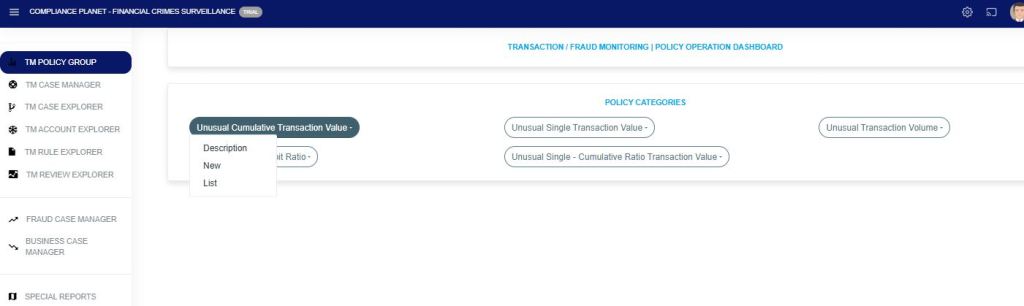
STEP 3: Click on the desired group policy from the “POLICY CATEGORIES” in fig. 5.1d. This displays a dropdown menu.
From the drop-down menu, click on “New.” This will display the policy creation page.
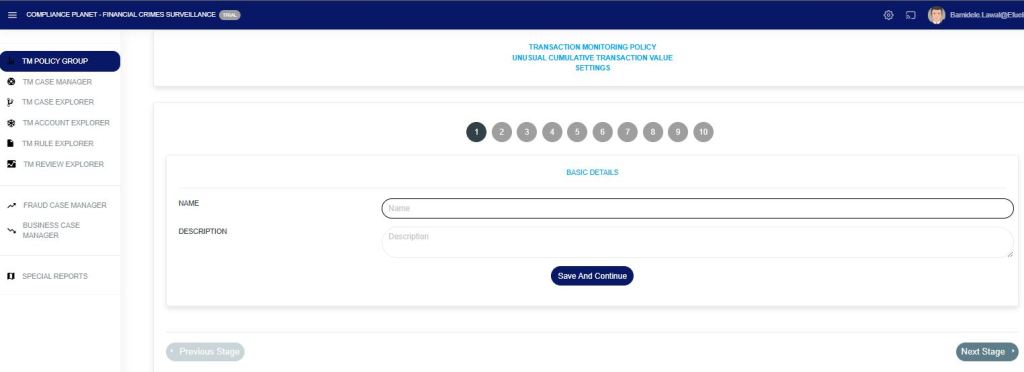
STAGE 1: Fill in the Basic details required as in FIG 5.1e.
- Name: Fill in the policy name.
- Description: Fill in the policy description.
Click on the “Save and Continue” button. This will save this stage and take you to the next stage.
STAGE 2: This is the policy filter stage. Fill in the fields according to your policy rule.

BVN: Enter the BVN(s) in the field provided. To input multiple BVNs, separate each one with a comma (,).
ACCOUNT: Enter the ACCOUNT NUMBER(s) in the field provided. To input multiple ACCOUNT NUMBERS, separate each one with a comma (,).
ACCOUNT SCHEME (included): Click on the dropdown to select the ACCOUNT SCHEMES you want to include.
ACCOUNT SCHEME (not included): Click on the dropdown to select the ACCOUNT SCHEMES you want to exclude.
SUBSECTOR SCHEME (included): Click on the dropdown to select the SUBSECTOR SCHEMES you want to include.
SUBSECTOR SCHEME (not included): Click on the dropdown to select the SUBSECTOR SCHEMES you want to exclude.
BRANCHES (included): Click on the dropdown to select the BRANCHES you want to include.
BRANCHES (not included): Click on the dropdown to select the BRANCHES you want to exclude.
INCLUSIVE NARRATION: Enter keywords in the transaction narration to be included, separating them with a pipe (aml|compliance|planet|).
EXCLUSIVE NARRATION: Enter keywords in the transaction narration to be excluded, separating them with a pipe (aml|compliance|planet|).
TRAN. TYPE: Click the dropdown and select the transaction type. It can be either credit, debit, or both credit and debit.
TRAN. CURRENCY: Click the dropdown and select the currency for the transaction.
TRAN INDUCED TYPE: Click the dropdown and select the transaction induced type.
TRAN SECTOR: Click the dropdown and select the transaction sector.
ACCOUNT OWNERSHIP: Click the dropdown and select the account ownership type.
ACCOUNT TIER: Click the dropdown and select the account tier type. It can be either Tier 1, Tier 2, or Tier 3.
ACCOUNT STATUS: Click the dropdown and select the account status. It can be either all accounts, accounts that are still open, or accounts that are closed.
ACCOUNT PRODUCT TYPE: Click the dropdown and select the account product type. It can be either Individual accounts or corporate accounts.
CUSTOMER TYPE: Click the dropdown and select the customer type.
BLACKLISTED BVN: Turn on the button if you want to filter only BVNs that are on the blacklist.
TRACK TRAN LOCATION: Turn on the button to view or enable tracking of the geographical location where each transaction occurred.
PRE-CLASSIFIED ACCOUNT RISK LEVEL: Click and select the risk level assigned to the account before applying the policy. It can be either low, medium, or high.
POST CLASSIFIED ACCOUNT RISK LEVEL: Click and select the updated risk level after applying the policy. It can be either low, medium, or high.
Click on the “Save and Continue” button. This will save this stage and take you to the next stage.
Note: The mandatory fields are “Tran Currency” and “Tran Type“.
STAGE 3: From (Fig. 5.1g), select the transaction amount alert type from the “Tran Amount Alert type” drop-down. Depending on the alert type chosen, an amount field will be displayed where the transaction amount needs to be entered.
Click on the “Save and Continue” button. This will save this stage and take you to the next stage.

STAGE 4: This stage sets the Tran Date Alert Type, Account Creation Date Alert Type, and Account Age Alert Type
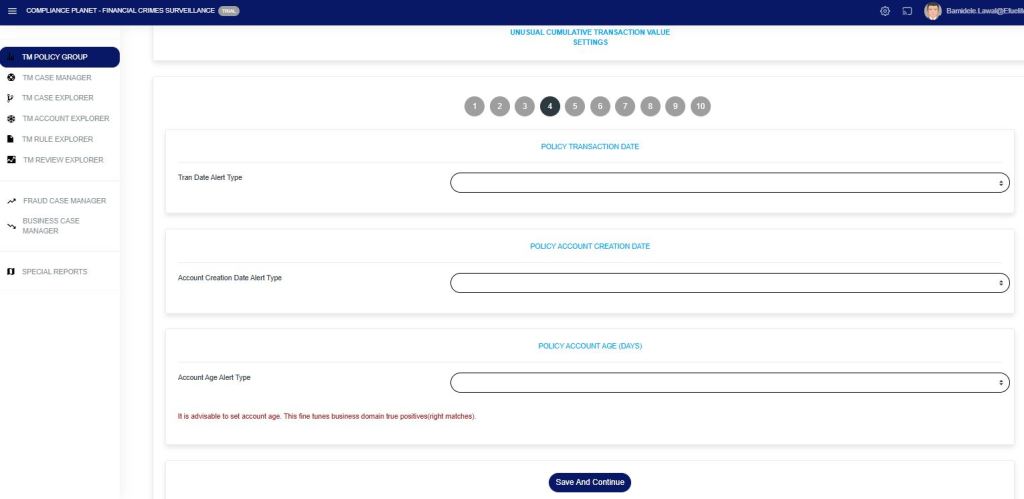
- Tran Date Alert Type: Click on the dropdown and select the transaction date alert type.
Raise alert for *Transaction date earlier than* – This option allows you to select a date; an alert will be raised for any transaction that occurred before the specified date.
Raise Alert for *Transaction Date Later Than* – This option allows you to select a date; an alert will be raised for any transaction that occurred after the specified date.
Raise Alert for *Transaction Date within this Date Range* – This option allows you to select a date range; alerts will be raised for transactions that fall within the specified period.
Depending on the alert type selected, a date field will be displayed where the transaction date needs to be entered. - Account Creation Date Alert Type (Optional): Click on the dropdown and select the account creation date alert type.
Raise Alert for *Accounts Created on Exact Date* – This option allows you to select a specific date; alerts will be raised for accounts created on that exact day.
Raise Alert for *Accounts Created Before* – This option allows you to select a date; alerts will be raised for any account created before the chosen date.
Raise alert for *Accounts created date later than* – This option allows you to select a date; alerts will be raised for accounts created after the specified date.
Raise alert for *Accounts created date within this date range* – This option allows you to select a date range; alerts will be raised for accounts created within the specified period.
Depending on the alert type selected, a date field will be displayed where the account creation date needs to be entered. - Account Age Alert Type: Click on the dropdown and select the account age alert type. This helps to monitor accounts created within a particular period, e.g., 48 hours (2 days) or a week (7 days).
Raise alert for *exact account age* – This option allows you to select a specific age in days; an alert will be raised for accounts that match the specified age.
Raise alert for *Account age lesser than* – This option allows you to specify an age threshold; alerts will be raised for accounts with an age less than the specified threshold.
Raise alert for *Account age greater than* – This option allows you to select an age threshold; alerts will be raised for accounts older than the specified number of days.
Raise alert for *Account age within this date range* – This option allows you to select a Lower and higher age threshold (in Days); alerts will be raised for accounts that fall within the specified age range.
Note: This Account Age Alert Type is a dynamic parameter that changes over time, regardless of the current date.
Click on the “Save” button for each section to save the changes for that section. Click the “Continue” button to proceed to the next stage.
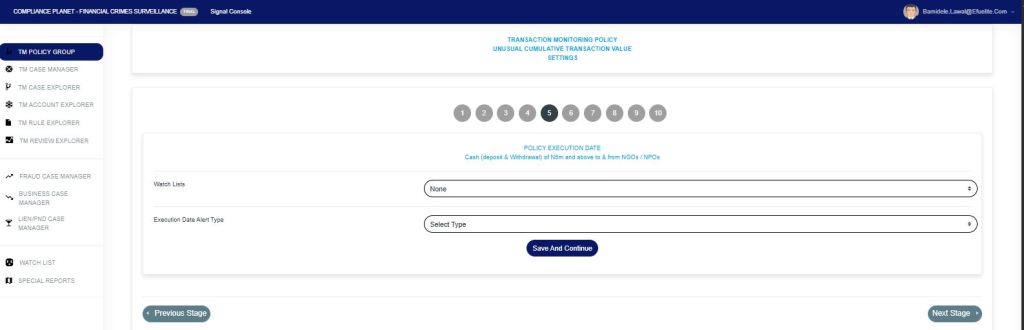
STAGE 5: The “Watch List” is to specifically monitor account (s) that have been profiled on the watch list menu that bridges the policy rule.
The “Execution Date alert type” sets a specific date or a date range for when the policy will be executed.
Click the drop-down and select the execution date alert type. Depending on the alert type chosen, a date field will be displayed where the execution date needs to be entered.
Click on the “Save and Continue” button. This will save your progress at this stage and take you to the next stage.
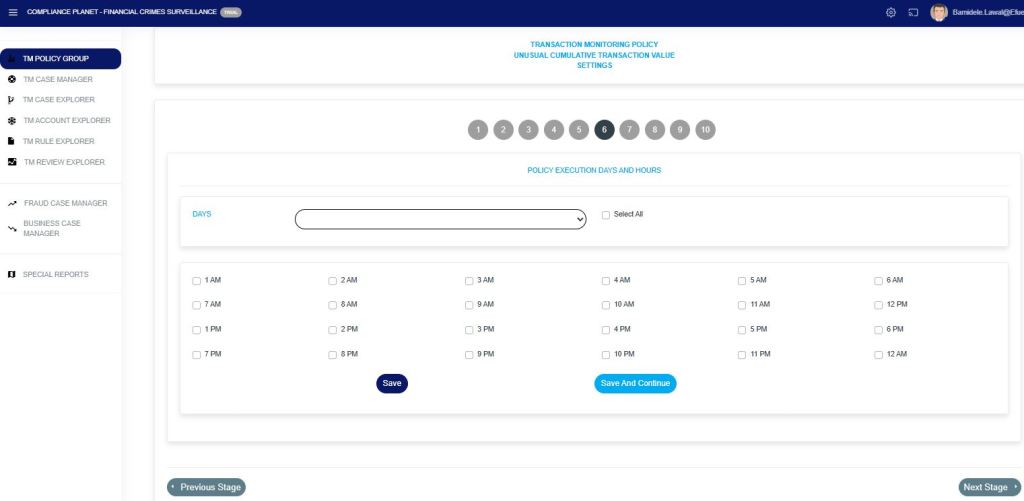
STAGE 6: From (Fig. 5.1j). This step sets the hour(s) of the weekdays on which the policy will be executed. To change the days, click on the “Days” drop-down and select the desired weekday. After editing the hours for a weekday, click on the “Save” button to save the changes for that day.
Note: By default, all the hours for the weekdays are checked (active).
Click on the “Save and Continue” button. This will save this stage and take you to the next stage.
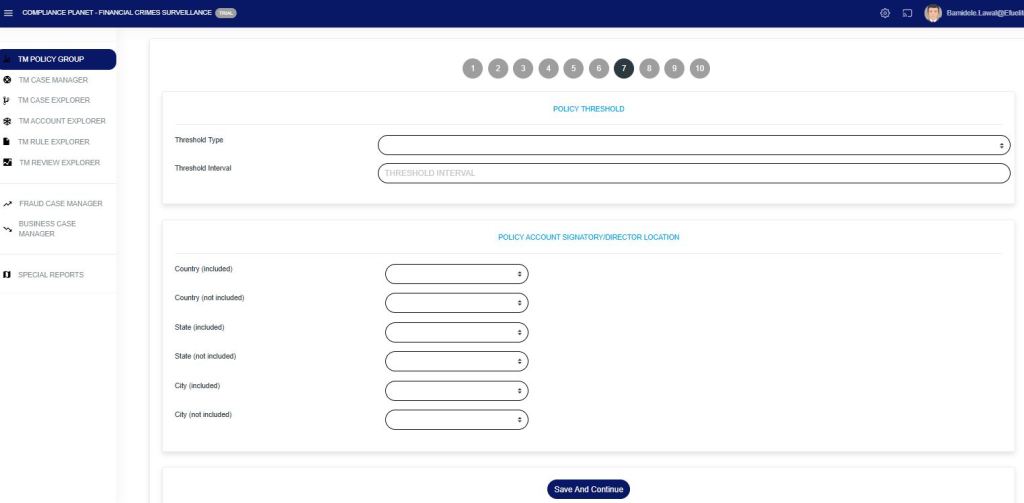
STAGE 7: From (5.1K). This step sets the “threshold type” and the “threshold interval” of the policy to be executed.
To narrow down the policy to only accounts whose signatory or director ID is from a particular country, state, or city, then make use of the drop-downs under the “POLICY ACCOUNT SIGNATORY/DIRECTOR LOCATION” section by selecting country/state/city.
Click on the “Save and Continue” button. This will save this stage and take you to the next stage.
STAGE 8: From (Fig. 5.1l). This stage allows the addition/removal of users who will receive notifications for this policy.
Click on the “Save and Continue” button. This will save this stage and take you to the next stage.

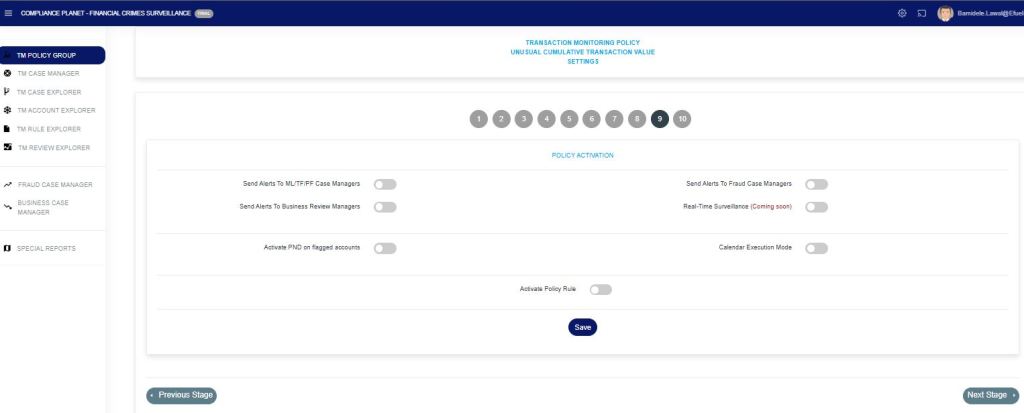
STAGE 9: From (Fig. 5.1m), there are different buttons for the policy rule created.
- Send Alerts to ML/TF/PF Case Manager: If this button is toggled on, the policy sends a notification automatically to the STR case managers.
- Send Alerts to Business Review Managers: If this button is toggled on, the policy automatically sends a notification to Business Review Managers.
- Send Alerts to Fraud Case Managers: If this button is toggled on, the policy automatically sends a notification to the Fraud Case Managers.
- Real-Time Surveillance: This button is toggled on specifically to send notifications for transactions that breach the rule as they occur.
- Activate PND on Flagged Accounts: If the alert breaches the PND-flagged account, this button is toggled on. Although this requires integration with the institution’s PND service.
- Calendar Execution Mode: This button is toggled on specifically for policy rule(s) that report specific, not business reviews, or AML or Fraud.
- Activate Policy Rule: This button is to activate the policy rule that has been created.
- Proactive Surveillance: This button is specifically toggled on to monitor transactions in advance and send alerts for suspicious activities before a breach occurs.
- Activate Surveillance Notification: This button is toggled on specifically to send real-time notifications whenever surveillance detects a transaction that matches a defined rule.
- Day-Time Segment Surveillance: This button is toggled on specifically to monitor and send alerts for rule-breaching transactions that occur during predefined daytime hours.
Click on the “Save and Continue” button. This will save this stage and take you to the next stage.
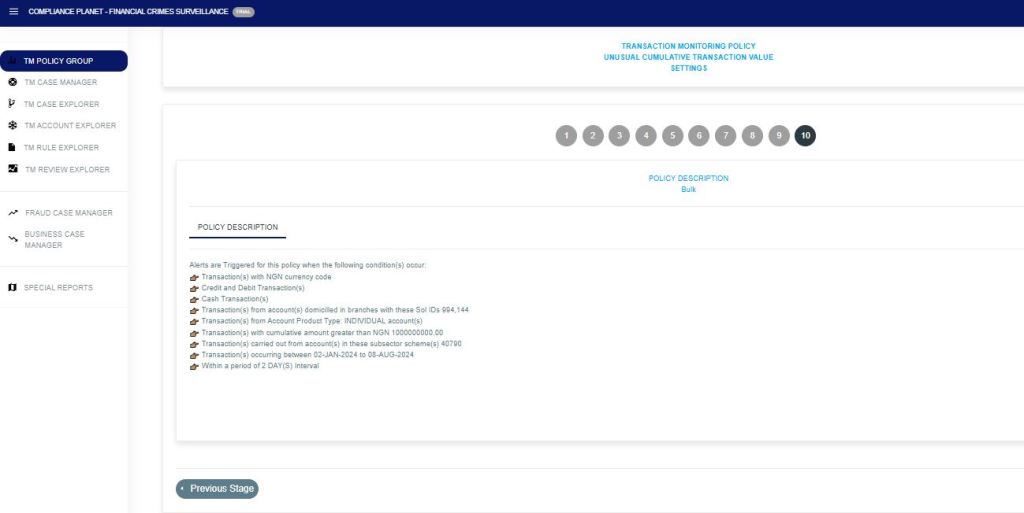
STAGE 10: From (Fig. 5.1n), this stage displays the policy’s target based on the parameters entered from stage 2 to stage 7.
N.B.: You can always go back to any of the stages should you want to change the data, just by clicking on the Particular “Stage number(1-9)” you wish to make changes to.
.
For further inquiries:
Tel: +234(0) 816 555 9818
Email: solutions@efuelite.com
Web: http://solutions.efuelite.com
