The EFCC CTR page on the Compliance Planet features is designed to download the EFCC CTR report for a specified period.
This is different from the NFIU CTR FTR Report. In this section, all transaction types are generated in a single Excel sheet, and it is submitted in Excel format (i.e., you do not download XML or convert to XML as in NFIU CTR FTR)
The Steps to carry out these operations are explained below.
Note: Only persons assigned the right(s) to ‘view CTR reports’ and ‘process CTR reports’ can carry out this operation.
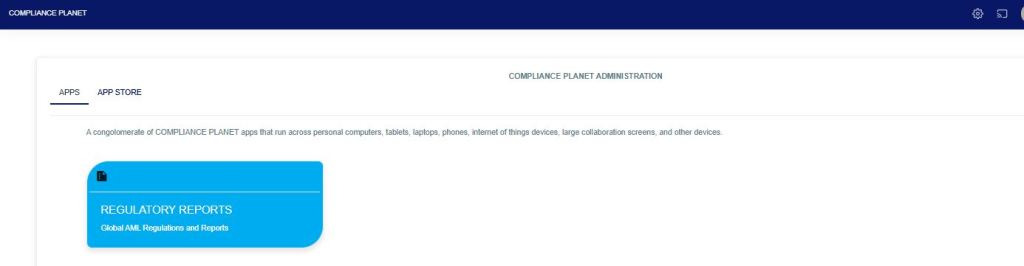
Step 1: From the app dashboard, click on “REGULATORY REPORTS” as in Fig. a below.
Fig a
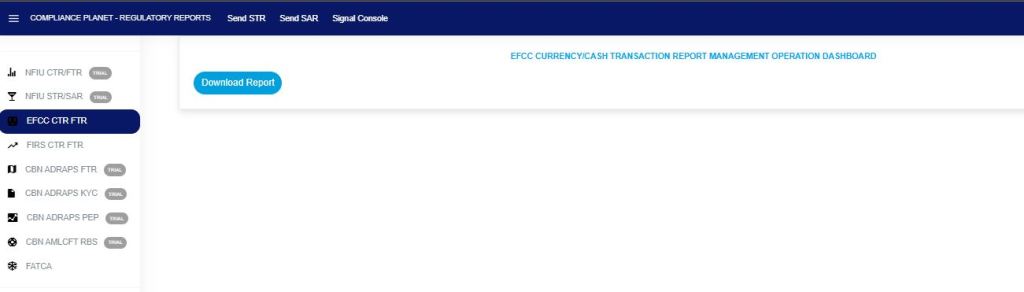
Step 2: Click on “EFCC CTR” on the drop-down list, and this displays the EFCC CTR page as in Fig. b below.
Fig b
You can instantly download EFCC CTR reports for any period. Reports are exported in Excel format. Here is how to schedule and download EFCC CTR transactions.
NOTE: Only the person(s) Assigned right(s) to ‘Process CTR reports’ will be able to carry out this Operation.
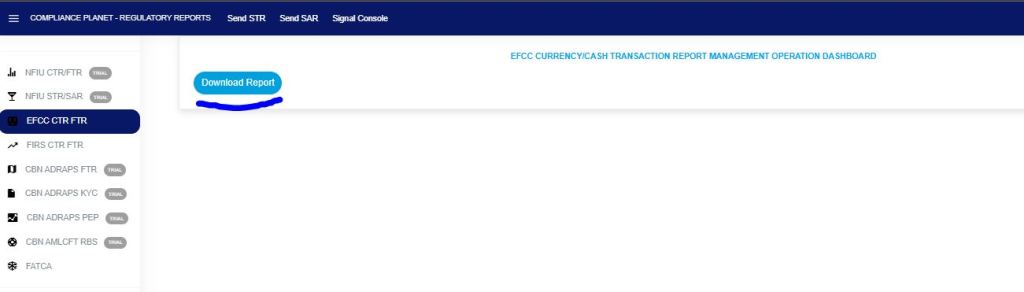
STEP 3: On the EFCC CTR homepage, click “Download Reports,” as shown in Fig. C below.
Fig. c
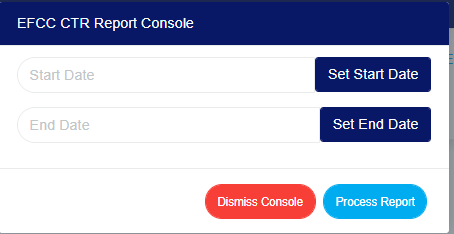
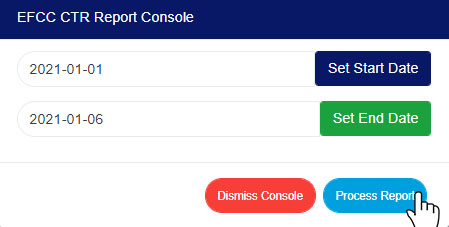
This displays an EFCC CTR Report Console, as shown in Fig. d below.
Fig .d
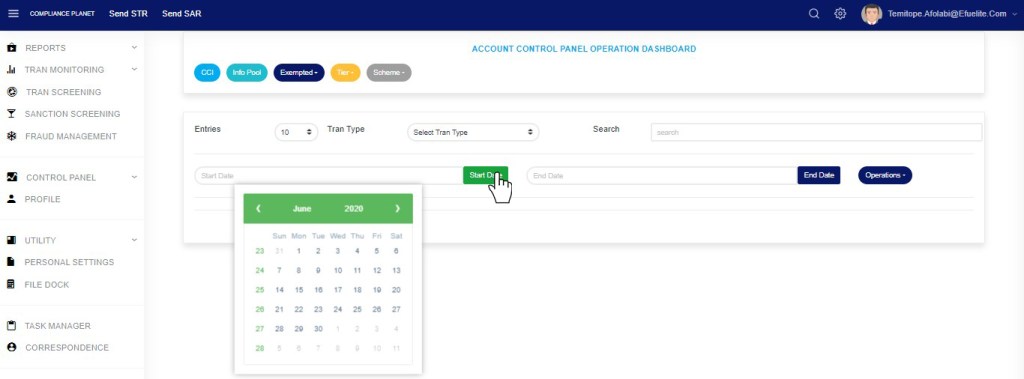
STEP 4: Click ‘Set Start Date’ and ‘Set End Date’ to specify the periods you want the software to download reports for.
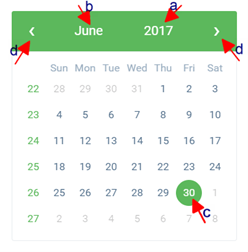
This will display a calendar dropdown as if Fig. e and f below.
Fig e
Fig f
Look at the arrows labelled a to d in Fig h to study the calendar.
Click on the given year to change it to your year of choice.
Click on the given month to change it to your month of choice.
Click on the day of the month.
You can also click on the angle brackets on the calendar ( ‘<’ or ‘>’ ) to go backward or forward.
Fig g
STEP 5: Click on the “PROCESS REPORT” button to generate a report. If you want to cancel the schedule, click on the DISMISS CONSOLE button. These buttons are at the bottom-right corner of the console as in Fig h below.
Fig h
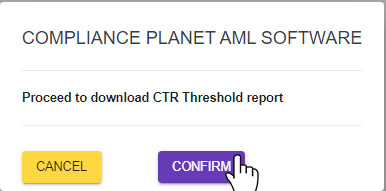
Clicking ‘Process Report’ displays a confirmation console, as shown in Fig i.
Click “Confirm” to proceed with the download or “Cancel” to return to the console.
Fig i
Clicking confirm displays the signal console as in Fig j below, which shows ongoing processes.
Fig j
You can terminate unfinished processes by clicking CANCEL OPS.
The operations pertaining to exempted accounts include exempting an account and removing an account from the exemption list.
NOTE: Only person(s) profiled as deputy supreme admin can carry out these operations
To perform any of the operations on Exempted Accounts;
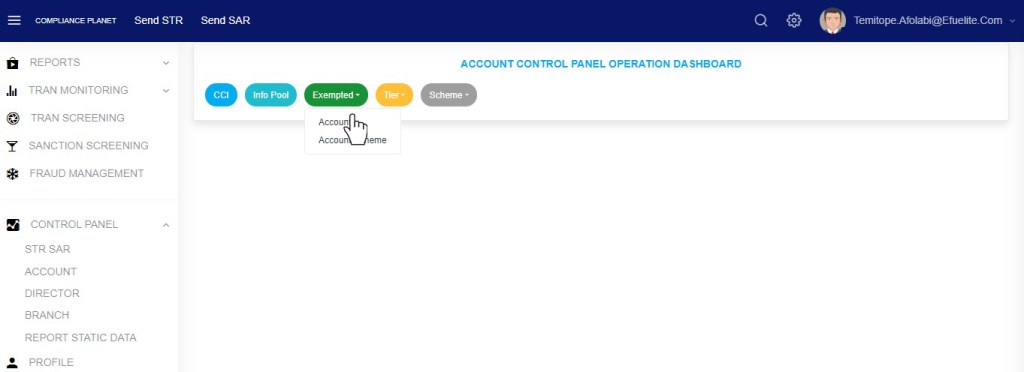
STEP 1: From the left-hand side menu, Click ‘Control panel’ as in fig. 16.2a.
Fig 16.2a
This will display a drop down as in Fig 16.2b below.
STEP 2: Click ‘ACCOUNT’ on the drop-down list. See an example in Fig 16.2b below.
Fig 16.2b
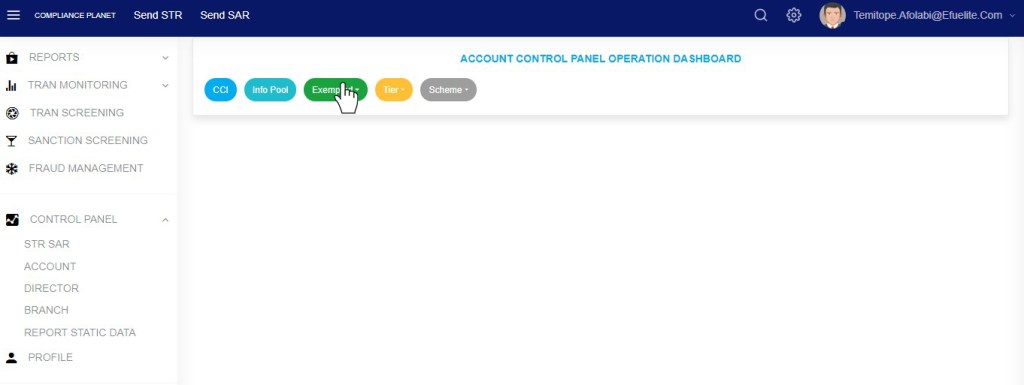
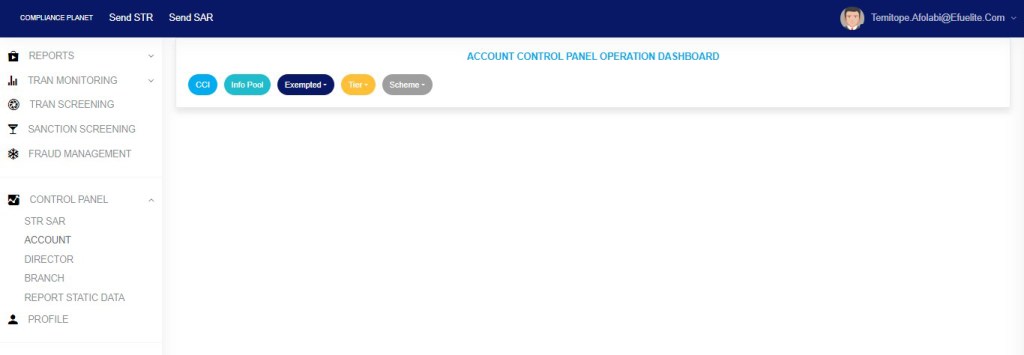
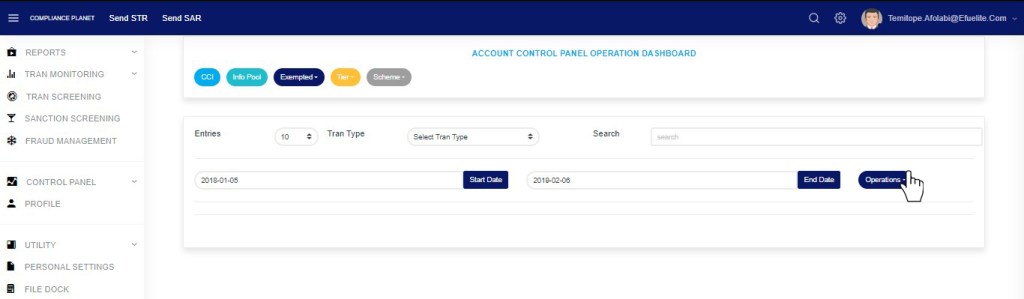
This will display the ACCOUNT CONTROL PANEL OPERATIONS dashboard as in Fig 16.2c below
Fig 16.2c
STEP 3: Click “Exempted” from the top menu, on the account page. See an example in fig16.2d below
Fig 16.2d
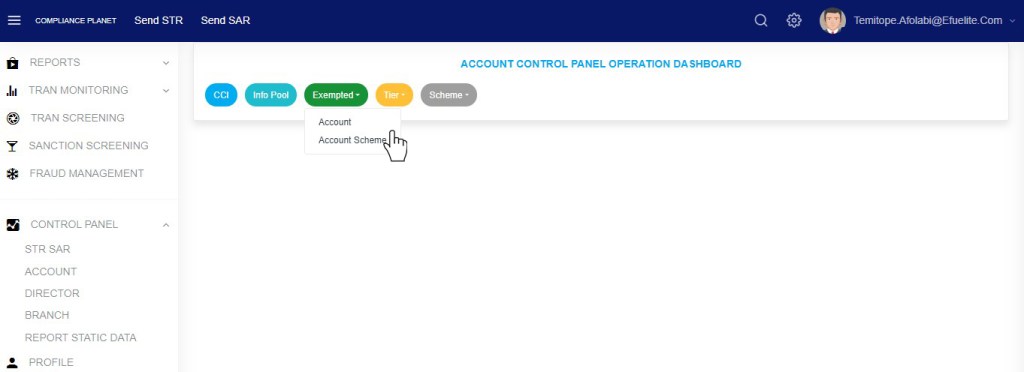
This displays a dropdown as in fig 16.2e below
STEP 4: Click “Account” on the drop-down list as in fig 16.2e below
Fig 16.2e
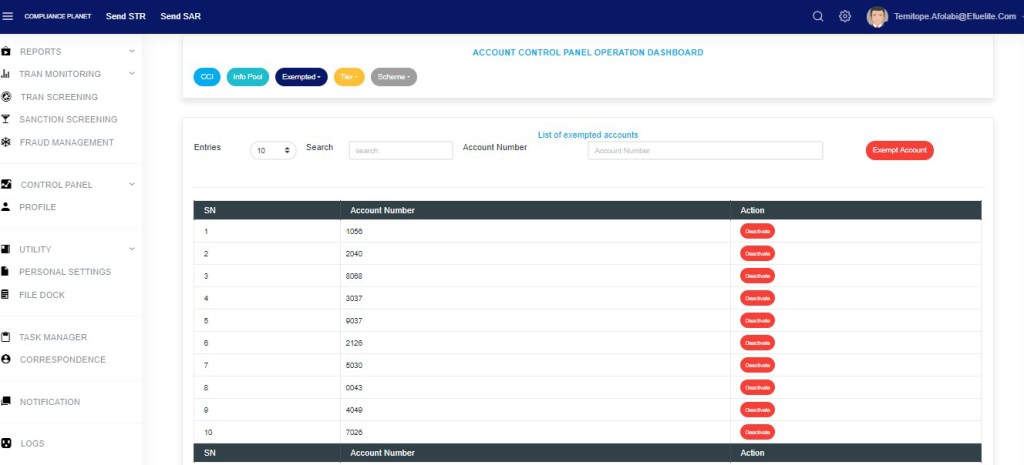
This displays a page as in fig. 16.2f below.
(fig. 16.2f)
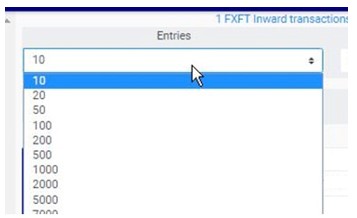
To adjust the number of exempted accounts per page, click on the ‘ENTRIES’ box as in fig. 16.2g below and select the number of records you want to see per page.
(fig. 16.2g)
Click on the Search text box to search for an exempted account number as in fig 12.2h below
Fig 16.2h
How To Exempt an Account Number
This refers to adding an account number to the CTR exemption list. Here is how to exempt an account from reports.
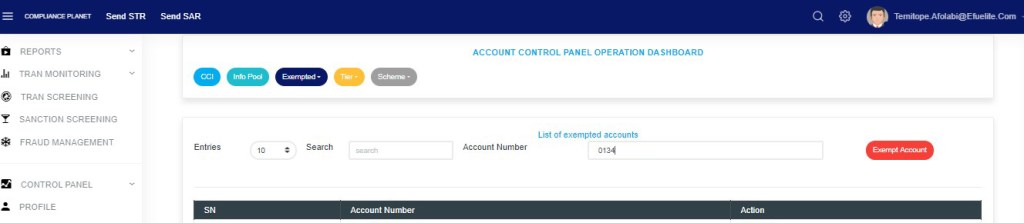
STEP 1: Type an account number in the ACCOUNT NUMBER box. See an example in fig. 16.3a below.
(fig. 16.3a)
STEP 2: Click ‘EXEMPT ACCOUNT’. This button is positioned at the top of the page as shown in fig. 16.3b.
(fig. 16.3b)
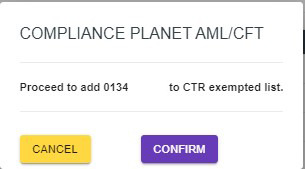
This displays a confirmation console as in fig. 16.3c.
(fig. 16.3c)
STEP 3: Click on ‘CONFIRM’ to add the account number to the exempted account list or ‘CANCEL’ to discontinue. If you proceed, a notification will be displayed at the top of the page.
(fig. 16.3d)
How to Remove An Account Number from the Exemption List
To remove an account number from the CTR exemption list;
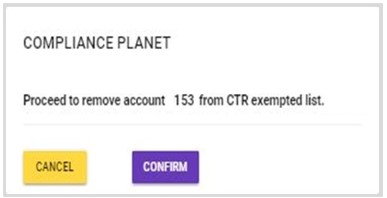
STEP 1: Click the ‘DEACTIVATE’ button. See fig. 16.4a for an example.
(fig. 16.4a)
This displays a confirmation console as in fig. 16.4b.
(fig. 16.4b)
STEP 2: Click on ‘CONFIRM’ to remove the account number from the exempted account list or ‘CANCEL’ to discontinue. If you proceed, the account will be removed from the exempted account list right away, and a notification will be displayed at the top of the page.
The operations pertaining to the exempted account scheme include exempting an account scheme and removing an account scheme from the CTR exemption list.
NOTE: Only person(s) profiled as deputy supreme admin can carry out these operations
To perform any of the operations on Exempted Account schemes;
STEP 1: From the left-hand side menu, Click ‘Control panel’ as in fig. 17.2a.
Fig 17.2a
This will display a drop down as in Fig 17.2b below.
STEP 2: Click ‘ACCOUNT’ on the drop-down list. See an example in Fig 17.2b below.
Fig 17.2b
This will display the ACCOUNT CONTROL PANEL OPERATIONS dashboard as in Fig 17.2c below
Fig 17.2c
STEP 3: Click “Exempted” from the top menu on the account page. See an example in fig. 17 .2d below
Fig 17.2d
This displays a dropdown as in fig 17.2e below
STEP 4: Click “Account Scheme” on the drop-down list as in fig 17.2e below
Fig 17.2e
This displays a page as seen in fig. 17.2f below.
(fig. 17.2f)
Click on the ‘ENTRIES’ box to adjust the number of entries per page as shown in fig. 17.2g below.
(fig. 17.2g)
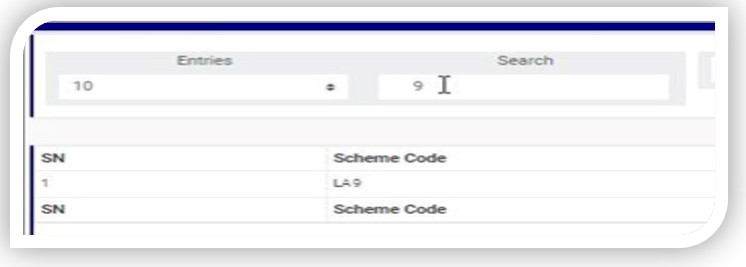
Type a scheme code in the search box to search for an exempted scheme code. See an example of a search in fig. 17.2h below.
(fig. 17.2h)
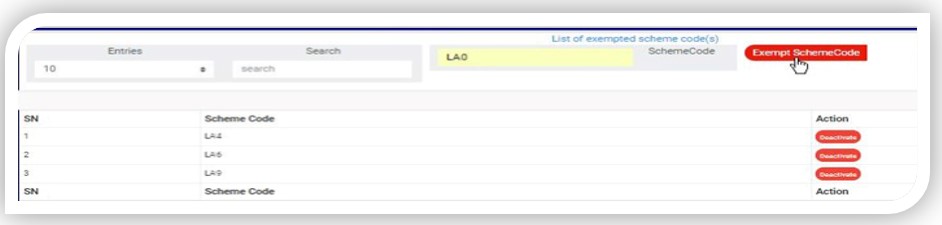
How To Exempt An Account Scheme
This refers to adding an account scheme code to the exemption list. Here is how to do this.
STEP 1: Type an account scheme code in the SCHEME CODE box. See an example in fig. 17.3a below.
(fig. 17.3a)
STEP 2: Click on ‘EXEMPT SCHEME CODE’’ as shown in fig. 17.3b.
(fig. 17.3b)
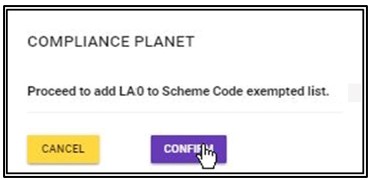
This displays a confirmation console as in fig. 17.3c.
(fig. 17.3c)
STEP 3: Click on ‘CONFIRM’ to add the account scheme to the exemption list or ‘CANCEL’ to discontinue. If you proceed, a notification will be displayed at the top of the page. See fig. 17.3d for an example.
(fig. 17.3d)
How to Remove An Account Scheme from the Exemption List
To remove an account scheme from the exemption list;
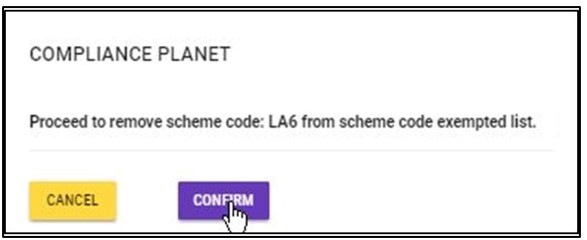
STEP 1: Click the ‘DEACTIVATE’ button as in fig. 17.4a for an example.
(fig. 17.4a)
This displays a confirmation console as in fig. 17.4b.
(fig. 17.4b)
STEP 2: Click on ‘CONFIRM’ to remove the account scheme from the scheme code exempted list or ‘CANCEL’ to discontinue. If you proceed, the scheme code will be removed from the list immediately, and a notification will be displayed at the top of the page. See fig. 17.4c for an example.
Under this feature, the software provides a list of the financial institution’s branch codes and their descriptions. The operations pertaining to branch codes on the Compliance Planet software include creating a new branch, activating or deactivating a branch, and deleting a branch, with options to carry out bulk operations also.
NOTE: Only person(s) profiled as deputy supreme admin can carry out these operations
To perform any of the operations on branch codes;
STEP 1: From the left-hand side menu, Click ‘Control panel’ as in fig. 19.2a.
Fig 19.2a
This will display a drop down as in Fig 19.2b below.
STEP 2: Click ‘BRANCH’ on the drop-down list. See an example in Fig 19.2b below.
Fig 19.2b
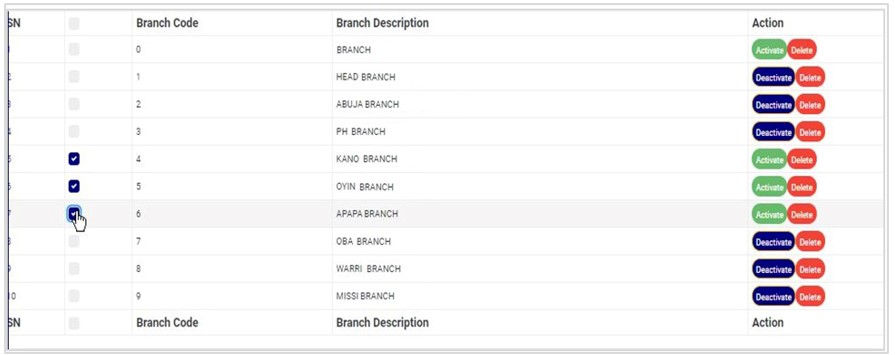
This displays a page showing a list of all the financial institution’s branch codes and their descriptions as in fig. 19.2c.
(fig. 19.2c)
At the bottom-right corner of the page, the software gives information about the number of pages of the list, with the page numbers written out. Click on any page number, to go that particular page. Click on ‘NEXT’ to go to the next page or ‘PREVIOUS’ to go to the page before the current page.
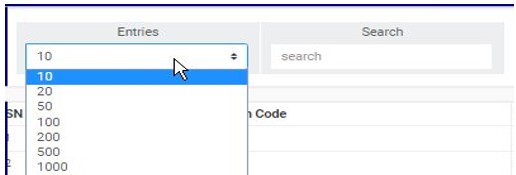
Click on the ‘ENTRIES’ box as in fig. 19.2d to adjust the number of branches you see per page.
(fig. 19.2d)
Search for branches by inputting the branch code or branch description in the search box. Search results will be displayed as soon as a character is typed in the search box. See fig. 19.2e below for an example.
(fig. 19.2e)
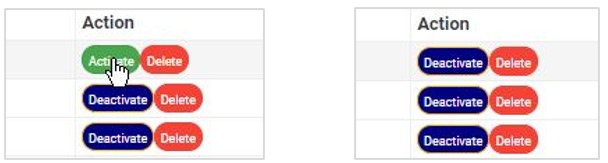
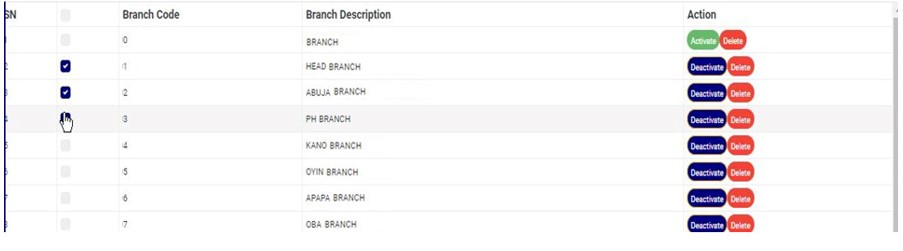
Each branch entry has two (2) action buttons; ‘Activate/Deactivate’ toggle button and ‘Delete’ button. See these buttons in fig. 19.2f.
(fig. 19.2f)
How to Activate or Deactivate an Existing Branch
A branch information can either be active or inactive. For branches that are active, their action buttons will read, ‘DEACTIVATE’ and branches that are inactive will have ‘ACTIVATE’ buttons. The ACTIVATE/DEACTIVATE button is a toggle switch that either activates or deactivates a branch information depending on its current status. Here is how to make use of the button.
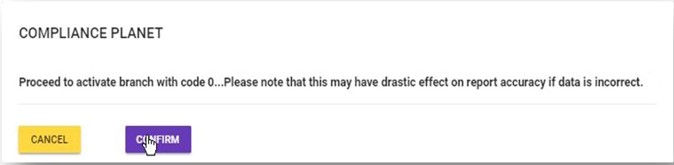
A) How to Activate A Branch
STEP 1: Click on ‘ACTIVATE’ as in fig. 19.3a.
(fig. 19.3a)
This displays a confirmation console to confirm your request to activate the branch
STEP 2: Click on ‘CONFIRM’ as in fig. 19.3b to proceed or ‘CANCEL’ to discontinue.
(fig. 19.3b)
A notification will be displayed at the top of the page when the activation is successful. See fig. 19.3c for an example.
(fig. 19.3c)
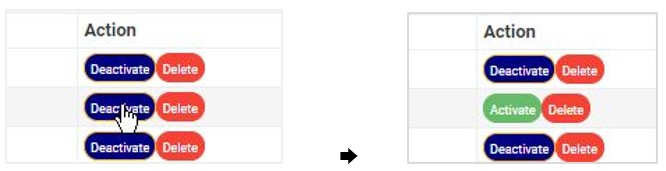
When a branch information has been successfully activated, the action button changes from ‘ACTIVATE’ to ‘DEACTIVATE’. See fig. 19.3d and fig. 19.3e for an example.
(fig. 19.3d) (fig. 19.3e)
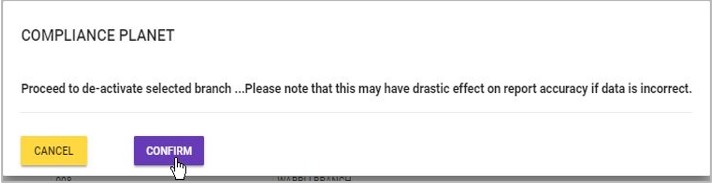
B) How to Deactivate A Branch
STEP 1: Click on ‘DEACTIVATE’ as in fig. 19.3f.
(fig. 19.3f)
This displays a confirmation console to confirm your request to deactivate the branch
STEP 2: Click on ‘CONFIRM’ as in fig. 19.3g to proceed or ‘CANCEL’ to discontinue.
(fig. 19.3g)
A notification will be displayed at the top of the page when the deactivation is successful. See fig. 19.3h for an example.
(fig. 19.3h)
When a branch has been successfully deactivated, the action button changes from ‘DEACTIVATE’ to ‘ACTIVATE’. See fig. 19.3i and fig. 19.3j for an example.
(fig. 19.3i) (fig. 19.3j)
How to Delete A Branch
This refers to deleting a branch’s information from the software. Here is how to delete a branch information.
STEP 1: Click on the ‘DELETE’ button of the branch information as in fig. 19.4a.
(fig. 19.4a)
This displays a confirmation console to confirm your request to delete the branch
STEP 2: Click on ‘CONFIRM’ as in fig. 19.4b to proceed or ‘CANCEL’ to discontinue.
(fig. 19.4b)
A notification will be displayed at the top of the page when the delete operation is complete.
How to Create A New Branch
This refers to creating a new branch on the software. Here is how to do this;
STEP 1: Click the ‘Operations’ button at the top-left side of the page. See this in fig 19.5a below
Fig 19.5a
This will display a drop-down as in fig 19.5b below
STEP 2: Click ‘NEW BRANCH’ on the operations drop-down list as shown in fig. 19.5b.
(fig. 19.5b)
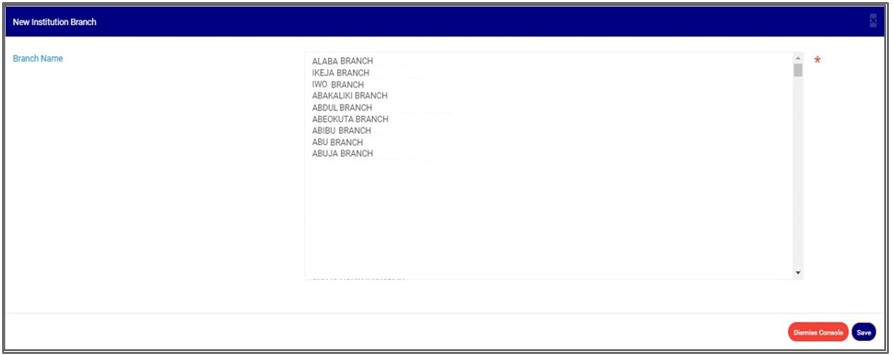
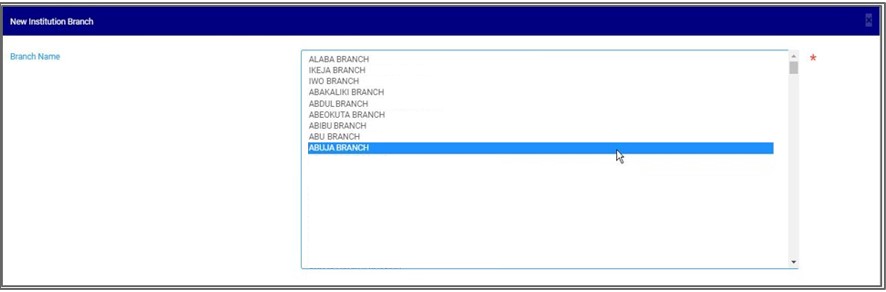
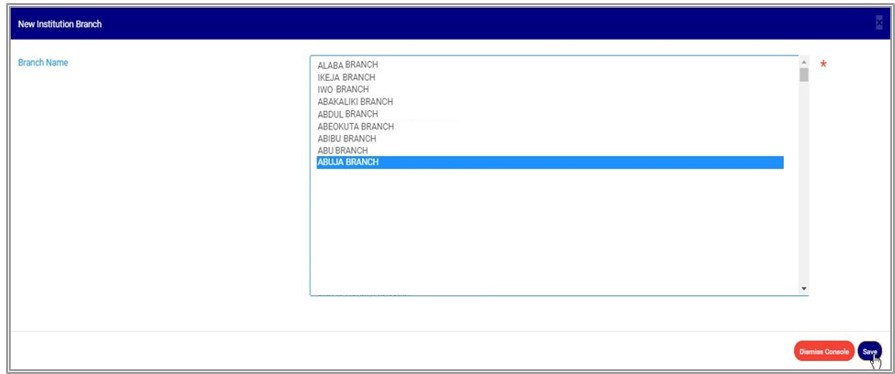
A console as in fig. 19.5c will be displayed. Here, you are to select the branch description.
(fig. 19.5c)
STEP 2: Select branch name as shown in fig. 19.5d.
(fig. 19.5d)
STEP 3: Click on ‘SAVE’ as in fig. 19.5e to save new branch information. Click on ‘DISMISS CONSOLE’ to close the console.
(fig. 19.5e)
This displays a confirmation console to confirm your request.
STEP 4: Click on ‘CONFIRM’ as in fig. 19.5f to proceed or ‘CANCEL’ to discontinue.
(fig. 19.5f)
A notification will be displayed at the top of the page when the operation is complete.
How To carry out bulk activation of branches
This refers to activating more than one branch and here is how to do this.
STEP 1: Select the deactivated branches to be activated by clicking on their checkboxes as shown in fig. 19.6a below. An inactive branch has an ‘ACTIVATE’ action button.
(fig. 19.6a)
STEP 2: Click the ‘Operations’ button at the top-left side of the page. See this in fig 19.6b below
Fig 19.6b
This will display a drop-down as in fig 19.6c below
STEP 3: Click ‘ACTIVATE SELECTED’ on the operations drop-down list as shown in fig. 19.6c.
(fig. 19.6c)
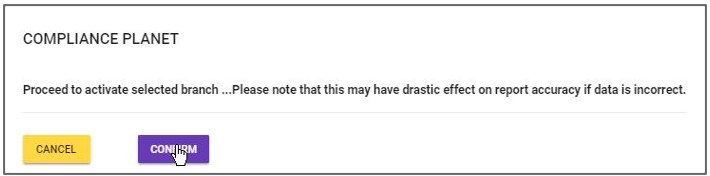
This displays a confirmation console to confirm your request.
STEP 4: Click on ‘CONFIRM’ as in fig. 19.6d to proceed or ‘CANCEL’ to discontinue.
(fig. 19.6d)
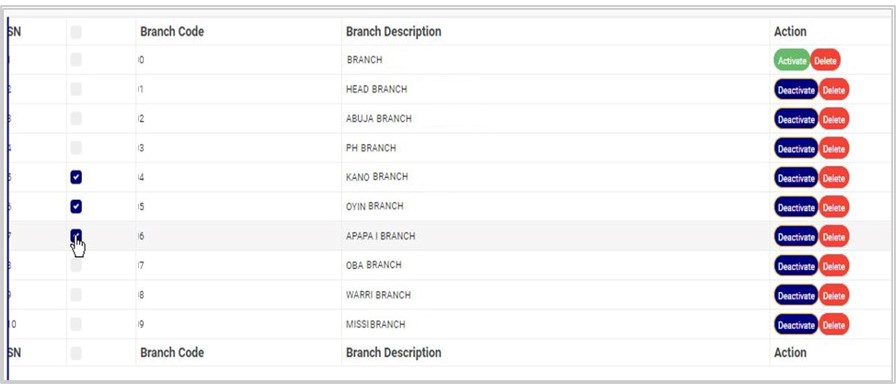
When the operation is successful, a notification will be displayed at the top of the page and the Activate/Deactivate toggle button of the selected branch information will change from ‘ACTIVATE’ to ‘DEACTIVATE’. See fig. 19.6e below for an example.
(fig. 19.6e)
How to Carry Out Bulk Deactivation of Branches
This refers to deactivating more than one branch information. Here is how to do this.
STEP 1: Select the branches to be deactivated by clicking on their check-boxes as shown in fig. 19.7a below. An active branch has a ‘DEACTIVATE’ action button.
(fig. 19.7a)
STEP 2: Click the ‘Operations’ button at the top-left side of the page. See this in fig 19.7b below
Fig 19.7b
This will display a drop-down as in fig 19.7c below
STEP 3: Click ‘DEACTIVATE SELECTED’ on the operations drop-down list as shown in fig. 19.7c.
(fig. 19.7c)
This displays a confirmation console to confirm your request.
STEP 3: Click on ‘CONFIRM’ as in fig. 19.7d to proceed or ‘CANCEL’ to discontinue.
(fig. 19.7d)
When the operation is successful, a notification will be displayed at the top of the page and the Activate/Deactivate button of the selected branch will change from ‘DEACTIVATE’ to ‘ACTIVATE’. See fig. 19.7e below for an example.
(fig. 19.7e)
How to Carry Out Bulk Delete Of Branches
This refers to deleting more than one branch information. Here is how to carry out a bulk delete.
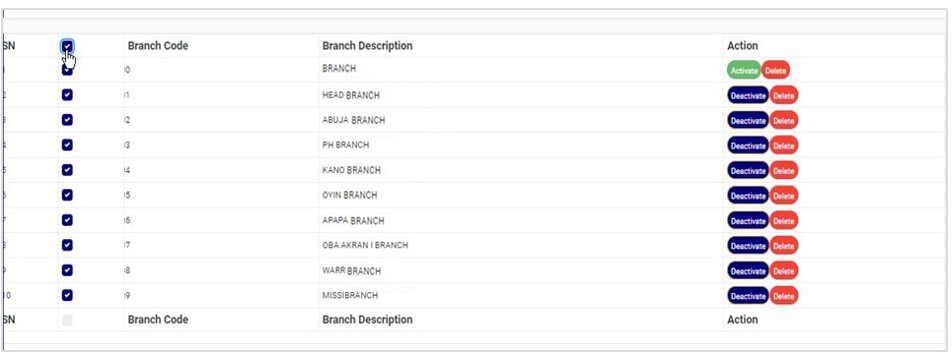
STEP 1: Select the branch information to be deleted by clicking on their checkboxes as shown in fig. 19.8a below. Both active and inactive branches can be deleted.
(fig. 19.8a)
To select or deselect all the entries on a page, click on the checkbox on the table title bar, that is, the checkbox between ‘S/N’ and ‘BRANCH CODE’. See fig. 19.8b for an example.
(fig. 19.8b)
STEP 2: Click the ‘Operations’ button at the top-left side of the page. See this in fig 19.8c below
Fig 19.8c
This will display a drop-down as in fig 19.8d below
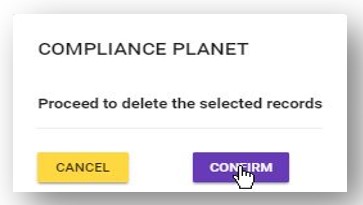
STEP 3: Click ‘DELETE SELECTED’ on the operations drop-down list as shown in fig. 19.8d.
(fig. 19.8d)
This displays a confirmation console to confirm your request to delete the branches selected.
STEP 3: Click on ‘CONFIRM’ as in fig. 19.8e to proceed or ‘CANCEL’ to discontinue.
(fig. 19.8e)
A notification will be displayed at the top of the page when the operation is complete.
previewing the list of CCI for the transaction report,
Editing a CCI,
Deleting a CCI.
Adding a new CCI,
Downloading a CCI and
Bulk Delete
NOTE: Only person(s) profiled as deputy supreme admin can carry out these operations
To perform any of the operations;
STEP 1: From the left-hand side menu, click ‘Control panel’ as in fig. 18.2a.
Fig 18.2a
This will display a drop down as in Fig 18.2b below.
STEP 2: Click ‘ACCOUNT’ on the drop-down list. See an example in Fig. 18 .2 b below.
Fig 18.2b
This will display the ACCOUNT CONTROL PANEL OPERATIONS dashboard as in Fig. 18 .2c below
Fig 18.2c
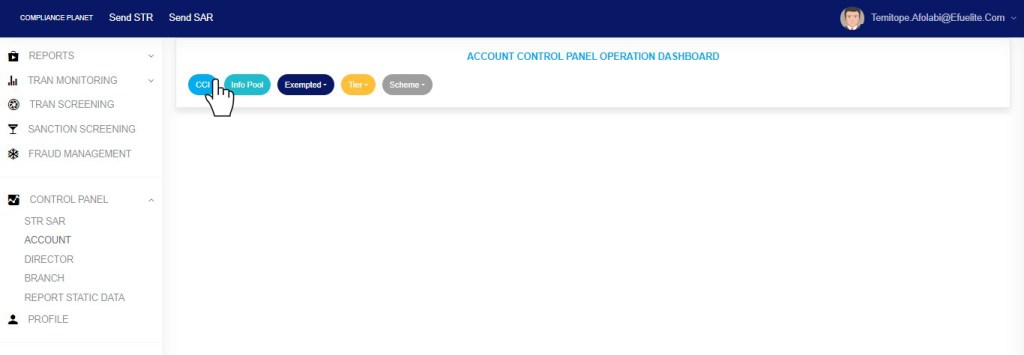
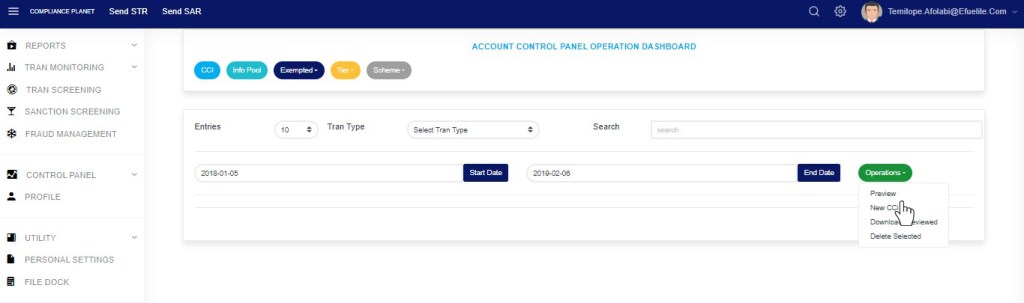
STEP 3: Click “CCI” from the top menu on the account page. See an example in fig. 18 .2d below
Fig 18.2d
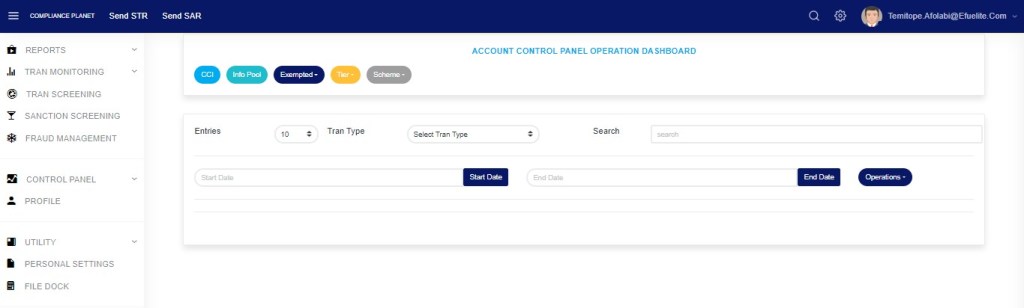
This displays a page as seen in fig. 18.2e below.
(fig. 18.2e)
How To Preview CCI List For Transaction Report
This refers to searching for CCIs for the various transaction reports during a specified period. Here is how to preview a CCI for a transaction type.
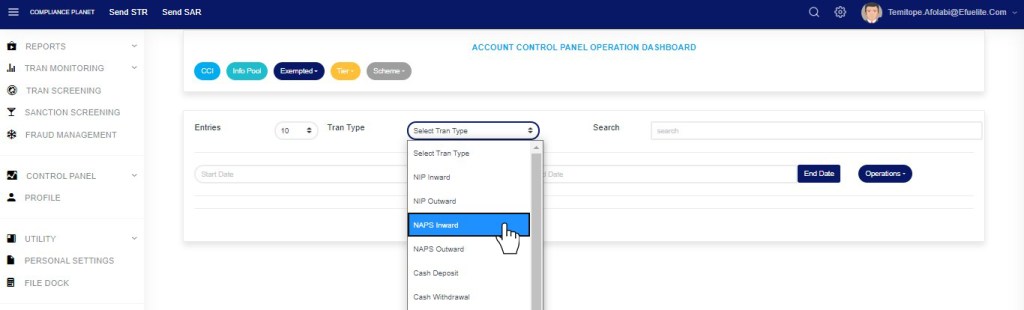
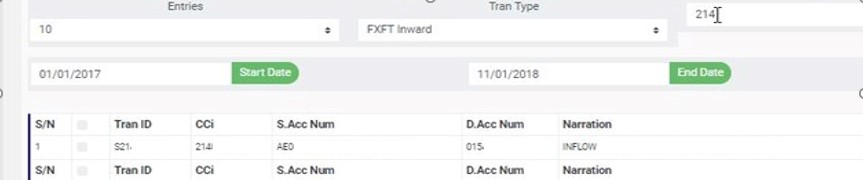
STEP 1: Select the transaction type from the ‘Tran Type’ box as shown in fig. 18.3a.
(fig. 18.3a)
STEP 2: Set ‘START DATE’ and ‘END DATE’ to specify the beginning date and the ending date of the transaction reports whose CCI list is to be generated. See fig. 18.3a for example.
(fig. 18.3b)
STEP 3: Click the “Operations” button as shown in fig 18.3c below
(fig. 18.3c)
This displays a drop-down as in fig 18.3d below
STEP 3: Click ‘PREVIEW’ on the drop-down list as in fig.18.3d below.
(fig. 18.3d)
Results for CCI for the selected transaction type will be displayed on the page as in fig. 18.3e below.
(fig. 18.3e)
At the bottom-right corner of the page, the software gives information about the number of pages. The page numbers represent buttons to go to each page. Clicking any page number will take you to that page. Click on the ‘NEXT’ button to go to the next page or the ‘PREVIOUS’ button to go to the page before the current page.
Click on the ‘ENTRIES’ box to adjust the number of entries per page as shown in fig. 18.3f below.
(fig. 18.3f)
You can search for a ‘CCI’ for a transaction by typing the ‘CCi’, source account number or the destination account number involved in the matched transaction. See an example of a search in fig. 18.3g below.
(fig. 18.3g)
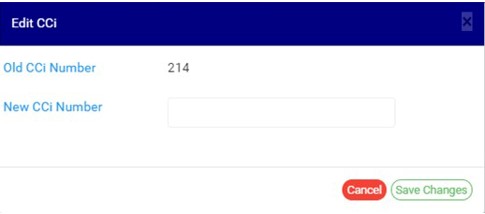
How to Edit CCI
This refers to changing the CCi number attached to a transaction. Here is how to do this.
STEP 1: Click on the ‘EDIT’ button of the CCI record. See fig. 18.4a for an example.
(fig. 18.4a)
This displays an ‘Edit CCI’ console as shown below.
(fig. 18.4b)
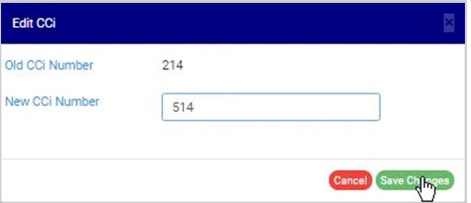
STEP 2: Fill in the new CCi (i.e., the new Certificate of Capital Importation number) to be attached to the transaction for reporting. See fig. 18.4c for an example.
(fig. 18.4c)
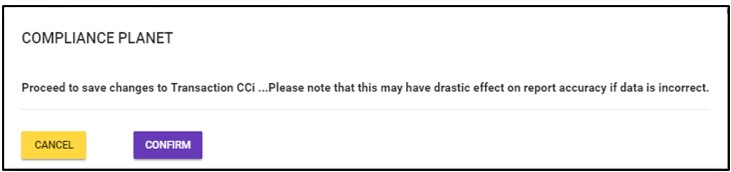
STEP 3: Click on ‘SAVE CHANGES’ as in fig. 18.4d to save the new transaction CCi.
(fig. 18.4d)
This displays a confirmation console as in fig 18.4e below.
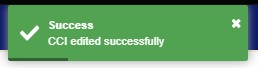
STEP 4: Click ‘CONFIRM’ as in fig. 18.4e to proceed to save changes or click on ‘CANCEL’ to discontinue.
(fig. 18.4e)
A notification as in fig. 18.4f will be displayed at the top of the page upon successful completion of the operation.
(fig. 18.4f)
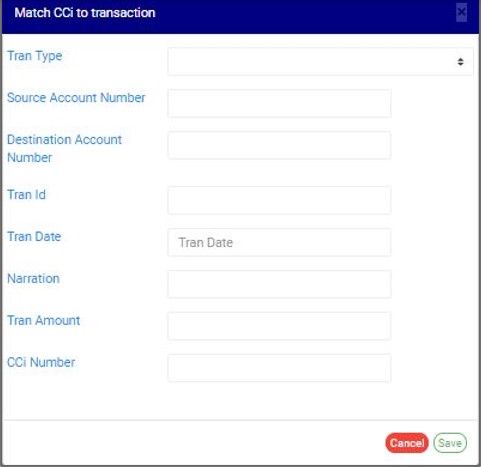
How To Add New CCI
This refers to matching a CCi to a transaction on the Compliance Planet software. This CCi will form part of the details that will be rendered for that particular transaction when the compliance planet processes an ADRAPS FTR report, including the transaction.
STEP 1: Click the “Operations” button as shown in fig 18.5a below
(fig. 18.5a)
This displays a drop-down as in fig 18.5b below
STEP 3: Click ‘New CCI’ on the drop-down list as in fig.18.5b below.
(fig. 18.5b)
This displays a console as in fig. 18.5c where details of the transaction and the CCi to be attached are to be filled.
(fig. 18.5c)
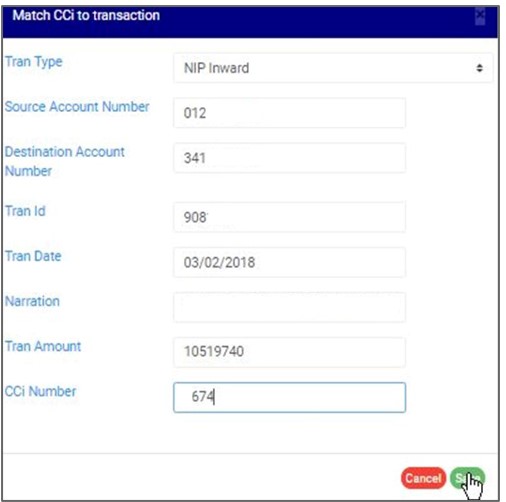
STEP 2: Fill in the required details and click on ‘SAVE’ as in fig. 18.5d to match CCi with the transaction. Click on ‘CANCEL’ to close the console.
(fig. 18.5d)
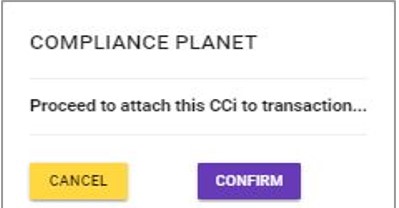
This displays a confirmation console as in fig. 18. 5e to confirm your request.
(fig. 18.5e)
Click on ‘CONFIRM’ to proceed or ‘CANCEL’ to discontinue. A notification will be displayed at the top of the page when the operation is successful.
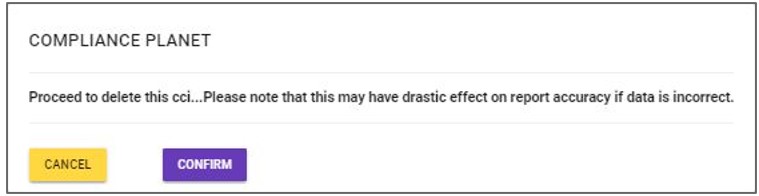
How To Delete CCI
This refers to deleting a CCi entry. Here is how to do this;
STEP 1: Click the ‘DELETE’ button for the CCi entry, as in fig. 18.6a.
(fig. 18.6a)
This will display a confirmation console to confirm your request to delete the transaction CCi.
STEP 2: Click on ‘CONFIRM’ as in fig. 18.6b to proceed or ‘CANCEL’ to discontinue.
(fig. 18.6b)
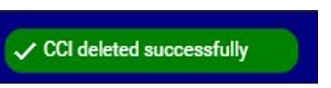
A notification will be displayed at the top of the page when the delete operation is complete.
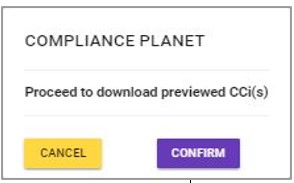
How to Download CCI
STEP 1: Select the CCI entry to be downloaded as in fig. 18.7a below.
(fig. 18.7a)
STEP 2: Click the “Operations” button as shown in fig 18.7b below
(fig. 18.7b)
This displays a drop-down as in fig 18.7c below
STEP 3: Click ‘Download Previewed’ on the drop-down list as in fig.18.7c below.
(fig. 18.7c)
This displays a confirmation console to confirm your request as in fig. 18.7d.
(fig. 18.7d)
STEP 3: Click on ‘CONFIRM’ to proceed with the download or click on ‘CANCEL’ to discontinue.
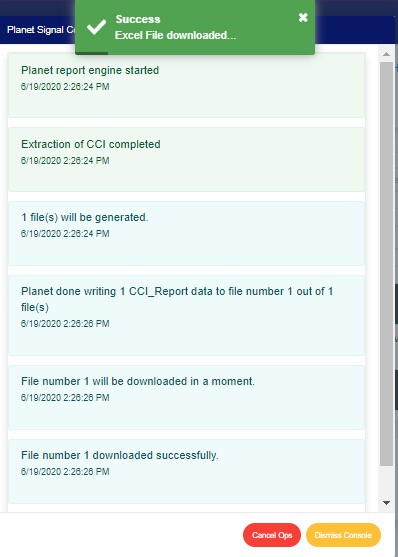
The signal console shows ongoing processes. An example of a signal console is Fig. 18 .7d. When the operation is complete, a notification will be displayed at the top of the page. See fig. 18.7e below for an example.
(fig. 18.7e)
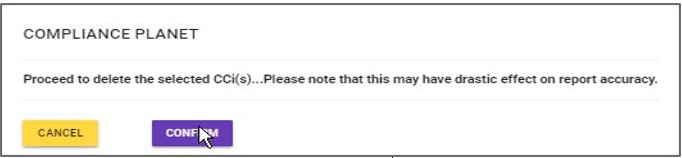
How to Make Bulk Delete of CCI Records
This refers to deleting multiple CCI entries. Here is how to do this;
STEP 1: Select the entries to be deleted by clicking on their check boxes.
STEP 2: Click ‘Delete Selected’ on the operations drop-down list as in fig. 18.8a below.
(fig. 18.8a)
This displays a confirmation console to confirm your request to delete the transaction CCi.
STEP 3: Click on ‘CONFIRM’ as in fig. 18.8b to proceed or ‘CANCEL’ to discontinue.
(fig. 18.8b)
A notification will be displayed at the top of the page when the operation is complete.
This section provides a guide to performing operations related to the Manager’s Cheque, with step-by-step instructions and pictures. See section 2.1.13 for notes on Manager’s Cheque
Note: Only the person(s) assigned the right to ‘view manager’s cheque transaction can carry out these operations.
STEP 1: From the left-hand side menu, click ‘UTILITY’ as in fig. 33.1a below
(fig. 33.1a)
This displays a drop-down list as in fig.32.0b.
STEP 2: On the drop-down list, click “MGR CHQ” as shown in fig 32.0b below
(fig. 33.1b)
This will display a MGR CHQ operations page as in fig. 33.1c below
Note: Only person(s) assigned right to ‘view manager’s cheque transaction’ can carry out these operations.
STEP1: Click on the ‘MGR CHQ Explorer’ button on the Manager’s Cheque Operation page. See Fig. 33 .2a for an example
(Fig. 33.2a)
This displays a ‘MGR CHQ Explorer’ console as in Fig 33.2b below
(Fig. 33.2b)
STEP 2: Click on SET START DATE and SET END DATE to specify the date range. See an example in Fig. 33 .2c below
(fig33.2c)
Take a look at the arrows labelled a to d in fig. 33.2dto study the calendar.
Click on the given year to change it to your year of choice.
Click on the given month to change it to your month of choice.
Then, click on the date of the month.
You can also click on the angle brackets on the calendar [ ‘<’ or ‘>’ ] to go backward or forward.
(fig. 33.2d)
STEP 3: Click on the ‘filter’ box to select a bank branch. If you want to see the transactions for all branches, select bank branches. It is the first option on the filter list.
(Fig. 33.2e)
STEP 4: Click on the ‘entries’ box to change the number of transactions you want to see per page. (See the drop-box in fig. 33.2f below).
(Fig. 33.2f)
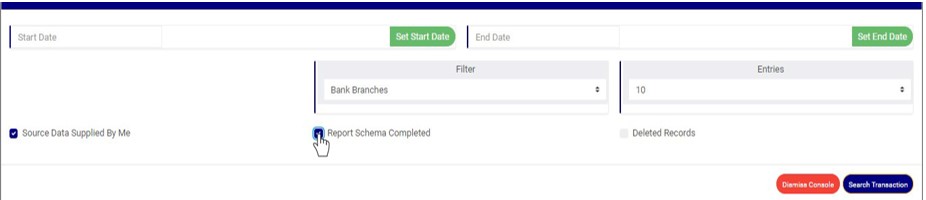
STEP 5: Tick the any of the checkbox as shown in fig 33.2g below to specify the transactions you want to view.
Select ‘Source Data Supplied by Me’ to see list of Manager’s cheque transactions whose source data was supplied by you
Select ‘Report Schema Completed’ to see list of Manager’s cheque transactions whose report schema is complete
Select ‘Deleted Records’ to see list of Manager’s cheque transactions that have been deleted.
(Fig. 33.2g)
NOTE: Leave all checkboxes unchecked to see list of all Manager’s cheque transactions
STEP 6: Click ‘Search Transaction’ as shown in fig 33.2h
(Fig. 33.2h)
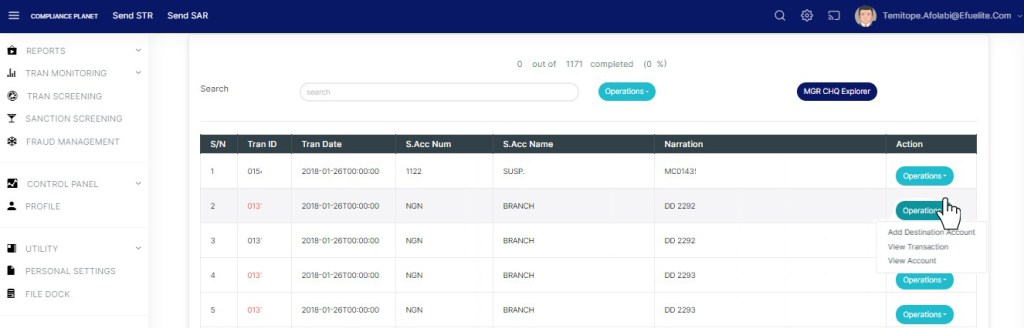
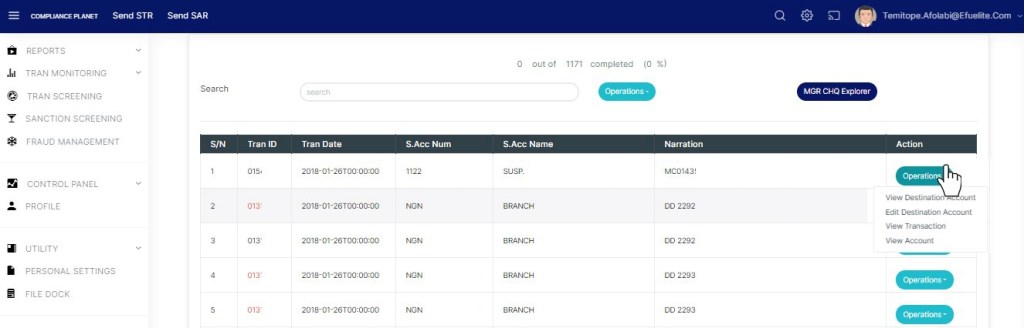
Clicking on the search transaction button will display a page as in Fig 33.2i below
(Fig. 33.2i)
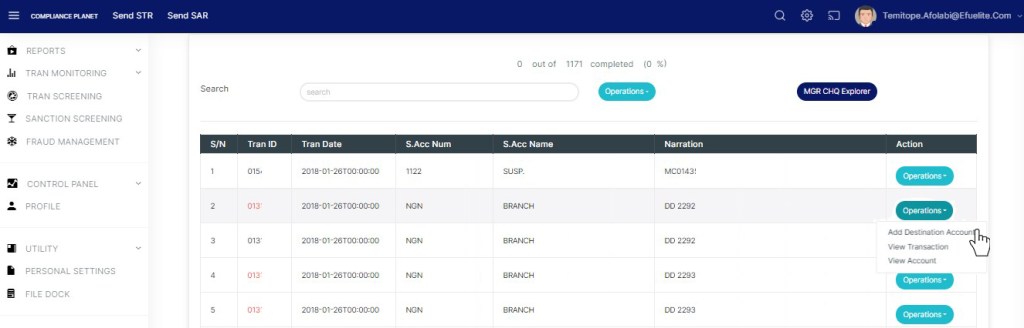
Transactions with transaction ID coloured Blue shows that the schema for the transaction is complete.
Transactions with transaction ID coloured Red shows that the schema for the transaction is incomplete.
Click on ‘Operations’ button on the Action column, this will display a drop down with option to ‘view Destination Account’ and ‘Edit Destination Account’ if the schema for the transaction is complete. However, if the schema is incomplete, the dropdown will have an option to ‘Add Destination Account’. See an example in fig 33.2j and 33.2k below.
Note: Only person(s) assigned right to ‘view manager’s cheque transaction’ and ‘Screen Edit Manager’s Cheque transactions’ can carry out these operations.
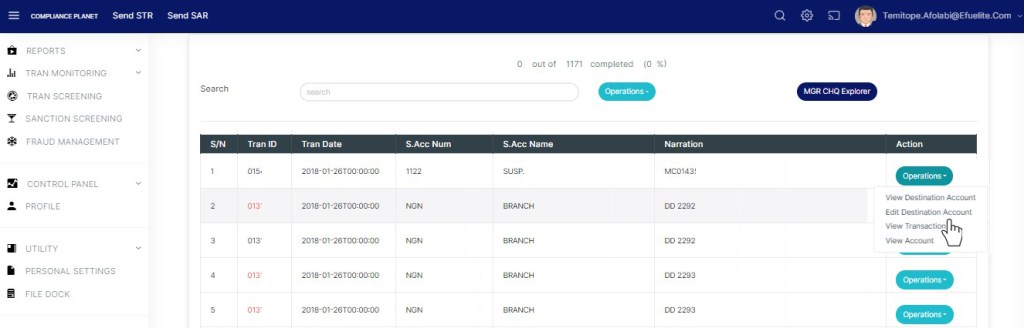
Click on the ‘Operations’ Button on the action column as in fig 33.2j and 33.2k above. This will display a dropdown
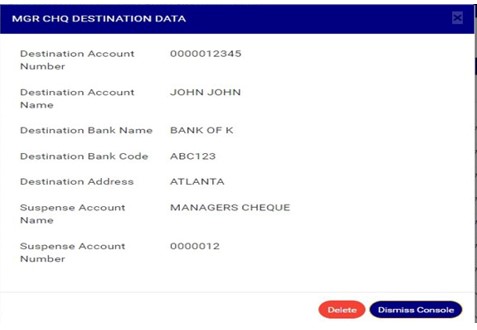
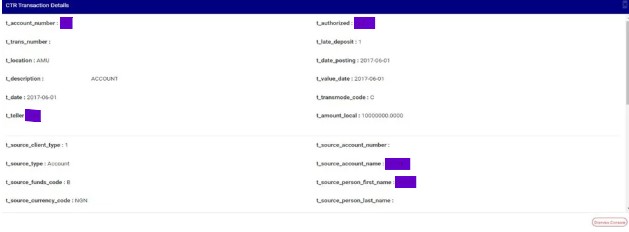
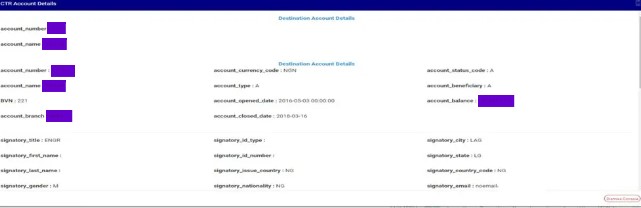
On the Operations Dropdown, click on ‘View Destination Account’ to see the destination account data attached to the transaction. As in fig 33.2l below
(Fig 33.2l)
This displays a console as in in fig 33.2m below.
(Fig. 33.2m)
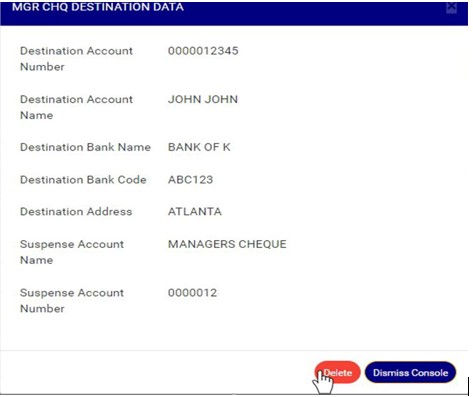
Click on ‘Dismiss console’ to close the console or click ‘Delete’ to delete the destination account data. See fig 33.2n
(Fig. 33.2n)
Clicking on delete will display a confirmation console as in Fig 33.2o below. Click confirm to continue or cancel to dismiss the operation.
(Fig. 33.2o)
A notification will be displayed at the top of the page when delete is successful. See Fig 33.2p below
Note: Only person(s) assigned right to “view manager’s cheque transactions” and “Screen Edit Manager’s Cheque transactions” can carry out these operations.
Click on the ‘Operations’ Button on the action column as in fig 33.2q below. This will display a dropdown.
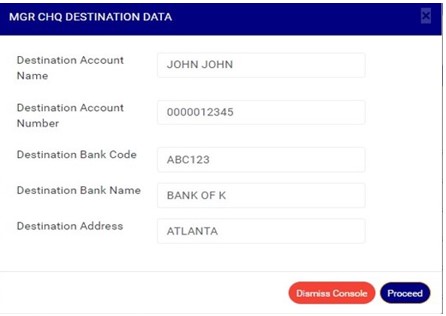
On the Operations Dropdown, click on ‘Edit Destination Account’ to modify Destination account for this transaction. As in fig 33.2q below
(Fig 33.2q)
Clicking on ’Edit Destination Account’ will display a console as in in fig 33.2r below.
(Fig. 33.2r)
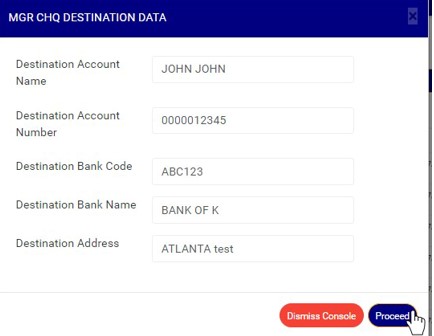
Click on any of the text box to edit the data as in fig 33.2s below
(Fig 33.2s)
Click on ‘Dismiss console’ to close the console or click ‘proceed’ to save the Destination account data. See fig 33.2t
(Fig. 33.2t)
Clicking on proceed will display a confirmation console as in Fig 33.2u below. Click on confirm to continue or cancel to dismiss the operation.
(Fig. 33.2u)
A notification will be displayed at the top of the page when edited destination account data is saved successfully. See Fig 33.2v below
This Option is available when there is no Destination account data attached to the transaction
Note: Only person(s) assigned right to ‘view manager’s cheque transaction’ and ‘Screen Edit Manager’s Cheque transactions’ can carry out these operations.
Click on the ‘Operations’ Button on the action column as in fig 33.2q below. This will display a dropdown.
On the Operations Dropdown, click on ‘ Add destination Account’ to add Destination account data to this transaction. This is shown in Fig 33.2w below
(Fig 33.2w)
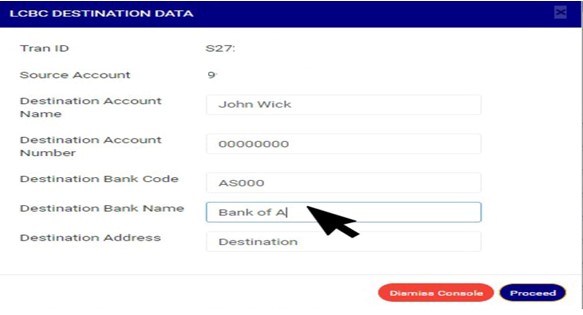
Clicking on ’add’ will display a console as in in fig 33.2x below.
(Fig. 33.2x)
Click on any of the text box to fill that field as in in fig 33.2y below.
(Fig. 33.2y)
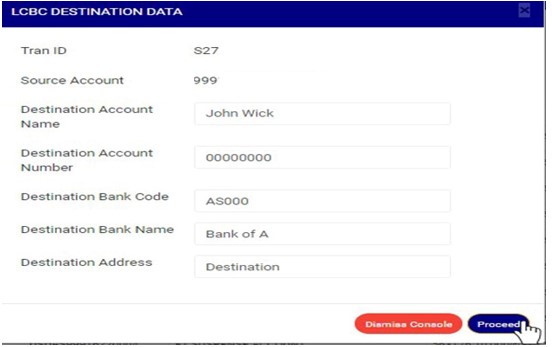
Click on Proceed to add the Destination account data or ‘dismiss console’ to dismiss the operation. See an example in Fig 33.2z below
(Fig. 33.2z)
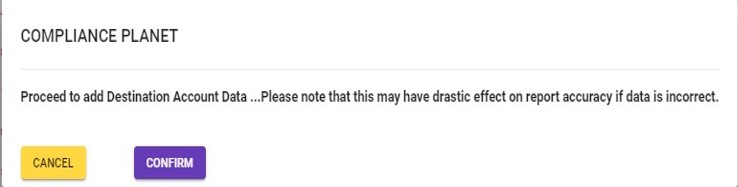
Clicking on Proceed will display a confirmation console as in Fig 33.2aa below. Click on confirm to continue or cancel to dismiss the operation.
(Fig. 33.2aa)
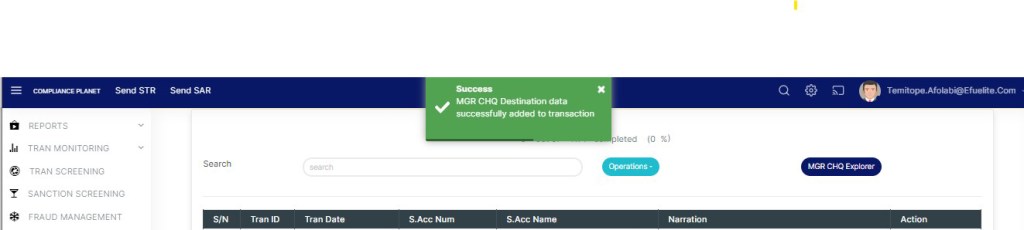
A notification will be displayed at the top of the page when the destination account data is successfully added. See Fig 33.2ab below
On the MANAGER’s CHEQUE explorer page you can make a bulk download of Manager’s cheque records either for viewing or editing purpose. The process is explained below
NOTE: Only person(s) with right to “view MGR CHQ transactions” and “Download MGR CHQ transactions” can carry out these operations.
STEP 1: Click on the “Operations” button at the top of the MANAGER’s CHEQUE explorer page.
Note that this Operations button houses features that are different from the operations button on the action column of the Managers’ Cheque transaction list .See the button for bulk operations in Fig 33.3a
(fig. 33.3a)
Clicking the operations button will display a dropdown as in fig. 33.3b below
(fig. 33.3b)
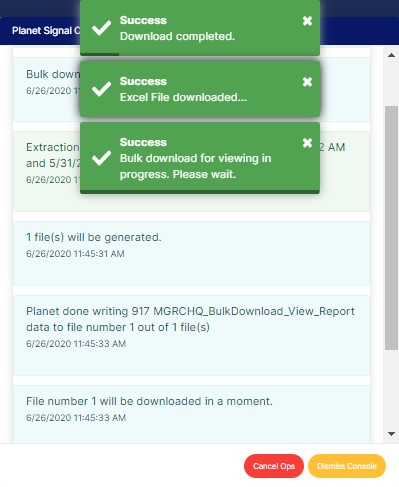
STEP 2: Click on the bulk view as shown in fig 33.3c below
(fig. 33.3c)
The signal console shows on going processes. An example of a signal console is fig 33.3d. You can terminate unfinished processes by clicking ‘CANCEL OPS’.
To minimize signal console, click on DISMISS CONSOLE.
(fig 33.3d)
An excel file with details of the Manager’s Cheque transactions will be downloaded when the process is complete.
NOTE: Only person(s) with right to “view MGR CHQ transactions” and “Download MGR CHQ transactions” can carry out these operations.
STEP 1: Click on the Operations button on the MANAGER’s CHEQUE Explorer page. See Fig 33.3e for an example
(fig. 33.3e)
Clicking the Operations button will display a dropdown as in fig. 33.3f below
(fig. 33.3f)
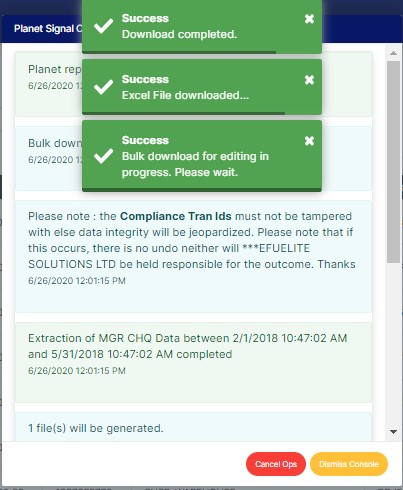
STEP 2: Click on the bulk Edit as shown in fig 33.3g below
(fig. 33.3g)
The signal console shows on going processes. An example of a signal console is fig 33.3d. You can terminate unfinished processes by clicking ‘CANCEL OPS’.
To minimize signal console, click on DISMISS CONSOLE.
(fig 33.3h)
An excel file with details of the Manager’s Cheque transaction will be downloaded when the process is complete. The data on the downloaded excel file can be edited and uploaded on the software to update multiple Manager’s transaction details at once.
However, the ‘Compliance tran Id’ for each record on the excel file must not be tampered with for the upload to be successful.
On the MGR CHQ operations page you can make a bulk upload of Edited Manager’s Cheque Transaction records.
Note: Only person(s) assigned right to ‘view manager’s cheque transaction’ and ‘Bulk Edit Manager’s Cheque transactions’ can carry out these operations.
The process is explained below
STEP 1: Click the ‘Operations’ button on the Manager’s cheque Operation page. See Fig 33.3i for an example
(fig. 33.3i)
Clicking the Operations button will display a drop-down as in fig. 33.3j below
STEP 2: Click the “Upload Bulk Edited Data” as shown in fig 33.3j below,
(Fig. 33.3j)
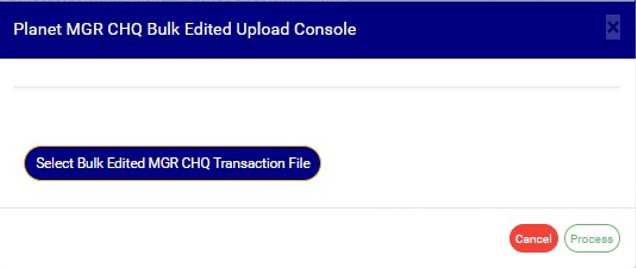
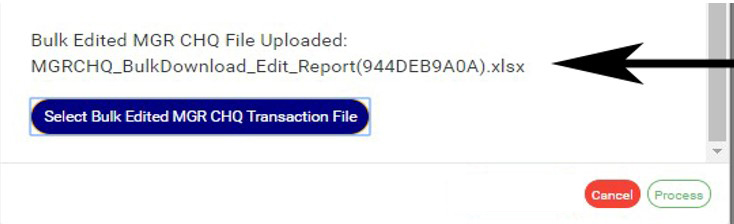
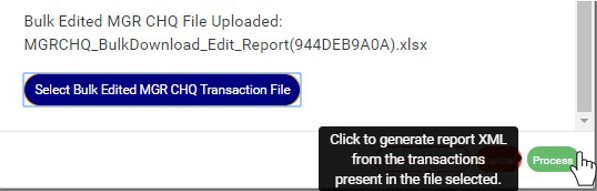
This will display a ‘Planet MGR CHQ Bulk Edited Upload Console’ as in Fig33.3k below.
(fig. 33.3k)
STEP 3: Click on ‘Select Bulk Edited MGR CHQ Transaction file’ to choose the edited transaction file you want to upload from your computer. See this in Fig 33.3l below
(fig. 33.3l)
The file name will be displayed on the console when upload is successful .See fig. 33.3m for an example of how the console looks like when you successfully upload a file from your computer.
(Fig. 33.3m)
STEP 4: Click on ‘process’ button to proceed with the upload. See fig. 33.3n below to see the green button at the bottom-right corner of the console.
(Fig. 33.3n)
This displays a confirmation console as in fig. 33.3o below. Click ‘confirm’ to continue or ‘cancel’ to dismiss the operation.
This feature allows service operations for various transaction types to be scheduled for any hour of the day.
NOTE: Only the person(s) profiled as administrator can carry out these operations
How to access the service operation schedule manager.
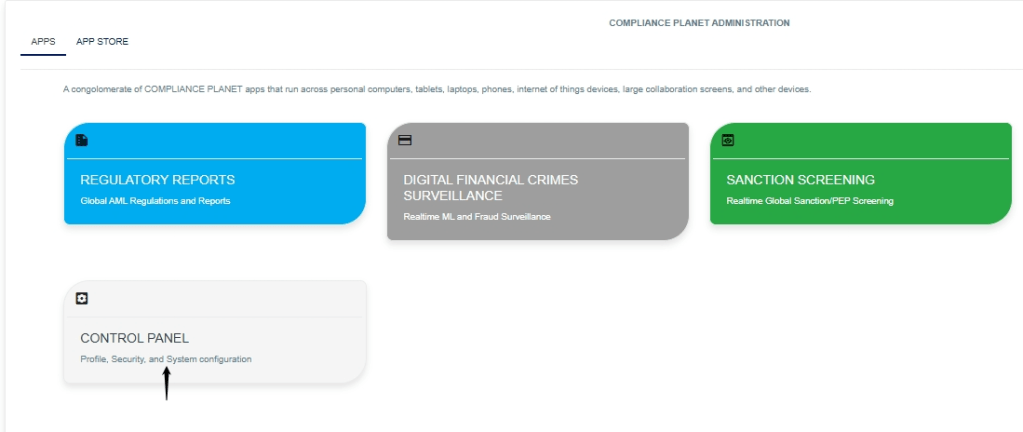
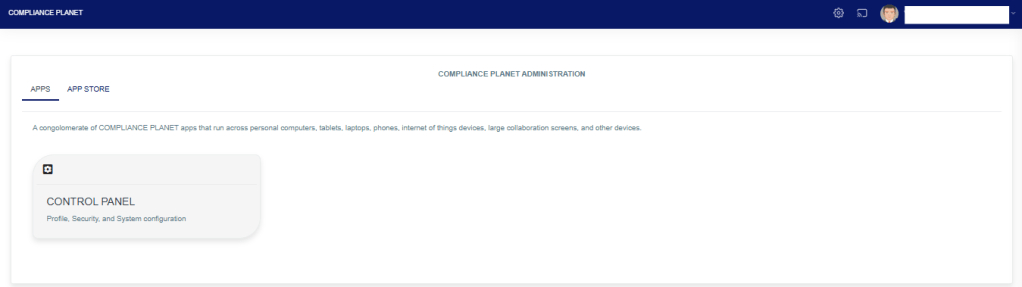
STEP 1: From the app dashboard, click on “CONTROL PANEL” as shown in the image below in Fig.2.1a
Fig.2.1a
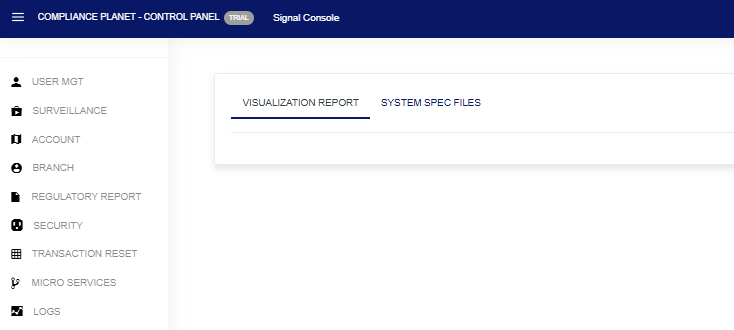
Click on “CONTROL PANEL” and this displays a page shown below in Fig.2.1b
Fig.2.1b
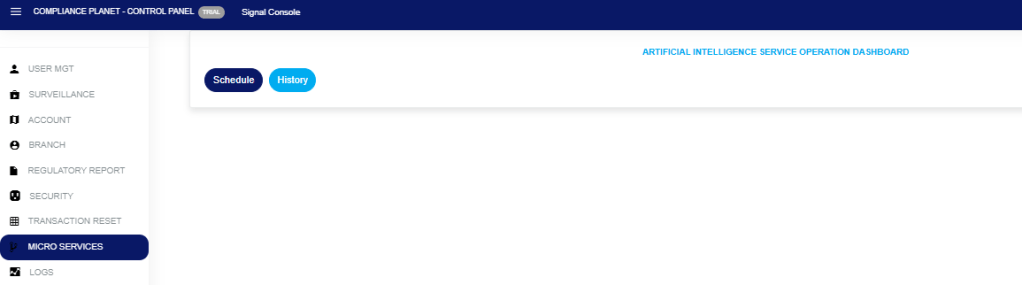
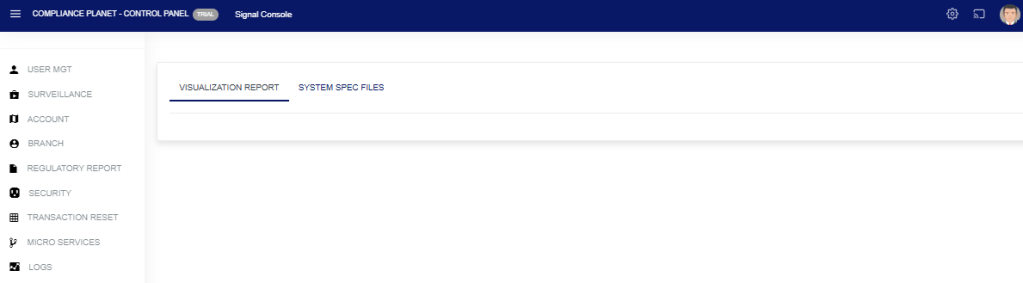
Click on “Micro Services”. This will display a page shown below in Fig.2.1c
Fig.2.1c
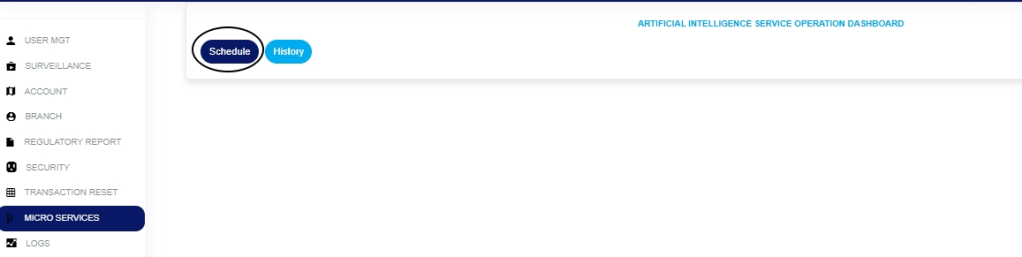
Click on “Schedule”, which will display a page shown below as seen in Fig.2.1d
Fig.2.1d
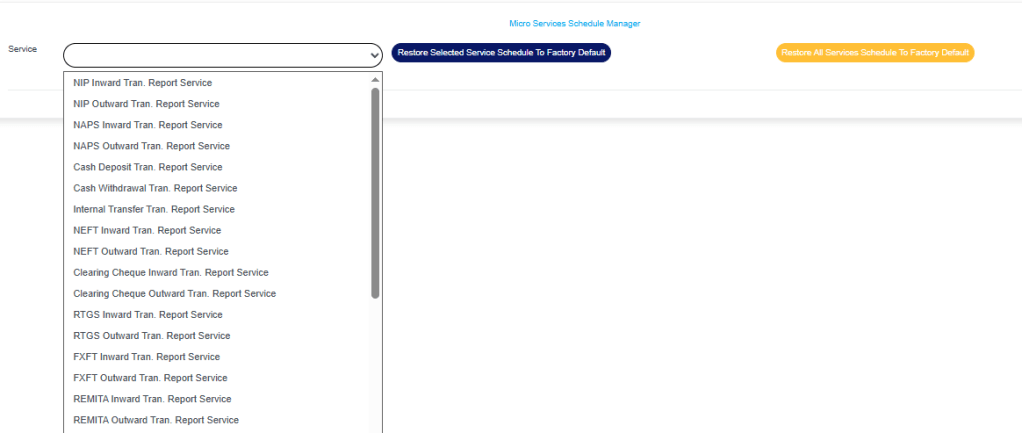
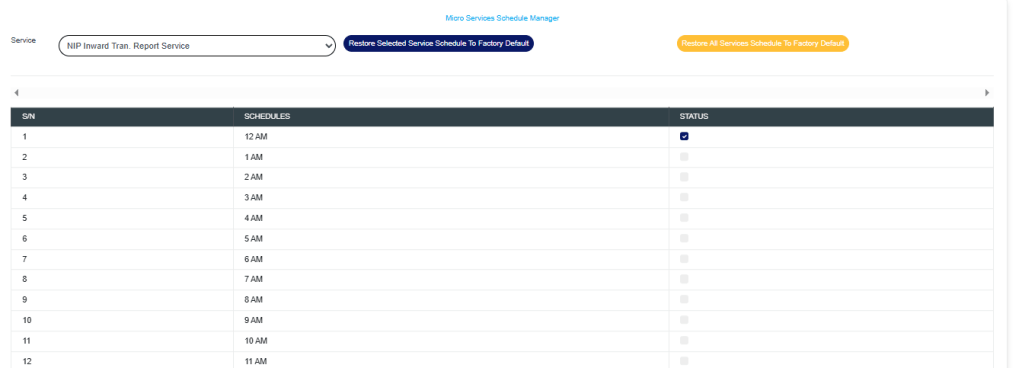
STEP 2: Click the ‘Service’ box to select the transaction type you want to view its schedule of service operations, as shown in Fig.2.1e below.
Fig.2.1e
The selected ‘service time schedule’ will be displayed immediately, as shown in Fig.2.1f
Fig.2.1f
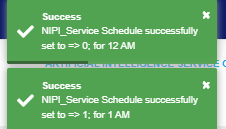
You can schedule a service operation at any time by marking the time checkbox. Click on the checkbox to select or deselect a time of the day as shown in Fig.2.1g
Fig.2.1g
By selecting or deselecting any time schedule, this will display a notification at the top of the page, as shown in Fig.2.1h.
Fig.2.1h.
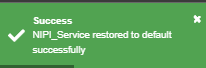
You can also restore the selected service operation schedule to factory default settings by clicking on ‘Restore Selected Service Schedule To Factory Default’ as shown in Fig 2.1i
Fig 2.1i
This will display a confirmation console. Click on ‘Confirm’ to proceed or ‘Cancel’ to dismiss the console, as shown in Fig.2.1j
Fig.2.1j
A notification will be displayed at the top of the page showing that the schedule has been restored to default successfully, as shown in Fig.2.1k
Fig.2.1k
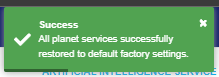
To restore all services operation schedule to factory default settings, click on ‘Restore All Services Schedule To Factory Default’ as shown in Fig.2.1l
Fig.2.1l
This will display a confirmation console. Click on ‘Confirm’ to proceed or ‘Cancel’ to dismiss the console, as shown in Fig.2.1m
Fig.2.1m
A notification will be displayed at the top of the page showing that all services have been restored to default settings successfully, as shown in Fig.2.1n
Fig.2.1n
How to view the History of the selected service operation schedule.
STEP 1: Click on ‘History’in the Artificial Intelligence operation dashboard page, as shown in Fig.2.2a
Fig.2.2a
This will display a page as shown below in Fig.2.2b
Fig.2.2b
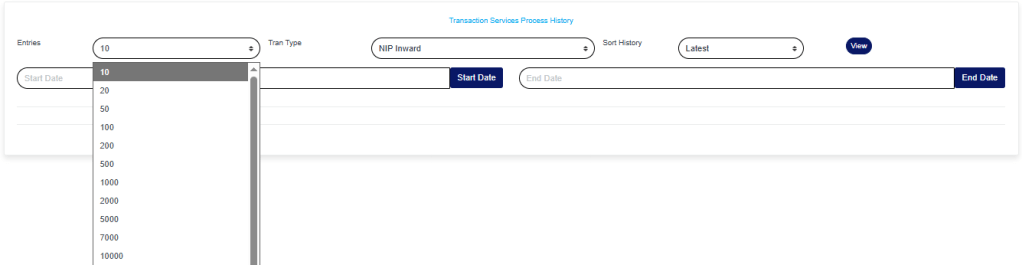
STEP 2: Click on the ‘Entries’ box to choose the number of entries you want to view per page, as shown in Fig.2.2c
Fig.2.2c
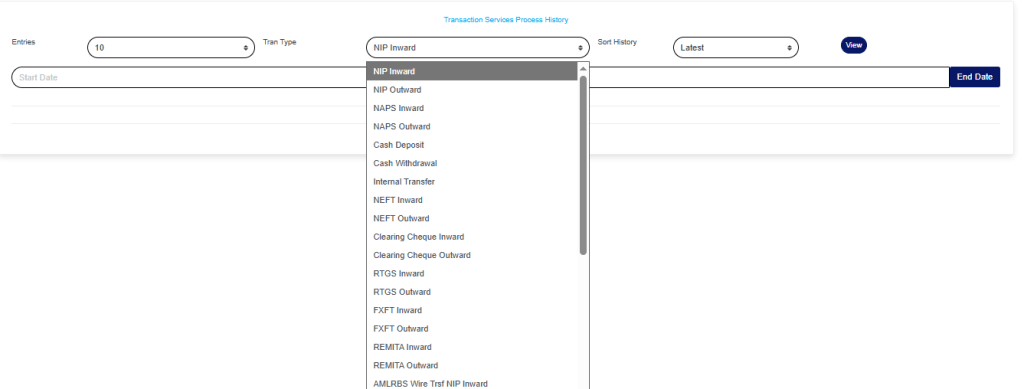
STEP 3: Click on the ‘Transaction type’ box and select the type of transaction you want to view its history, as shown in Fig.2.2d
Fig.2.2d
STEP 4: Click on the ‘Sort History’box and select the latest or earliest form of transaction you want to view its history, as shown in Fig.2.2e
Fig.2.2e
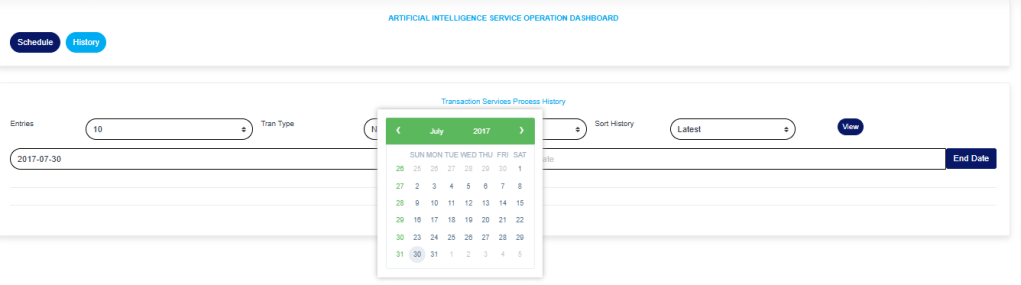
STEP 5: Click on the “Start” and “End” dates to specify the dates. This will display a calendar as shown in Fig.2.2f and Fig.2.2g
Fig.2.2f
Fig.2.2g
Take a look at the arrows labelled a to d in Fig.2.2h to study the calendar.
a. Click on the given year to change it to your year of choice
b. Click on the given month to change it to your month of choice
c. Then click on the date of the month
d. You can also click on the angle brackets on the calendar [ ‘<’ or ‘>’ ] to go backward or forward.
Fig.2.2h
Note that all boxes must be filled appropriately in the Artificial Intelligence Service Operation Dashboard page.
STEP 6: Click on “View” as shown in the page below in Fig.2.2i
Fig.2.2i
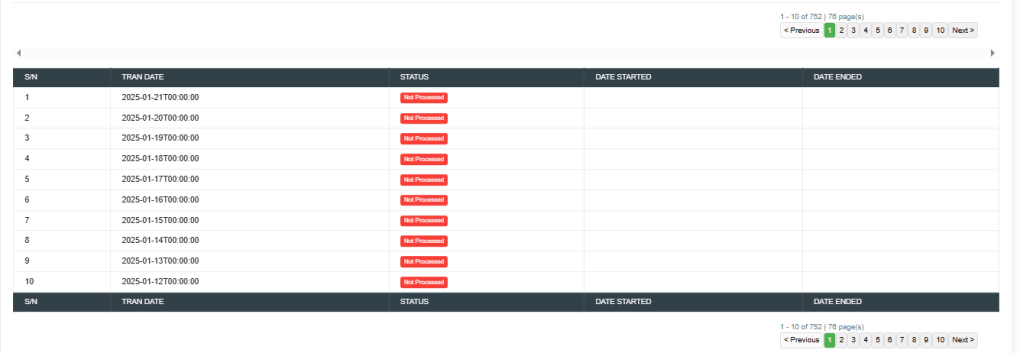
This will display a page below showing the history of transaction spool according to the dates filled in the start and end boxes, as seen in Fig.2.2j
This feature houses notifications generated by the Compliance Planet software when a report is processed successfully. These notifications are also sent to the user’s email.
This section provides a guide on how to perform operations pertaining to notifications on the Compliance Planet software, with step-by-step instructions and pictures.
Operations here include viewing and deleting notifications. Here is how to make use of the features.
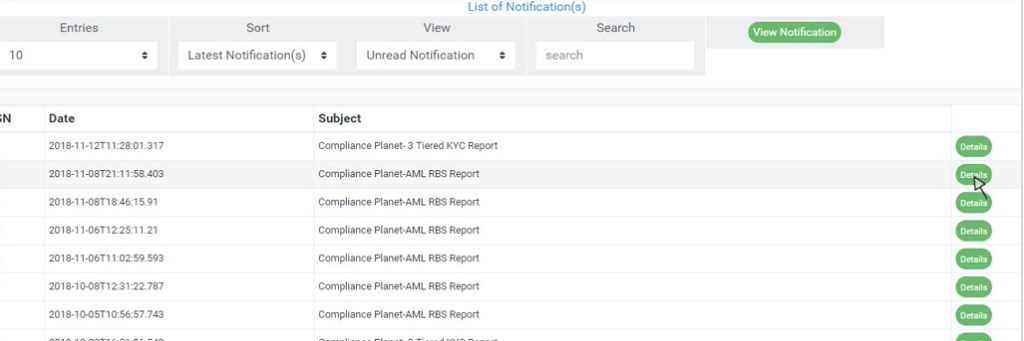
Click on ‘Notification’ on the left-hand side menu as in fig. 35.1a.
(fig. 35.1a)
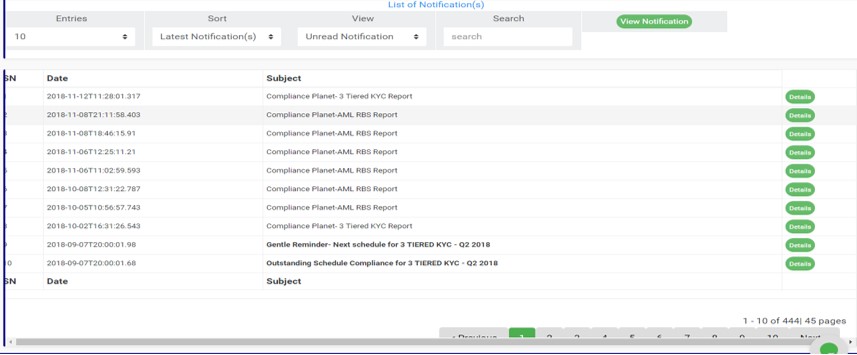
This will display the notifications page. See fig. 35.1b for an example of the page.
(fig. 35.1b)
Click on the ‘entries’ box as in fig. 35.1c to adjust the number of notifications you want to see per page.
(fig. 35.1c)
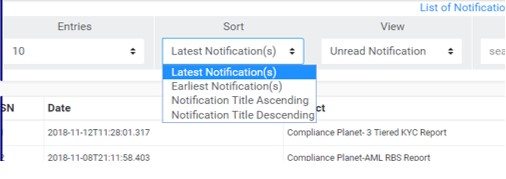
You can sort the notifications to be seen from the latest notification (oldest notification) to the earliest notification (newest notifications) or vice versa. Specify the order of the list by clicking on the ‘Sort’ box as in fig. 35.1d. The default view is from the latest to the earliest.
(fig. 35.1d)
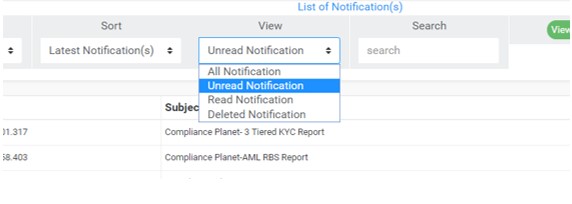
Select the notifications to be displayed by clicking the ‘View’ box as in fig. 35.1e. The categories of notifications available are; Unread notification, Read notification, Deleted notification and All notifications. The Unread category is the default view on landing on the page.
(fig. 35.1e)
After selecting the category you want to see, click on ‘View Notification’ as in fig. 35.1f.
(fig. 35.1f)
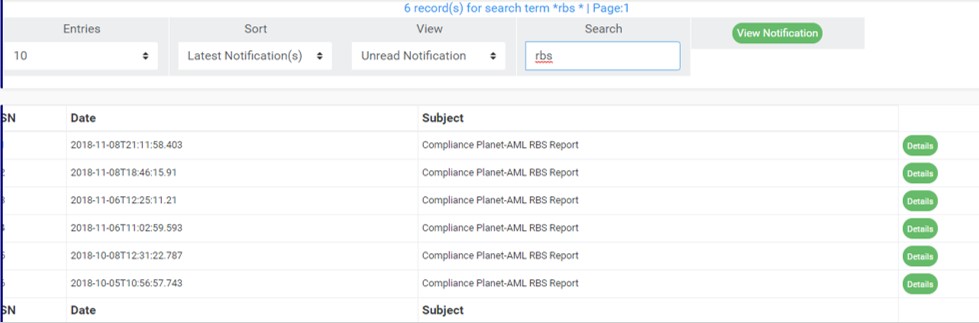
Search for a notification or a set of notifications by typing a search term in the ‘Search’ box. Search results are displayed in real time. See fig. 35.1g for an example of a search.
(fig. 35.1g)
Each notification has a ‘Details’ button that shows details of the message conveyed by the notification. Click on ‘Details’ as in fig. 35.1j to see a notification message.
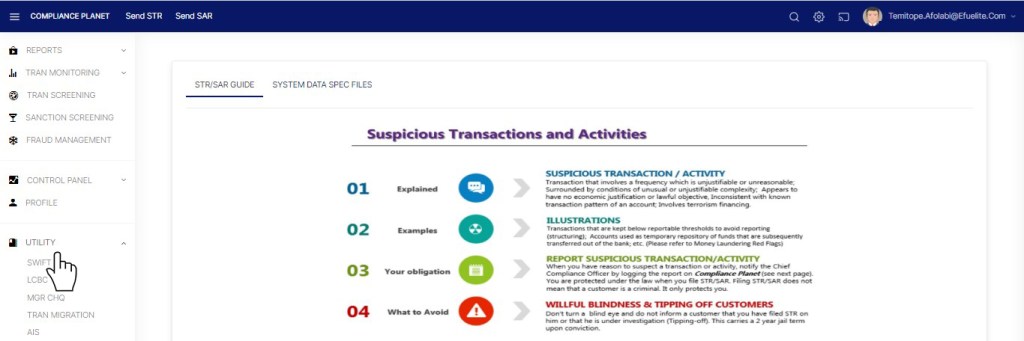
SWIFT Message types come in a format that cannot be interpreted by a layman, hence the need for a SWIFT message reader (SWIFT message translator). The SWIFT console has a message reader. The Compliance Planet SWIFT message reader processes MT102 and MT103 only. These message types are category 1 messages -Customer Payments and Cheques. Here is how to translate a SWIFT message.
STEP 1: From the left-hand side menu, click ‘UTILITY’ as in fig. 30.3a below
(fig. 30.3a)
This displays a drop-down list as in fig.30.3b.
STEP 2: On the drop-down list, click “Swift” as shown in fig 30.3b below
(fig. 30.3b)
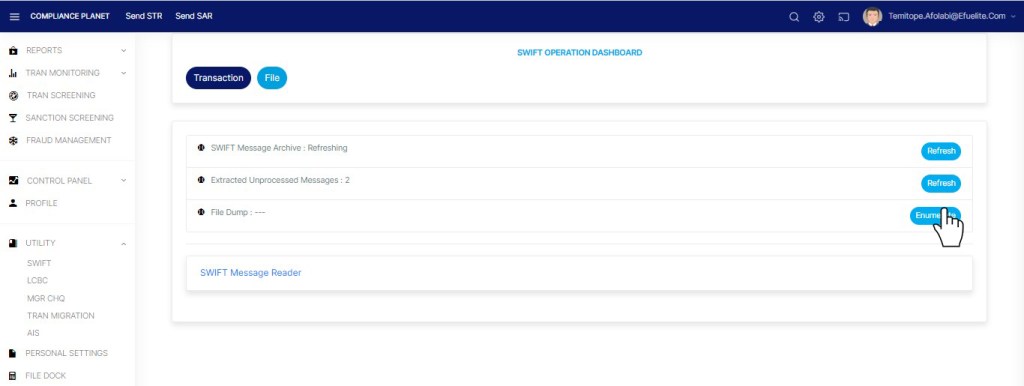
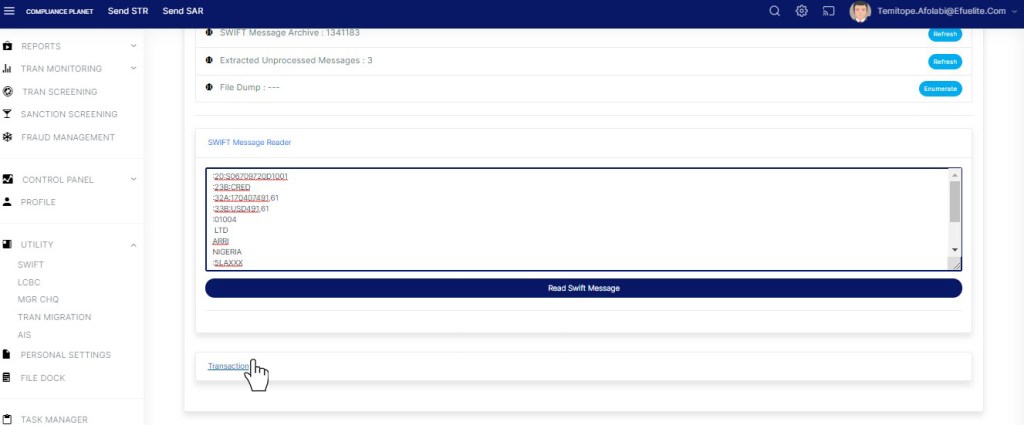
This displays a “SWIFT OPERATIONS DASHBOARD” as in fig. 30.3c.
STEP 3: Click “File” On the SWIFT OPERATIONS DASHBOARD as shown in fig 30.3c below
(fig. 30.3c)
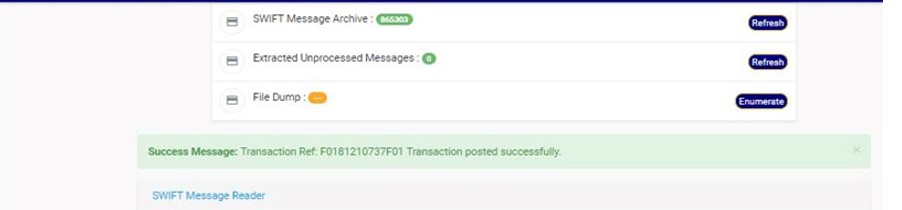
This displays a page as in fig. 30.3d. On this page the software give information on the number of Swift messages archived, extracted unprocessed messages and file dump. You can refresh these data by clicking the “Refresh” button as shown in fig 30.3d below
Fig 30.3d
The SWIFT dashboard also gives information on the number of SWIFT files processed by the software on the server. This figure can also be refreshed by clicking on its ‘Enumerate’ button as in fig. 30.3e below
fig. 30.3e
Also, the SWIFT dashboard has a SWIFT message reader that translates SWIFT messages to information that is meaningful to users.
How to Translate SWIFT messages
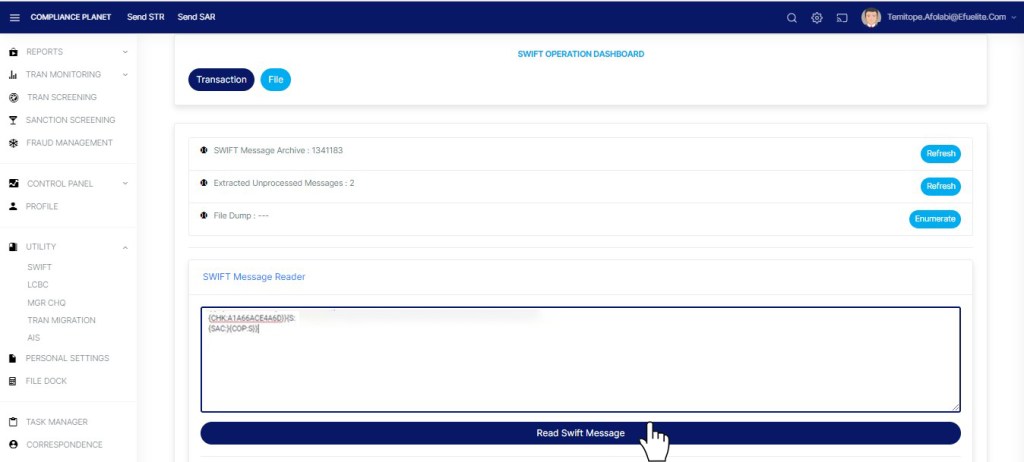
STEP 1: Click on ‘SWIFT Message Reader’ as in fig. 30.4a below.
(fig. 30.4a)
This displays a text box as in fig. 30.4b.
(fig. 30.4b)
STEP 2: Paste the MT102 or MT103 message to be translated in the text box. See an example in fig. 30.4c.
(fig. 30.4c)
STEP 3: Click on ‘Read SWIFT Message’ as in fig. 30.4d to translate the message.
(fig. 30.4d)
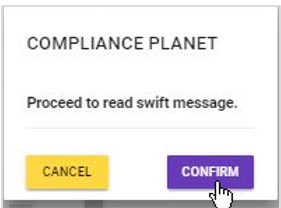
This displays a confirmation console to confirm the processing of the message. Click on ‘Confirm’ to proceed or ‘Cancel’ terminate the operation.
(fig. 30.4e)
By clicking on ‘Confirm’, the compliance planet software SWIFT reader will read the message, and place a transaction folder at the right side of the console and a notification will be displayed at the top of the page. The number of transaction folders represents each transaction reported in the SWIFT message translated. See fig. 30.4f below for an example.
(fig. 30.4f)
STEP 4: Click on the transaction folder(s) as in fig. 30.4g to view the message(s).
(fig. 30.4g)
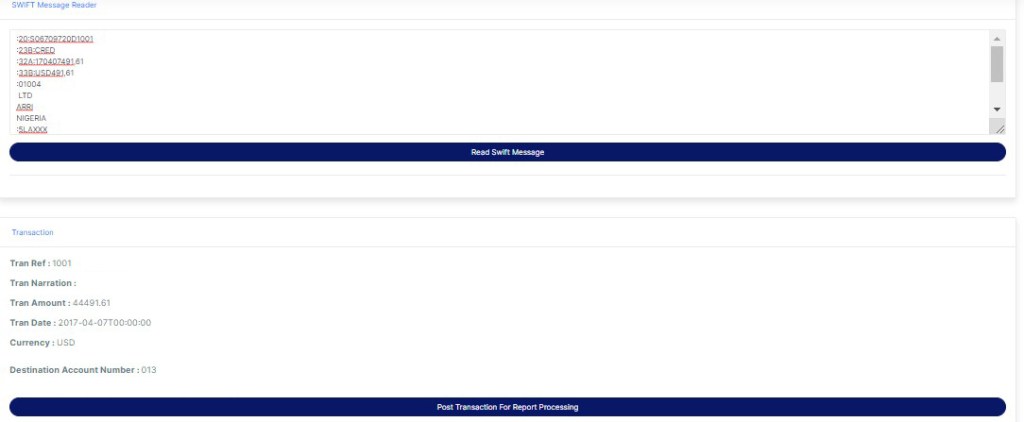
The translated version of the SWIFT message will be displayed as shown in fig. 30.4h
(fig. 30.4h)
Transactions reported in SWIFT messages fall under the Foreign Exchange Transaction type (FXFT). From the message reader, SWIFT transactions read can be posted to the transaction pool for Report processing. Transactions posted will form part of reports generated by the Compliance Planet. If they are re-posted, the transaction details will be duplicated in the report generated.
To post the transaction(s) for report processing;
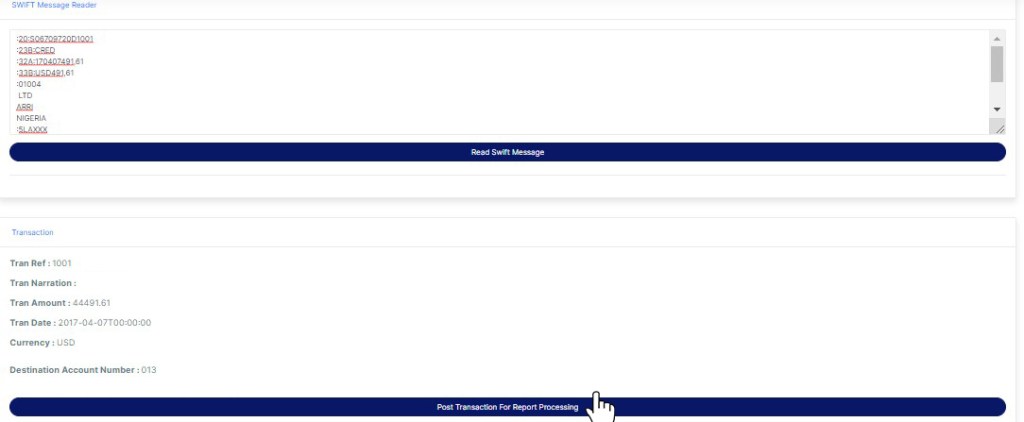
click on ‘Post Transaction for Report Processing’ as in fig. 30.4i below.
(fig. 30.4i)
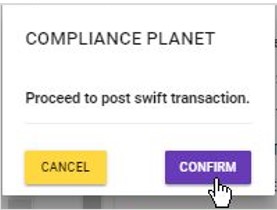
This displays a confirmation console as in fig. 30.4j. Click on ‘Confirm’ to proceed.
(fig. 30.4j)
A ‘Success Message’ will be displayed on the page as seen in fig. 30.4k below.
This section provides a guide on how to modify transaction type options available when sending an STR notification (see section 6.2.1) on the Compliance Planet, with step-by-step instructions and pictures.
NOTE: Only person(s) profiled as deputy supreme admin can carry out these operations
To perform any of the operations:
STEP 1: From the app dashboard, click “CONTROL PANEL” as in Fig. 20.2a below.
Fig 20.2a
This will display a drop-down as in Fig. 20.2b below.
Fig. 20.2b
STEP 2: Click ‘SURVEILLANCE’ on the drop-down list. See an example in Fig. 20.2b below.
Fig 20.2b
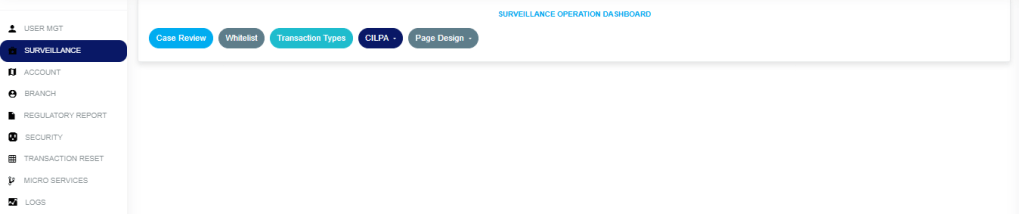
This will display the SURVEILLANCE OPERATION dashboard as in Fig. 20.2c below.
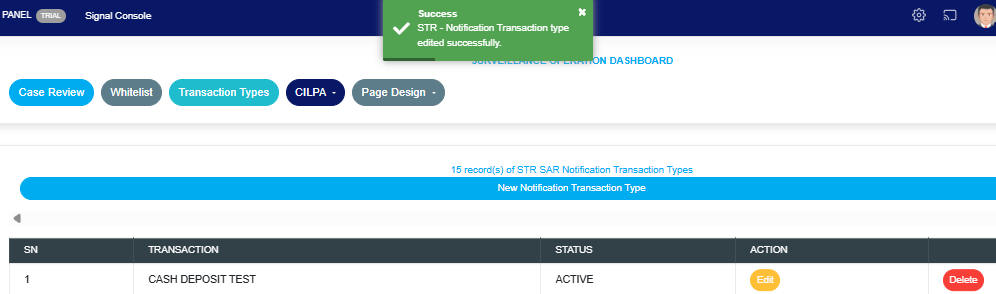
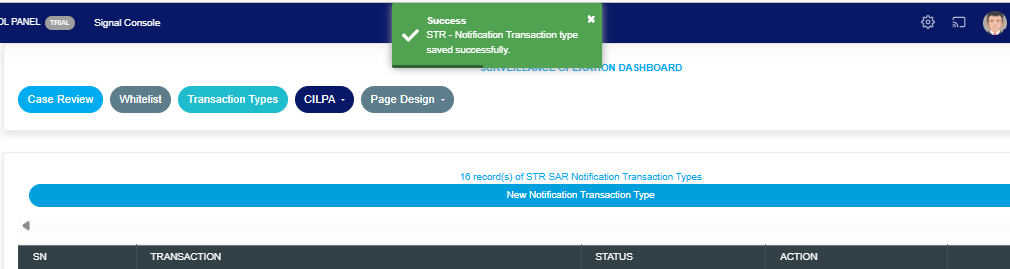
STEP 3: Click on “Transaction types” as in Fig. 20.2c below.
(Fig. 20.2c)
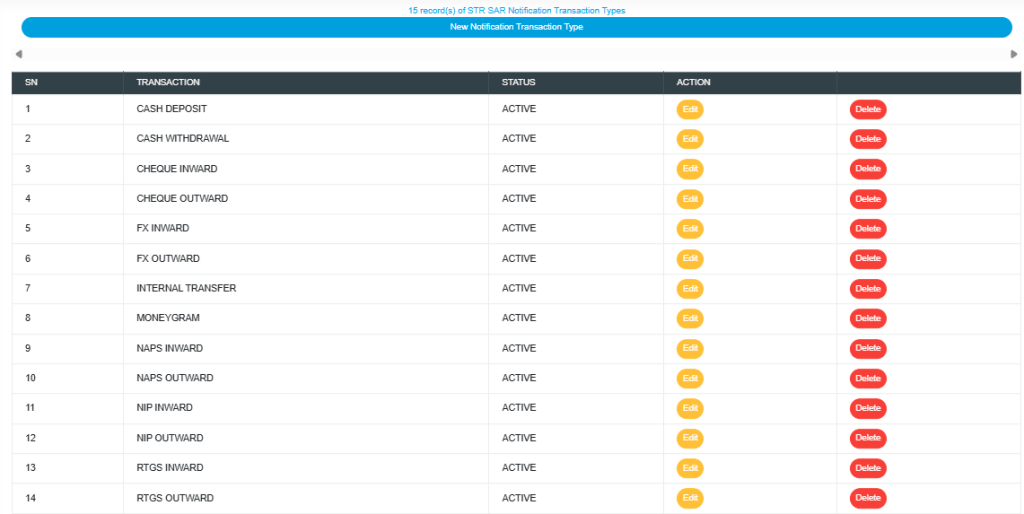
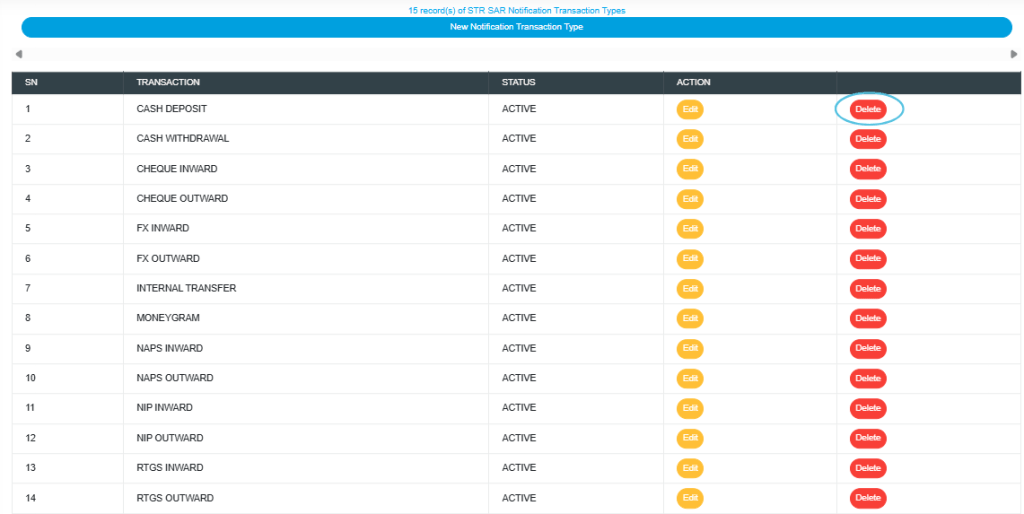
This displays a page showing a list of all transaction types that have been created and are available on the software. See Fig. 20.2d for an example.
(Fig. 20.2d)
How to Edit an STR notification transaction type
This refers to changing the description or status of the transaction type. Here is how to do this.
STEP 1: Click on the ‘EDIT’ button in the action column. See Fig. 20.3a for an example.
(Fig 20.3a)
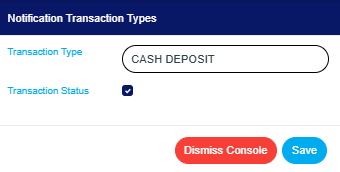
Clicking the EDIT button will display a ‘Notifications Transaction Type’ console as shown in Fig. 20.3b below.
(Fig 20.3b)
STEP 2: Click on the transaction type text box to change the Notification transaction type description. See an example in Fig. 20.3c below.
(Fig 20.3c)
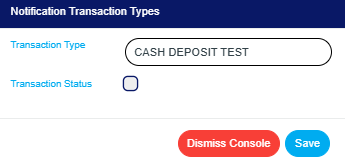
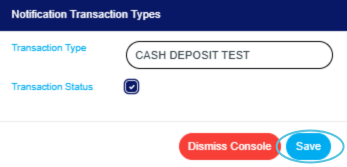
STEP 3: Click on the ‘Transaction Status’ checkbox to make that transaction notification type active or inactive. This is illustrated in Fig. 20.3d and Fig. 20.3e below.
(Fig 20.3d)
(Fig 20.3e)
Fig. 20.3d shows that the transaction type is set ACTIVE, while Fig. 20.3e shows that the transaction type is set INACTIVE.
An active transaction type will be available when sending a new STR notification on the Compliance Planet. In contrast, an inactive transaction type will no longer be part of the available options when sending a new STR notification on the compliance planet.
STEP 4: Click the ‘SAVE’ button to save the edit or click ‘DISMISS CONSOLE’ to cancel the operation. See Fig. 20.3f for an example.
Fig 20.3f
This displays a confirmation console as in Fig. 20.3g below.
Fig 20.3g
A notification, as in Fig. 20.3h (A), will be displayed at the top of the page when the operation is successful. Also, see Fig. 20.3h for an example of the updated description and status.
Fig 20.3h
How to Delete an STR notification transaction type
This refers to deleting an STR notification transaction type. If a transaction type is deleted, it will no longer be part of the available options when sending a new STR notification on the compliance planet (See section 6.2.1 for sending an STR notification).
Here is how to do this.
STEP 1: Click on the ‘delete’ button of the STR notification transaction type as in Fig.20.4a.
(fig20.4a)
This displays a confirmation console to confirm your request to delete the transaction type.
STEP 2: Click on ‘CONFIRM’ as in Fig.20.4b to proceed or ‘CANCEL’ to discontinue.
(Fig.20.4b)
A notification will be displayed at the top of the page when the delete operation is complete.
(Fig.20.4c)
How to add a new STR notification transaction type
This refers to creating a new STR notification transaction type. This transaction type will form part of the available options when sending a new STR notification on the compliance planet (See section 6.2.1 for sending an STR notification).
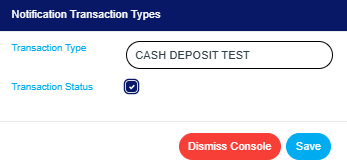
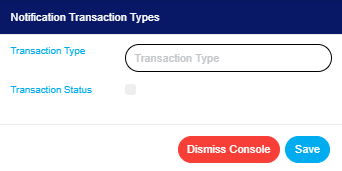
STEP 1: Click on ‘NEW NOTIFICATION TRANSACTION TYPE’ as shown in Fig. 20.5a below.
(Fig. 20.5a)
A console as in Fig. 20.5b will be displayed.
(fig. 20.5b)
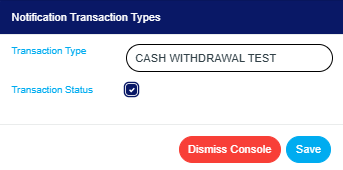
STEP 2: Input the transaction type as in Fig. 21.5c below
(Fig. 20.5c)
STEP 3: Click on the transaction status checkbox to make that transaction notification type active or inactive. This is illustrated in
Fig 21.5d and Fig 20.5e below
(Fig 20.5d)
(Fig 20.5e)
Fig. 20.5d shows that the transaction type is set ACTIVE, while Fig. 21.0e shows that the transaction type is set INACTIVE.
An active transaction type will form part of the available options when sending a new STR notification on the compliance planet (See section 6.2.1 for sending an STR notification). In contrast, an inactive transaction type will no longer be part of the available options when sending a new STR notification on the compliance planet.
STEP 3: Click on ‘SAVE’ to save the edit or click ‘DISMISS CONSOLE’ to cancel the operation. See Fig. 20.5f for an example.
Fig 20.5f
This displays a confirmation console as in Fig. 20.5g below. Click ‘Confirm’ to proceed or ‘Cancel’ to close the console.
Fig 20.5g
A notification, as in Fig. 20.5h (A), will be displayed at the top of the page, and the description and status will be updated.