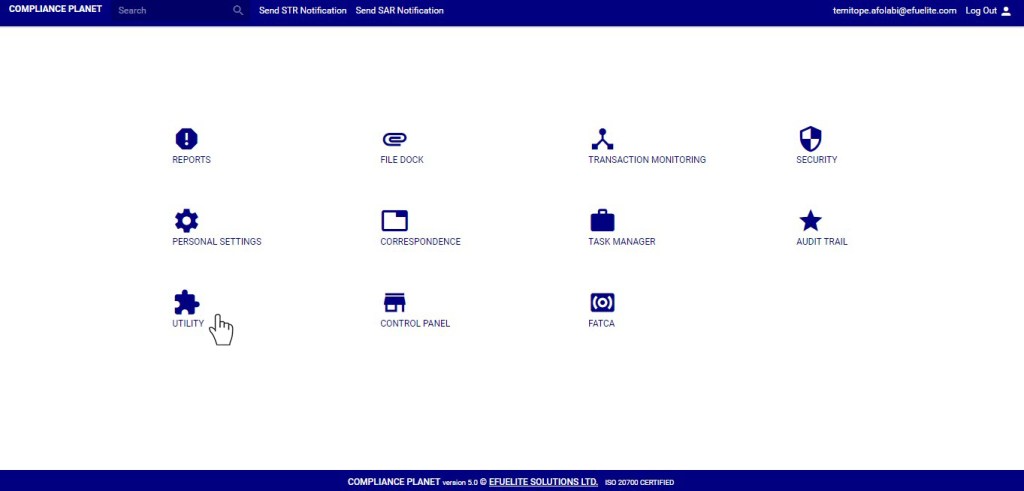
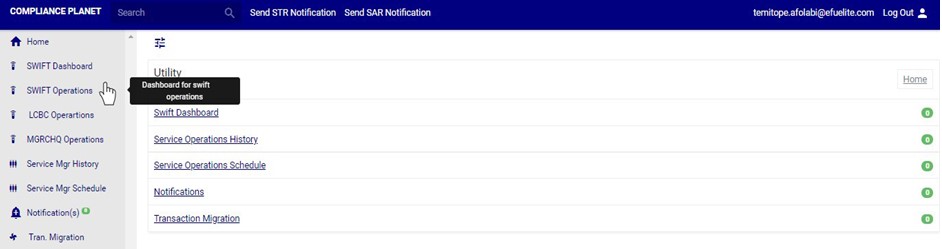
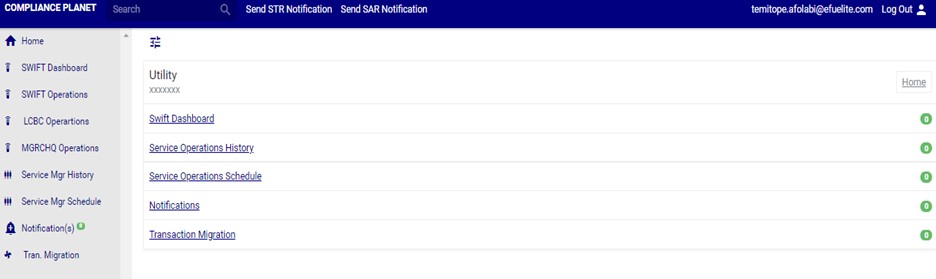
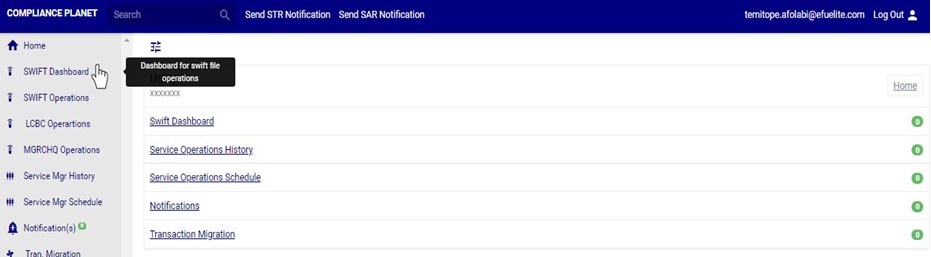
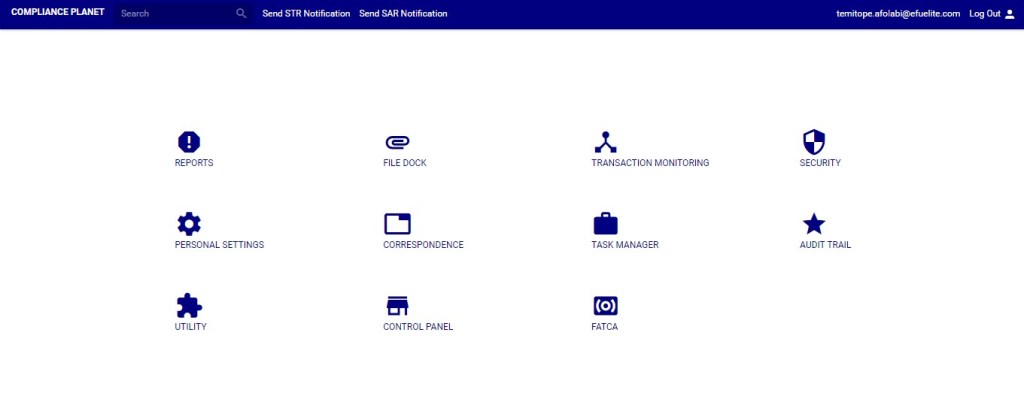
The utility menu houses the following features:
- SWIFT File Operations
- Planet Service Manager
- Planet Notifications
- Data Migration
For further enquiries :
Tel +234(0) 816 555 9818
Email solutions@efuelite.com
Web http://solutions.efuelite.com
EFUELITE SOLUTIONS LTD (COMPLIANCE PLANET)
Anti-Money Laundering Monitoring, Digital and Financial Crime Surveillance, Global Sanction and PEP Screening And Reporting Software
The utility menu houses the following features:
For further enquiries :
Tel +234(0) 816 555 9818
Email solutions@efuelite.com
Web http://solutions.efuelite.com
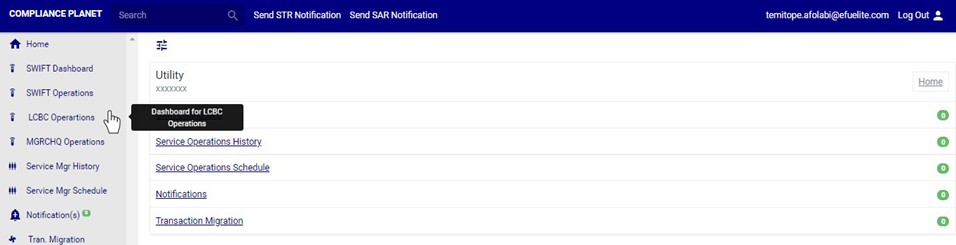
This section provides a guide on how to perform operations pertaining to letter of Credit Bill for Collection (LCBC), with step-by-step instructions and pictures. See section 2.1.14 for notes on LCBC.
Note: Only person(s) assigned right to ‘view LCBC transactions’ will be able to carry out this operation(s)
(fig. 32.0b)

(fig. 32.0c)
Note: Only person(s) assigned right to ‘view LCBC transactions’ will be able to carry out this operation(s)
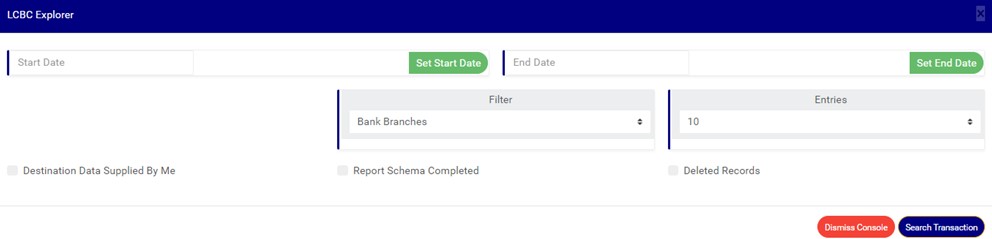
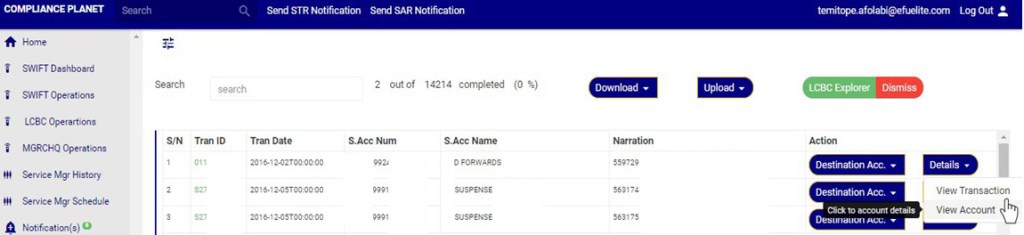
STEP1: Click on ‘LCBC Explorer’ button on the LCBC Operation page. See Fig 32.2a for an example
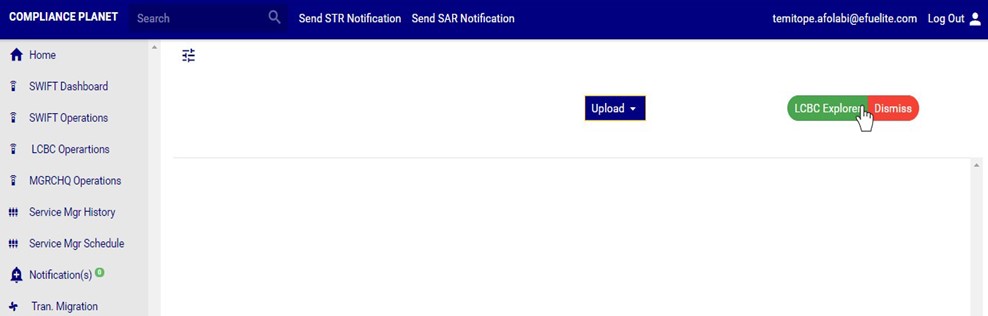
(Fig. 32.2a)
(Fig. 32.2b)
STEP 2: Click on SET START DATE and SET END DATE to specify the date range to be covered. See an example in Fig 32.2c below
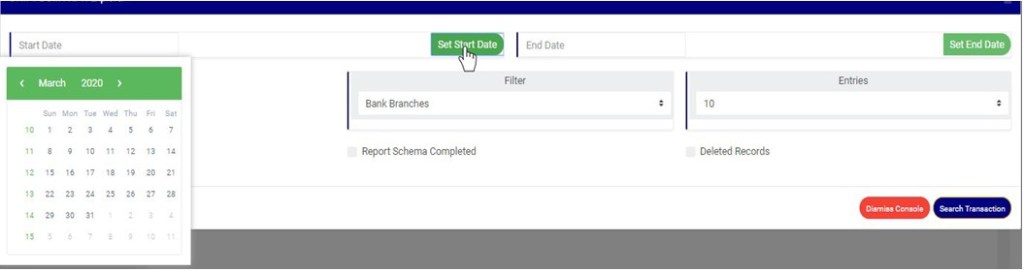
(fig. 32.2c)
(fig. 32.2d)
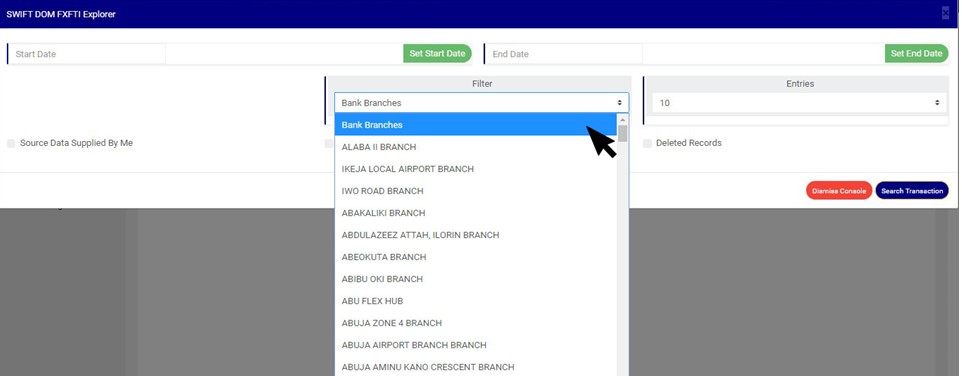
STEP 3: Click on the ‘filter’ box to select a bank branch. (See the example in fig. 32.2e). If you want to see the transactions for all branches, select bank branches. It is the first option on the filter list.

(Fig. 32.2e)
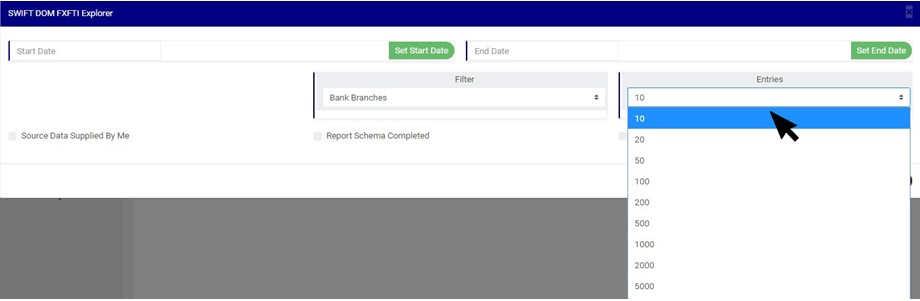
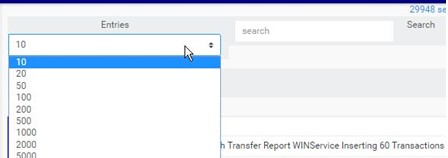
STEP 4: Click ‘entries’ box to change the number of transactions you want to see per page. (See the drop-box in fig. 32.2f. below).
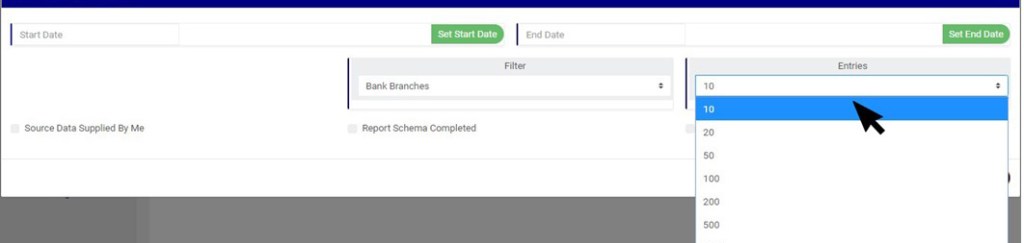
(Fig. 32.2f)
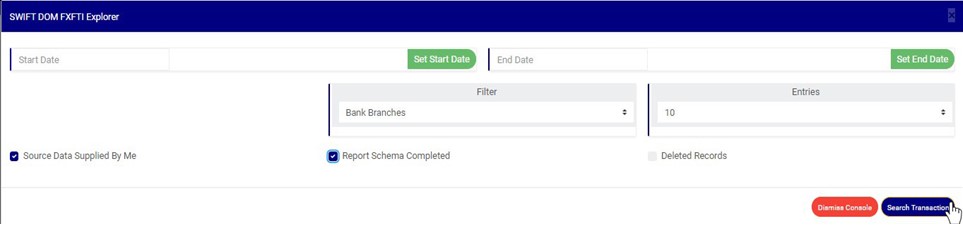
STEP 5: Tick the any of the checkbox as shown in fig 32.2g to further specify the transactions you want to view
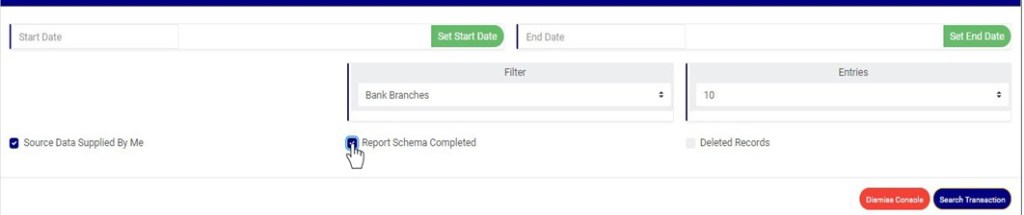
(Fig. 32.2g)
NOTE: Leave all checkboxes unchecked to see list of all LCBC transactions
STEP 6: Click ‘Search Transaction’ as shown in fig 32.2h
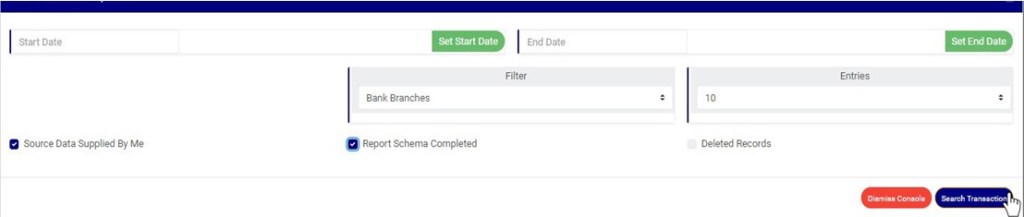
(Fig. 32.2h)
(Fig. 32.2i)
(Fig. 32.2j)

(Fig. 32.2k)
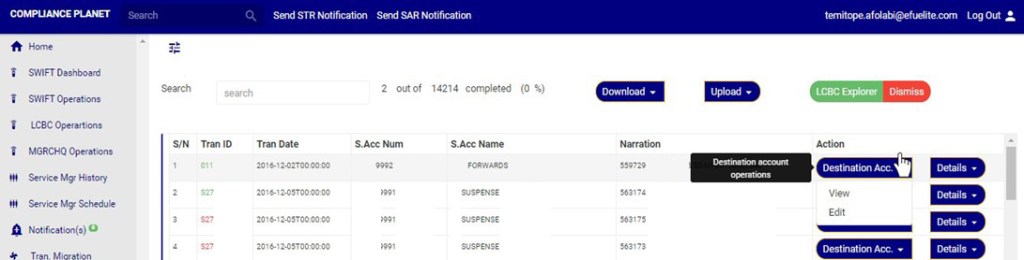
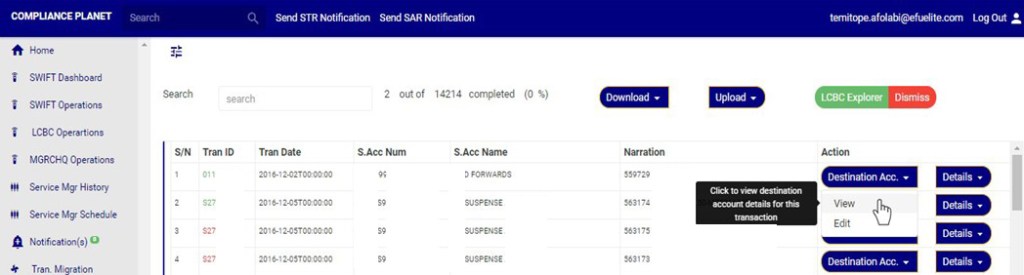
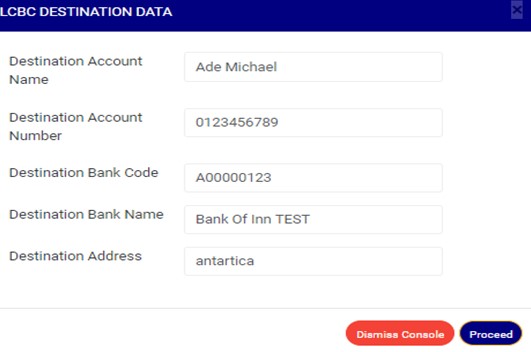
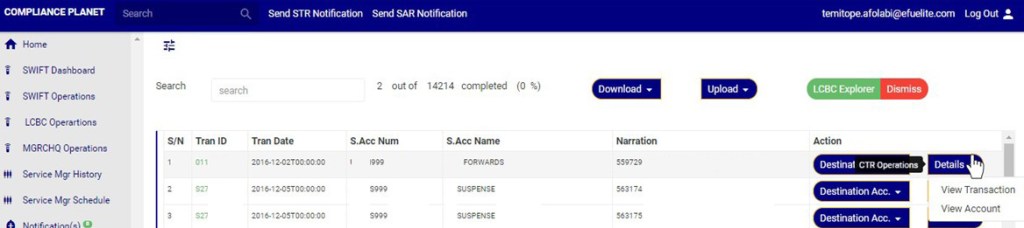
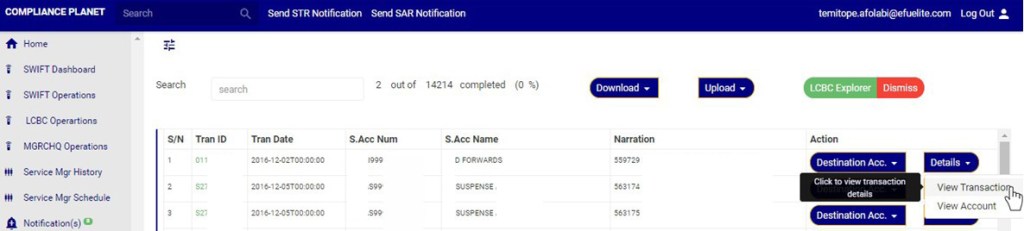
This option is available if a Destination account has been added to the LCBC transaction.
Note: You need to be assigned right to ‘view LCBC transactions’ and ‘Screen Edit LCBC transactions’ to be able to delete attached destination account data.
(Fig. 32.2l)

(Fig. 32.2m)

(Fig. 32.2n)

(Fig. 32.2o)

(Fig. 32.2p)
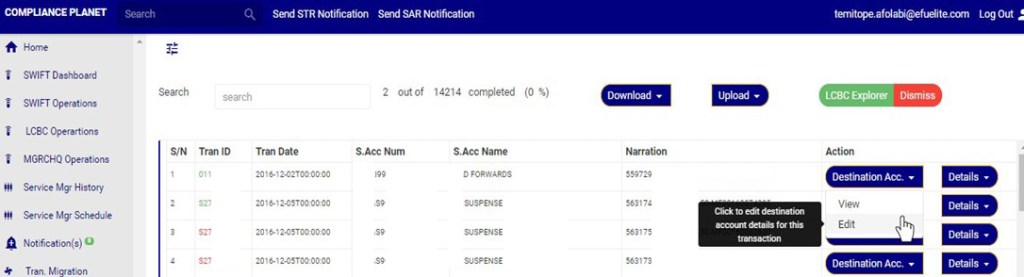
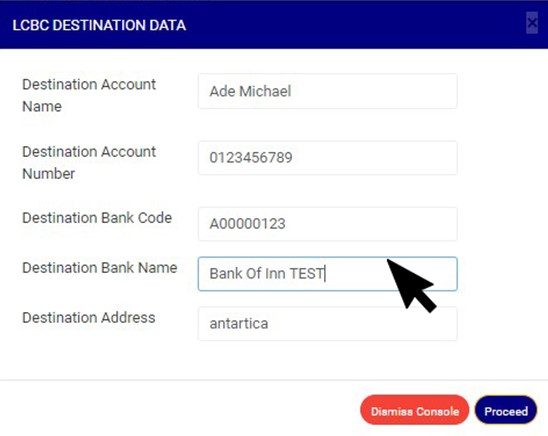
This option is available only if there is a ‘destination account’ data attached to the LCBC transaction
Note: You need to be assigned right to ‘view LCBC transactions’ and ‘Screen Edit LCBC transactions’ to be able to Edit attached destination account data.
(Fig. 32.2q)
(Fig. 32.2r)
(Fig 32.2s)

(Fig. 32.2t)

(Fig. 32.2u)

(Fig. 32.2v)
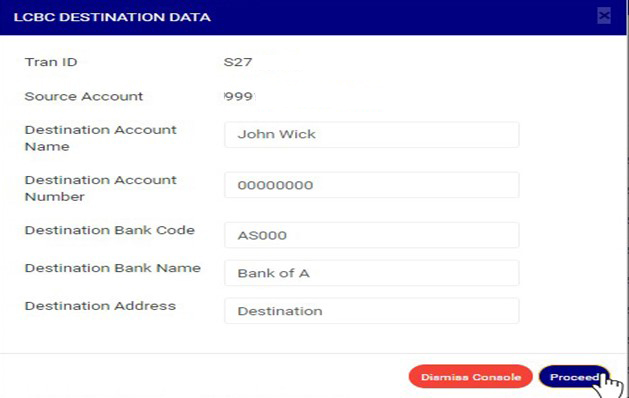
This Option is available when there is no Destination account data attached to the transaction
Note: You need to be assigned right to ‘view LCBC transactions’ and ‘Screen Edit LCBC transactions’ to be able to add destination account data.

(FIG 32.2w)

(Fig. 32.2y)

(Fig. 32.2z)
(Fig. 32.2aa)

(Fig. 32.2ab)

(Fig. 32.2ac)
(Fig. 32.2ad)
Note: You need to be assigned right to ‘view LCBC transactions’ to be able to carry out this operation
(Fig. 32.2ae)
(Fig. 32.2af)
Note: You need to be assigned right to ‘view LCBC transactions’ to be able to carry out this operation
(Fig. 32.2ag)

(Fig. 32.2ah)
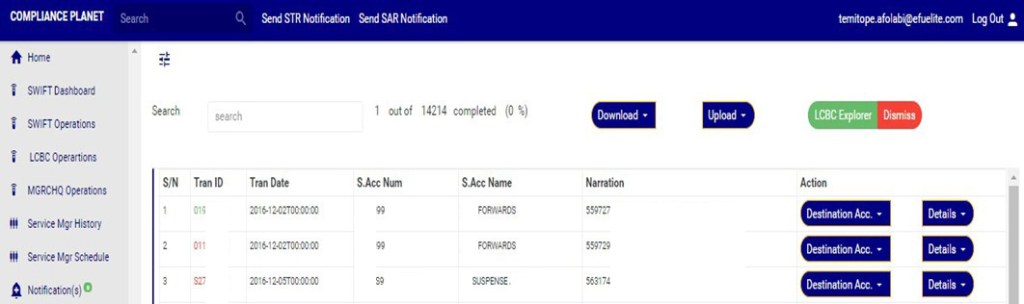
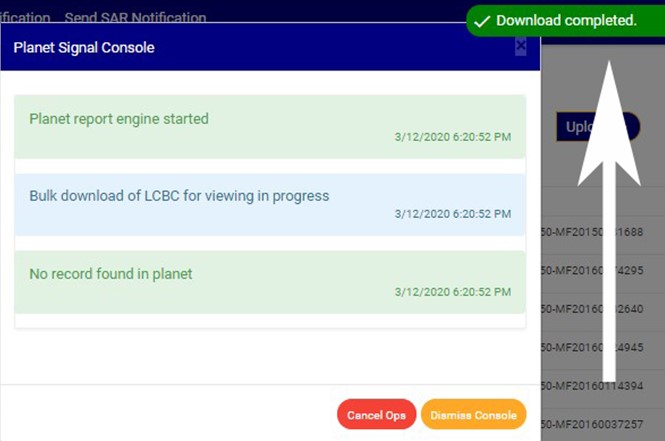
On the LCBC explorer page you can make a bulk download of Letter of Credit Bill for Collection (LCBC) transaction records either for viewing or editing purpose. The process is explained below.
Note that the records downloaded for editing purpose can be edited and uploaded on the software to update the records. However,
This feature downloads the LCBC Transaction records as an excel file.
Note: You need to be assigned right to ‘view LCBC transactions’ and ‘Download LCBC transactions’ to be able to carry out this operation
STEP 1: Click the ‘Download’ button on the LCBC Explorer page. See Fig 32.3a for an example

(fig. 32.3a)

(fig. 32.3b)
STEP 2: Click ‘bulk view’ as shown in fig 32.3c below

(fig. 32.3c)
(fig 32.3d)
Note: You need to be assigned right to ‘view LCBC transactions’ and ‘Download LCBC transactions’ to be able to carry out this operation
STEP 1: Click on the download button on the LCBC Explorer page. See Fig 32.3f for an example

(fig. 32.3f)

(fig. 32.3g)
STEP 2: Click on the bulk Edit as shown in fig 32.3h below

(fig. 32.3h)
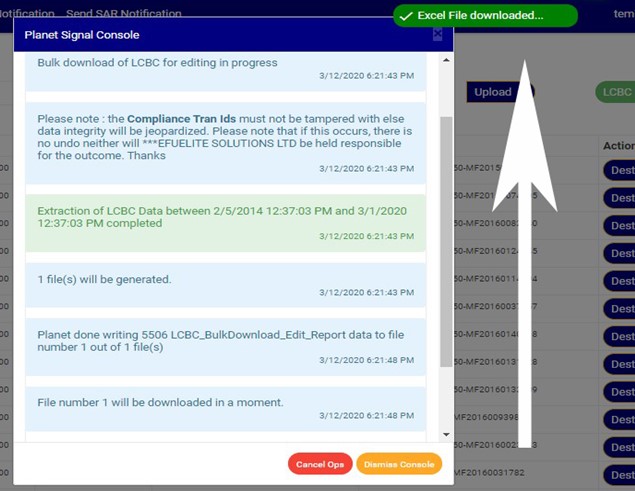
An excel file with details of the LCBC transaction will be downloaded when the process is complete. The details on the downloaded excel file can be edited and uploaded on the software to update multiple LCBC transaction details at once. However, the ‘Compliance tran Id’ for each record on the excel file must not be tampered with for the upload to be successful.
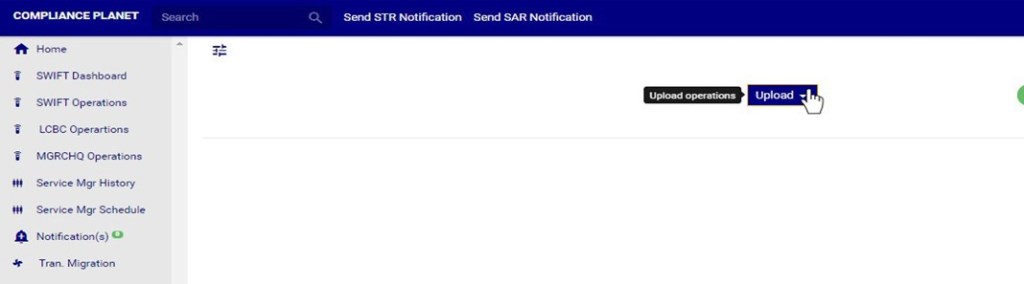
On the LCBC Operations page you can make bulk upload of Edited LCBC Transaction records. The process is explained below
Note: You need to be assigned right to ‘view LCBC transactions’ and ‘Edit bulk LCBC transactions’ to be able to carry out this operation
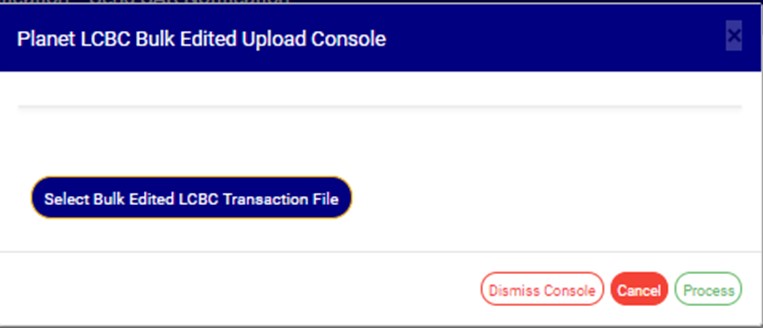
STEP 1: Click on the Upload button on the LCBC Operation page. See Fig 32.3i for an example
(fig. 32.3i)
STEP 2: Click ‘bulk edited data’ on the dropdown as shown in fig 32.3j below

(Fig. 32.3j)
(fig. 32.3k)
STEP 3: Click on ‘Select Bulk Edited LCBC Transaction file’ to choose the edited transaction file you want to upload from your computer. See this in Fig 32.3l below
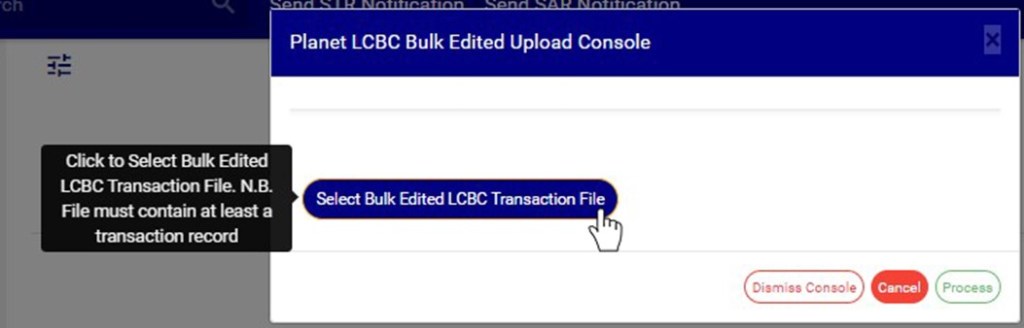
(fig. 32.3l)
(Fig. 32.3m)
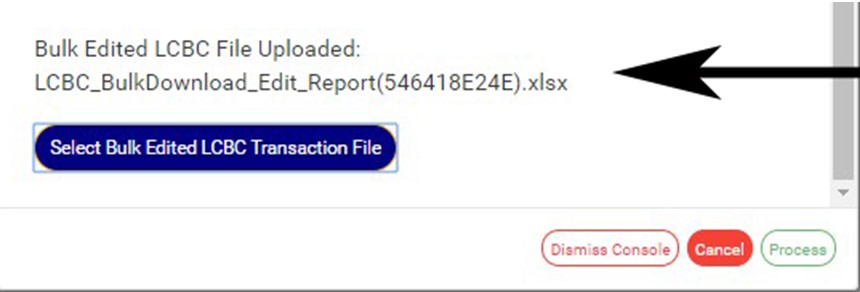
STEP 4: Click on ‘process’ button to proceed with the upload. See fig. 32.1f below to see the green button at the bottom-right corner of the console.

(Fig. 32.3m)

(Fig. 32.3n)
For further enquiries :
Tel +234(0) 816 555 9818
Email solutions@efuelite.com
Web http://solutions.efuelite.com
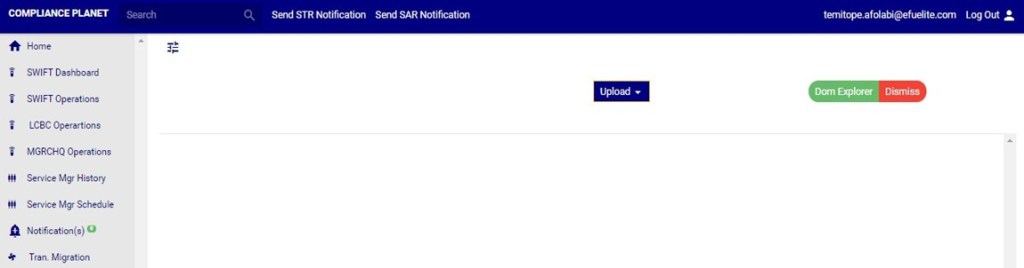
This section provides a guide on how to perform operations pertaining to swift, with step-by-step instructions and pictures.

(fig. 31.0b)
(fig. 31.0c)
(fig. 31.0d)
Note: Only person(s) assigned right to ‘view SWIFT DOM transactions’ will be able to carry out this operation(s)
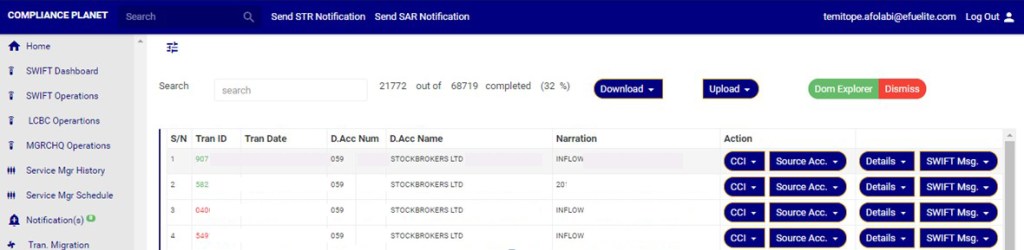
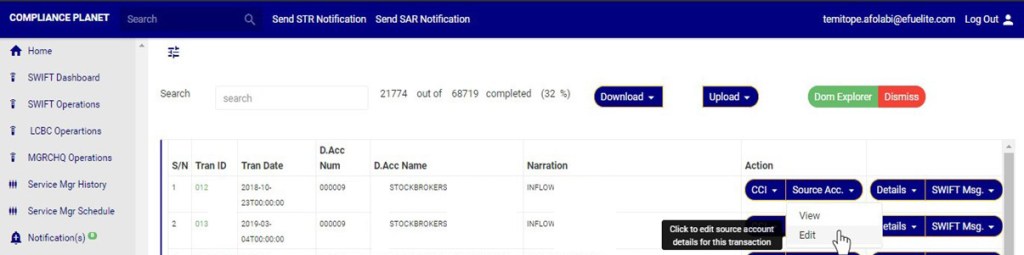
STEP1: From the left hand side menu, Click on ‘Swift Operations’ as in fig. 31.2a.

(fig. 31.2a)
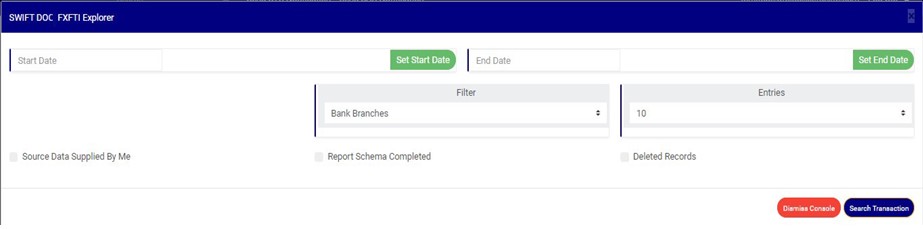
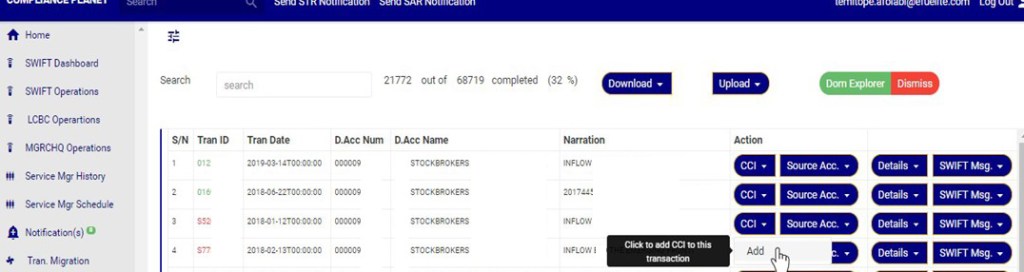
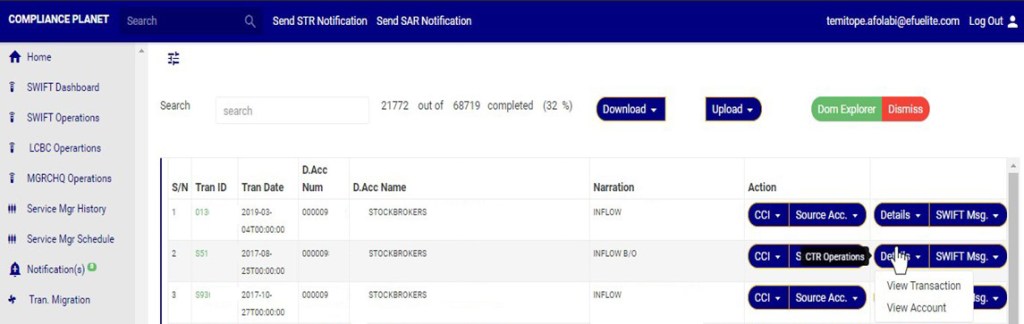
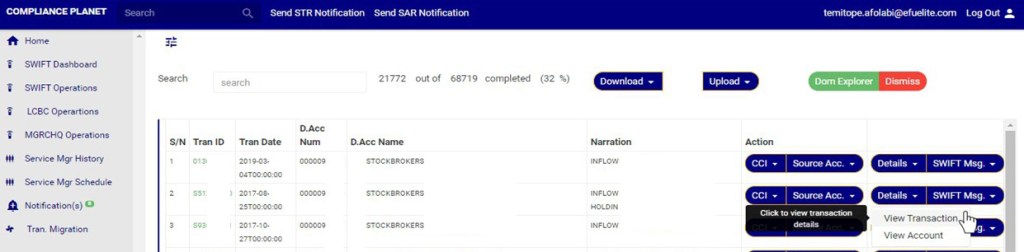
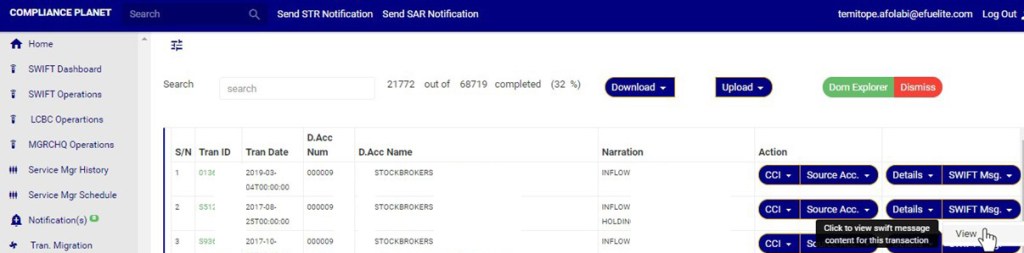
STEP 2: Click on ‘Doc Explorer’ button on the Swift Operation page. See Fig 31.2b for an example

(Fig. 31.2b)
(Fig. 31.2c)
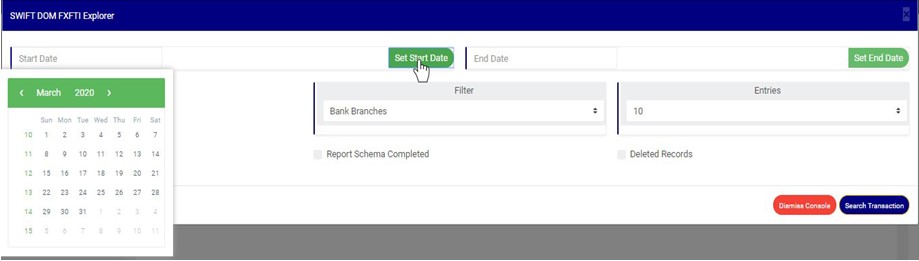
STEP 3: Click on SET START DATE and SET END DATE to specify the period to be covered. See an example in Fig 31.2d below
(fig. 31.2d)
(fig. 31.2e)
STEP 4: Click on the filter box to select a particular bank branch. (See the example in fig. 31.2f). If you want to see the transactions for all branches, select bank branches. It is the first option on the filter list.
(Fig. 31.2f)
STEP 5: Click the ‘entries’ box to change the number of transactions you want to see per page. (See the drop-box in fig. 31.2g. below)
(Fig. 31.2g)
STEP 6: Tick any of the checkbox as shown in fig 31.2h to specify the transactions you want to view
NOTE: Leave all checkboxes unchecked to see list of all SWIFT FXFT transactions

(Fig. 31.2h)
STEP 7: Click ‘Search Transaction’ as shown in fig 31.2i
(Fig. 31.2i)
(Fig. 31.2j)
Note: Only person(s) assigned right to ‘view SWIFT DOM transactions’ will be able to carry out this operation(s)

(Fig. 31.2k)
(Fig. 31.2l)
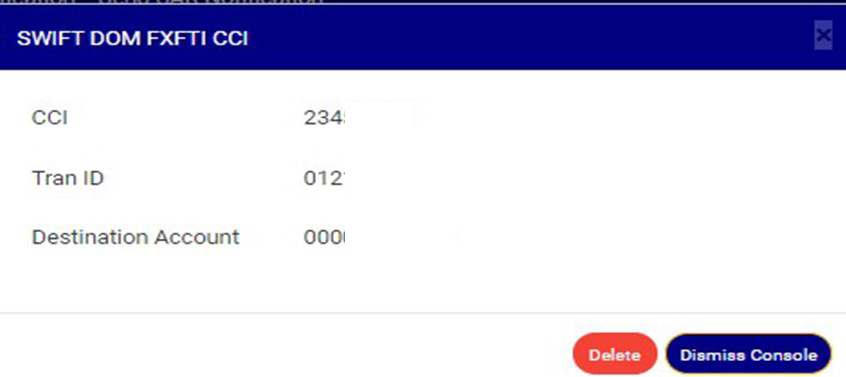
Note: Only person(s) assigned right to ‘view SWIFT DOM transactions’ and ‘Screen Edit SWIFT DOM transactions’ will be able to delete attached CCI data
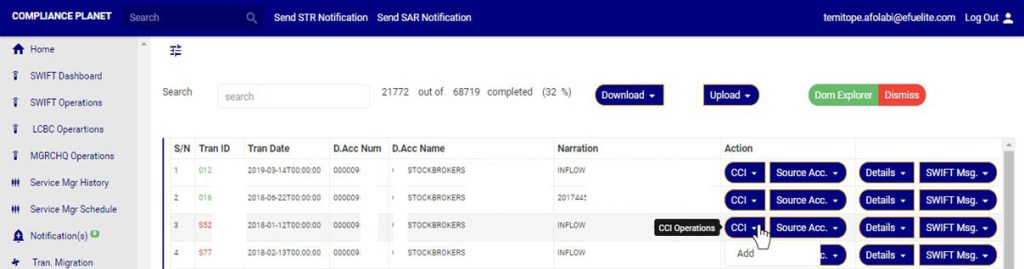
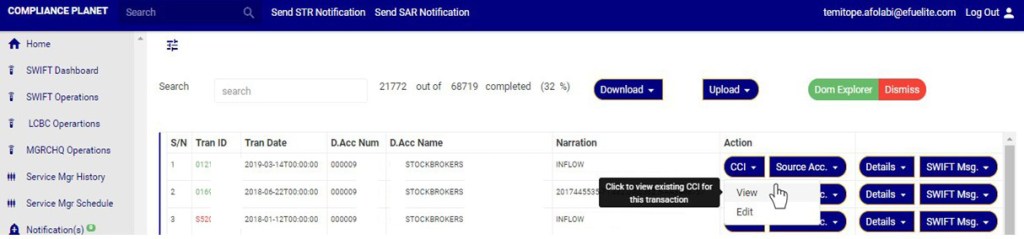
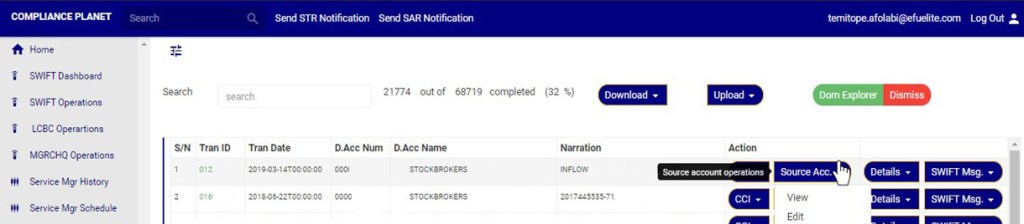
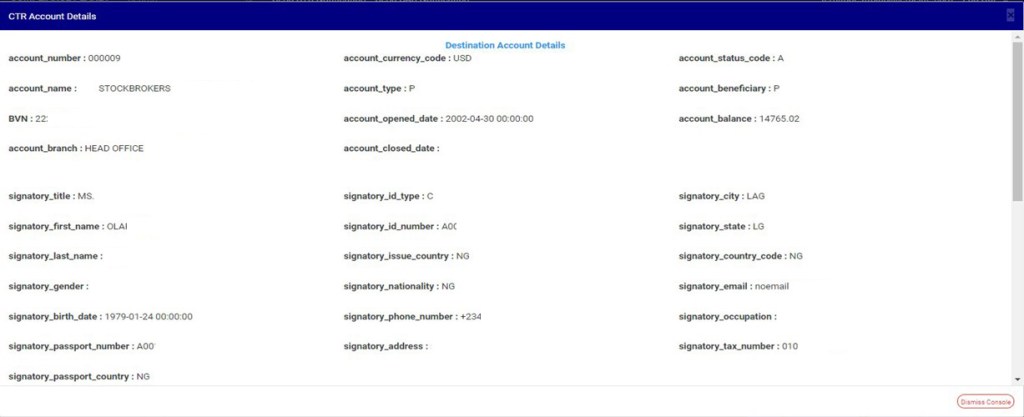
This option will be available if a Certificate of Capital Importation (CCI) has been added to the schema.
(Fig 31.2m)
(Fig. 31.2n)

(Fig. 31.2o)

(Fig. 31.2p)

(Fig. 31.2q)
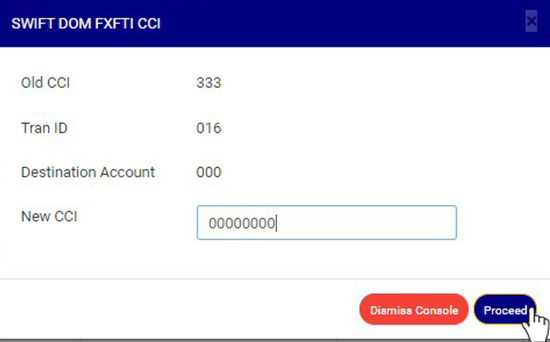
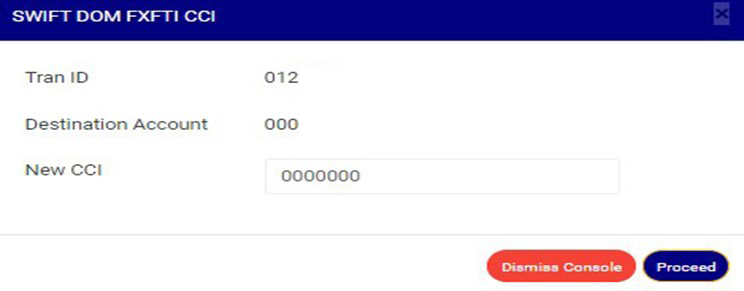
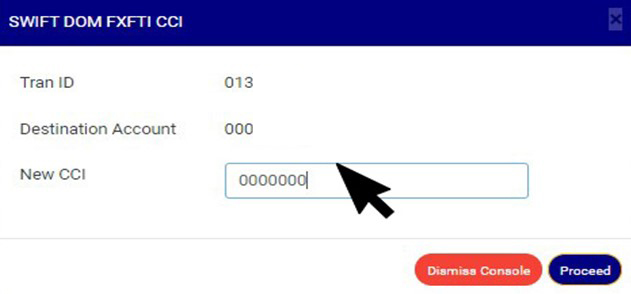
This option is will be available if a cci has been added to the Swift FXFTI transaction.
Note: Only person(s) assigned right to ‘view SWIFT DOM transactions’ and ‘Screen Edit SWIFT DOM transactions’ will be able to Edit attached CCI data
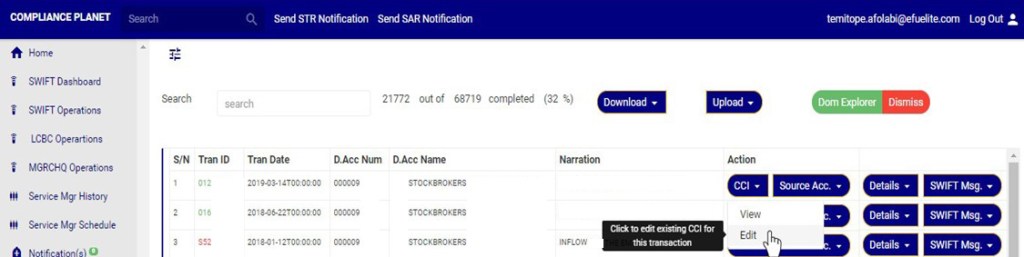
(Fig 31.2r)
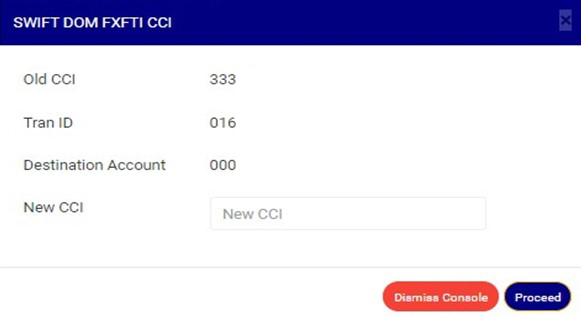
(Fig. 31.2s)
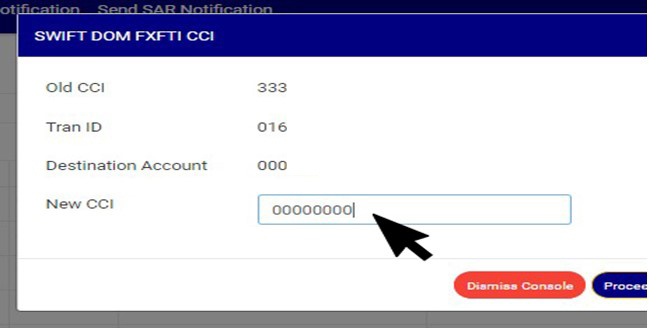
(Fig 31.2t)
(Fig. 31.2u)
(Fig. 31.2v)

(Fig. 31.2w)
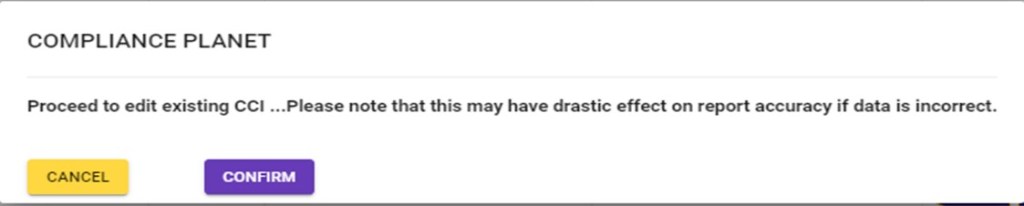
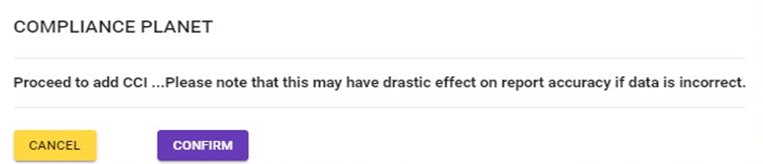
Note: Only person(s) assigned right to ‘view SWIFT DOM transactions’ and ‘Screen Edit SWIFT DOM transactions’ will be able to add CCI to a SWIFT FXFTI transaction
(Fig 31.2x)
(Fig. 31.2y)
(Fig. 31.2z)

(Fig. 31.2aa)
(Fig. 31.2ab)

(Fig. 31.2ac)
(Fig. 31.2ad)

(Fig. 31.2ae)
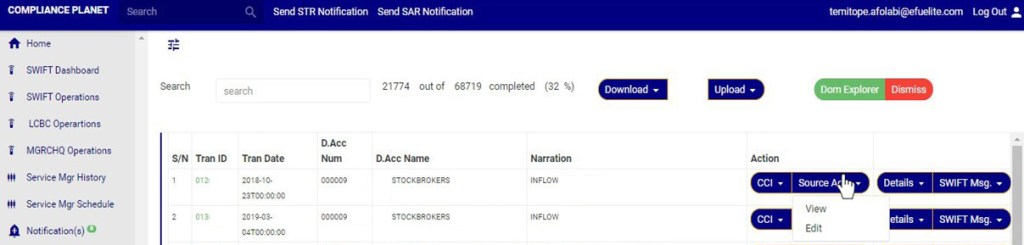
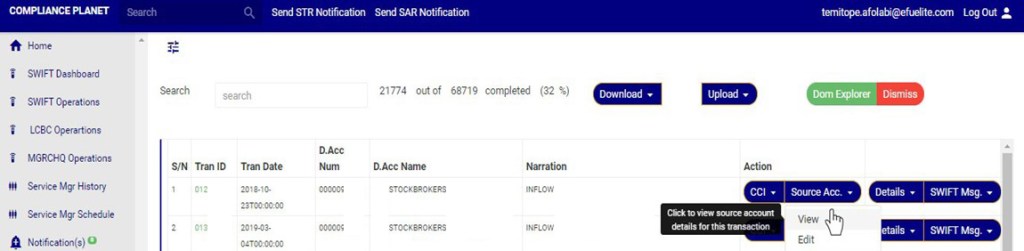
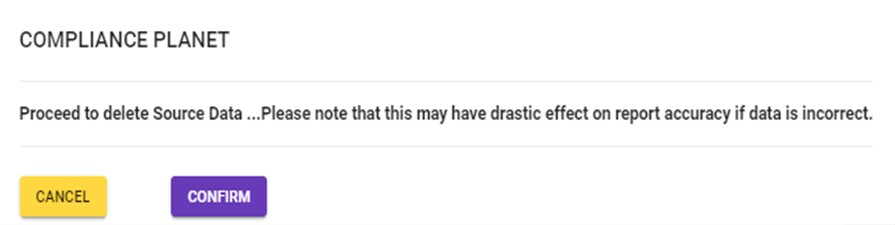
Note: Only person(s) assigned right to ‘view SWIFT DOM transactions’ and ‘Screen Edit SWIFT DOM transactions’ will be able to delete Source Account data
(Fig. 31.2af)
(Fig 31.2ag)
(Fig. 31.2ah)
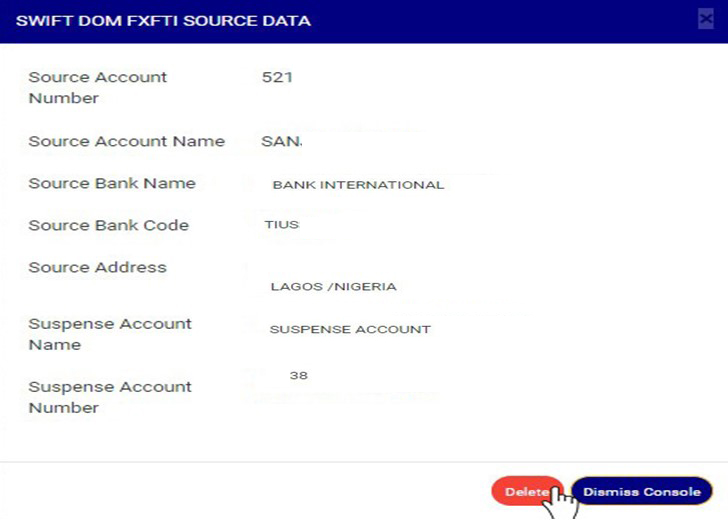
(Fig. 31.2ai)
(Fig. 31.2aj)

(Fig. 31.2ak)
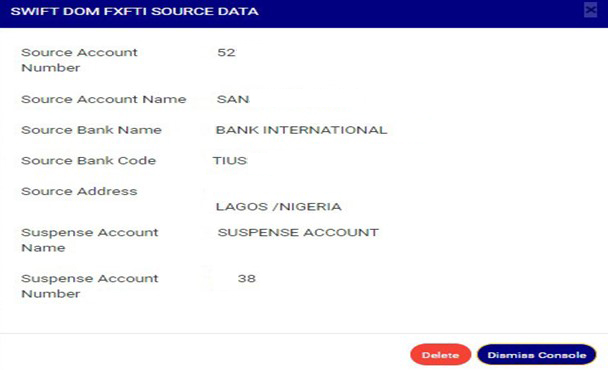
Note: Only person(s) assigned right to ‘view SWIFT DOM transactions’ and ‘Screen Edit SWIFT DOM transactions’ will be able to Edit Source Account data
(Fig 31.2al)
(Fig. 31.2am)
(Fig. 31.2an)
(Fig. 31.2ao)

(Fig. 31.2ap)
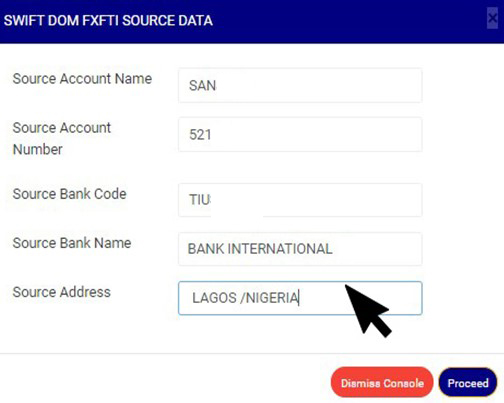
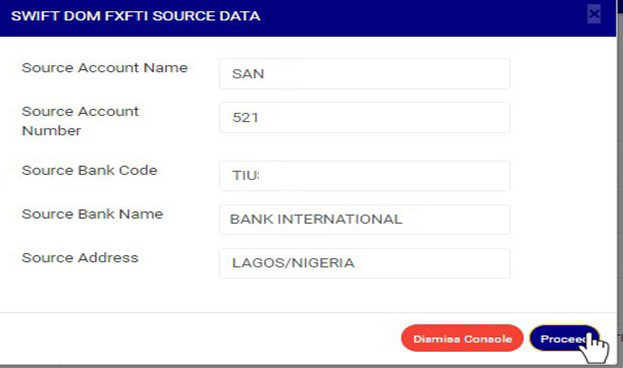
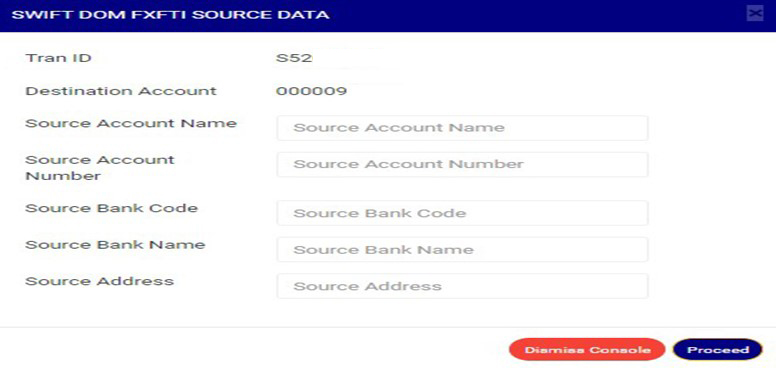
This Option is available for SWIFT FXFTI transactions with no source account data.
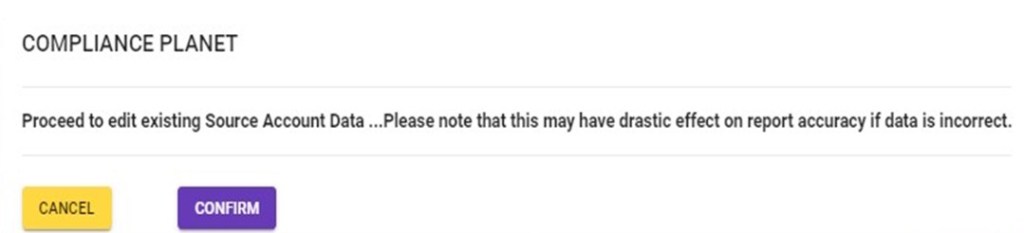
Note: Only person(s) assigned right to ‘view SWIFT DOM transactions’ and ‘Screen Edit SWIFT DOM transactions’ will be able to add Source Account data
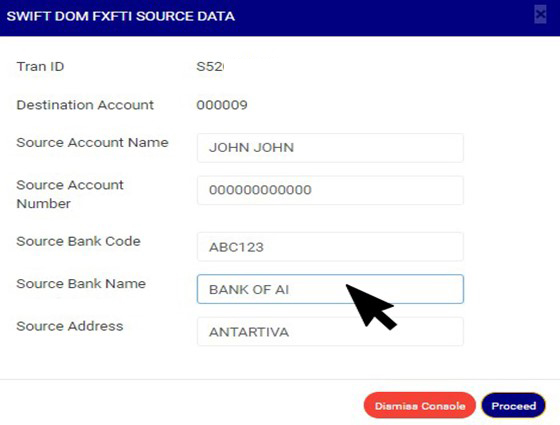
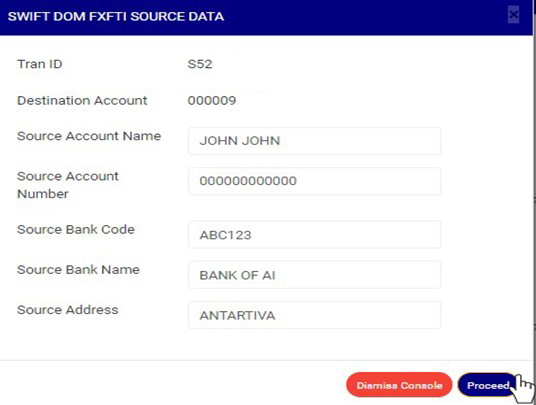
(Fig 31.2aq)
(Fig. 31.2ar)
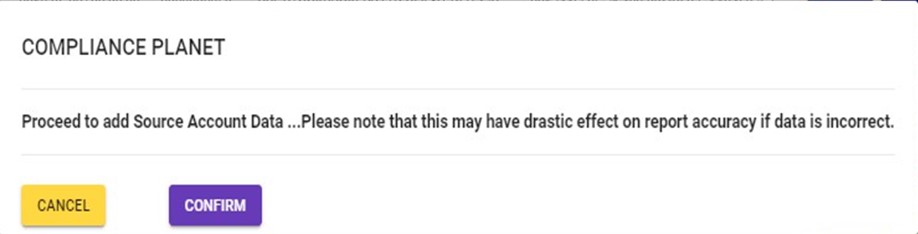
(Fig. 31.2as)
(Fig. 31.2at)
(Fig. 31.2au)

(Fig. 31.2av)
Note: You need to be assigned right to ‘view SWIFT DOM transactions’ to carry out this operations
(Fig 31.2aw)
Note: Only person(s) assigned right to ‘view SWIFT DOM transactions’ will be able to carry out this operation(s)
(Fig 31.2ax)

(Fig 31.2ay)
Note: Only person(s) assigned right to ‘view SWIFT DOM transactions’ will be able to carry out this operation(s)

(Fig 31.2az)
(Fig 31.2ba)
Note: You need to be assigned right to ‘view SWIFT DOM transactions’ to carry out this operations

(Fig. 31.2bb)
(Fig. 31.2bc)
(Fig. 31.2bd)
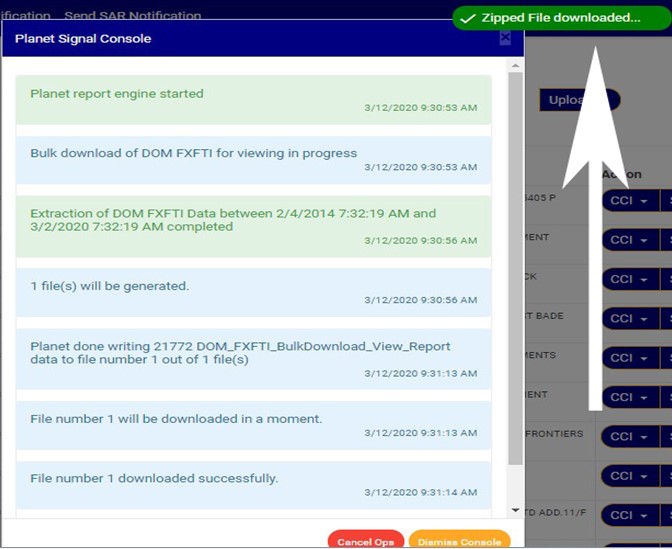
On the SWIFT FXFTI transaction list page you can make a bulk download of Foreign Exchange Foreign Transactions (FXFT) files either for viewing or editing purpose. The process is explained below
Note: You need to be assigned right to’view SWIFT DOM transactions’ and ‘Download SWIFT DOM transactions’ to carry out this operations
STEP 1: Click on the download button on the SWIFT FXFTI transaction list page. See Fig 31.3a for an example

(fig. 31.3a)

(fig. 31.3b)
STEP 2: Click on the bulk view as shown in fig 31.3c below

(fig. 31.3c)
(fig 31.3d)
➔ An excel file with details of the SWIFT FXFT transaction will be downloaded when the process is complete.
Note: You need to be assigned right to ‘view SWIFT DOM transactions’ and ‘Download SWIFT DOM transactions’ to carry out this operations
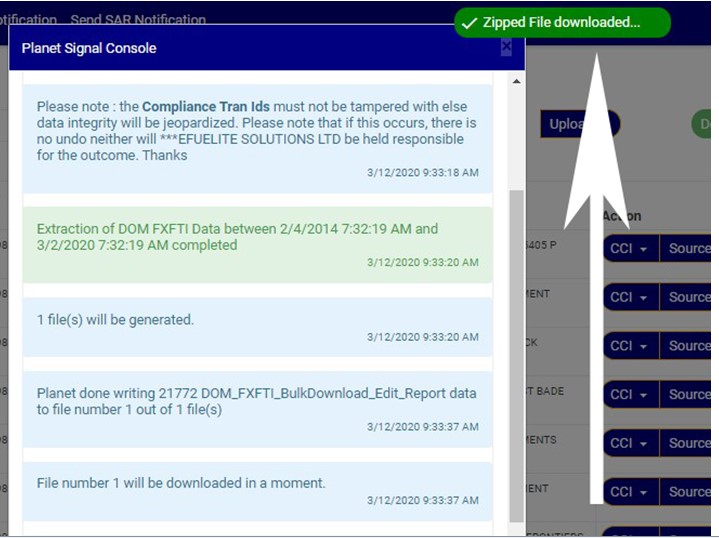
STEP 1: Click on the download button on the SWIFT FXFTI transaction page. See Fig 31.3e for an example

(fig. 31.3e)

(fig. 31.3f)
STEP 2: Click on the bulk Edit as shown in fig 31.3g below

(fig. 31.3g)
(fig 31.3h)
➔ An excel file with details of the SWIFT FXFT transaction will be downloaded when the process is complete. The data on the file when edited can be uploaded to update that record on the software using the bulk upload feature.
Note that the headings in the excel file must not be tampered with.
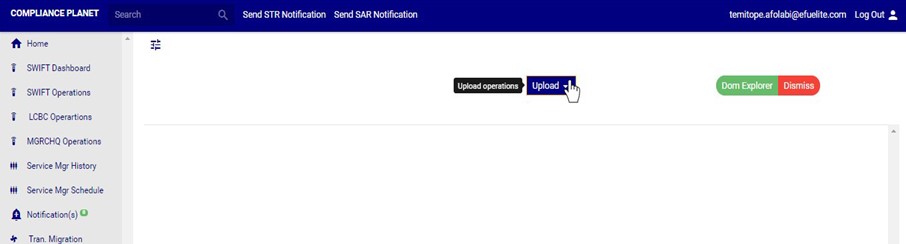
On the Swift Operations page you can make a bulk upload of Edited Swift Foreign Exchange Foreign Transactions (FXFT) files. The process is described below
Note: You need to be assigned right to ‘view SWIFT DOM transactions’ and ‘Bulk Edit SWIFT DOM transactions’ to carry out this operations
STEP 1: Click on the Upload button on the Swift Operation page. See Fig 31.3i for an example
(fig. 31.3i)
STEP 2: Click the bulk edited data as shown in fig 31.3j below
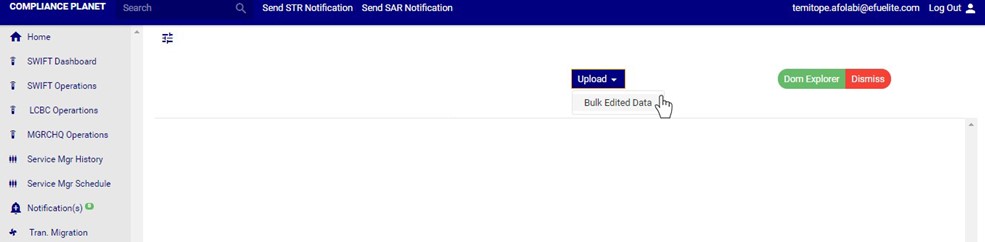
(fig. 31.3j)
(fig. 31.3k)
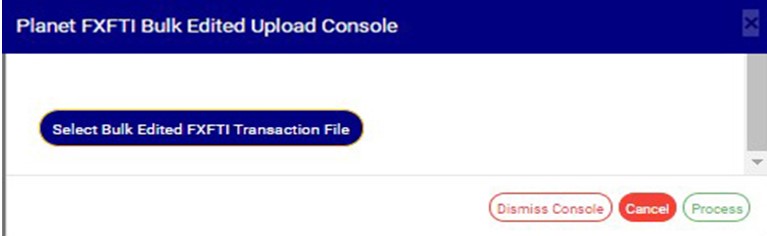
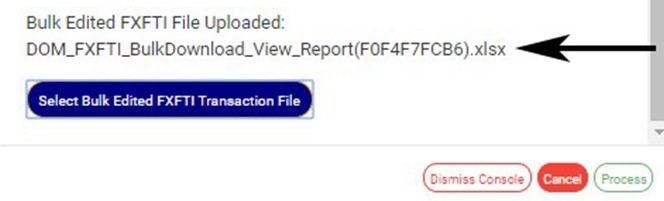
STEP 3: Click on ‘Select Bulk Edited FXFTI Transaction file’ to choose the edited transaction file you want to upload from your computer. See this in Fig 31.3l below

(fig. 31.3l)
(Fig. 31.3m)
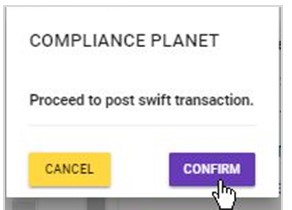
STEP 4: Click on ‘process’ button to proceed with the upload. See fig31.1fbelow to see the green button at the bottom-right corner of the console.
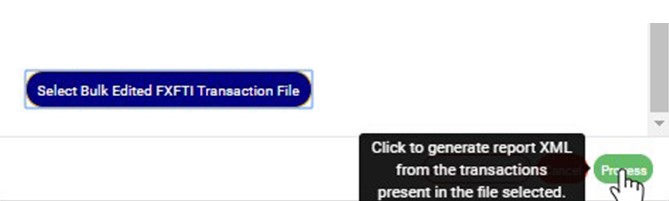
(Fig. 31.3m)
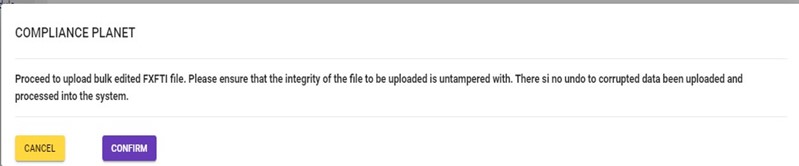
(Fig. 31.3n)
For further enquiries :
Tel +234(0) 816 555 9818
Email solutions@efuelite.com
Web http://solutions.efuelite.com
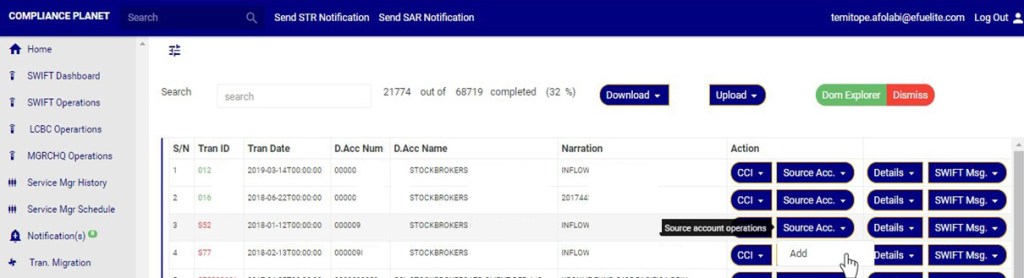
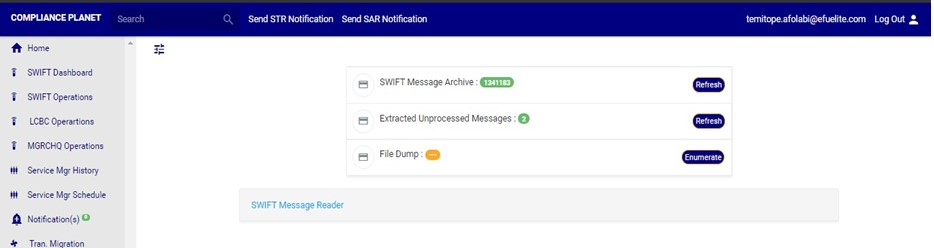
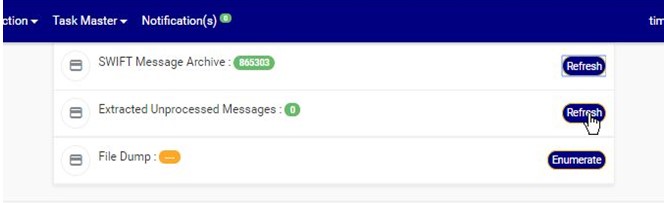
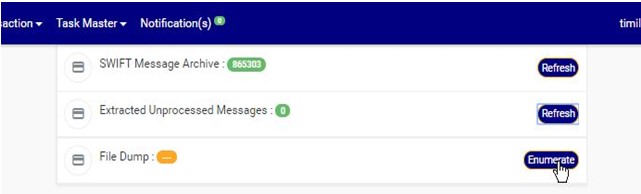
The SWIFT dashboard provides information on the number of archived messages, the number of unprocessed messages and the number of SWIFT files processed by the software on the server. Also, SWIFT messages can be translated here on this page.
Note: Only person(s) assigned right to ‘view SWIFT DOM transactions’ will be able to carry out this operation(s)
To access the Compliance Planet’s SWIFT dashboard;

(fig. 30.3a)
(fig. 30.3b)
(fig. 30.3c)
(fig. 30.3d)

(Fig. 30.3e)
(Fig. 30.3f)
(fig. 30.3g)
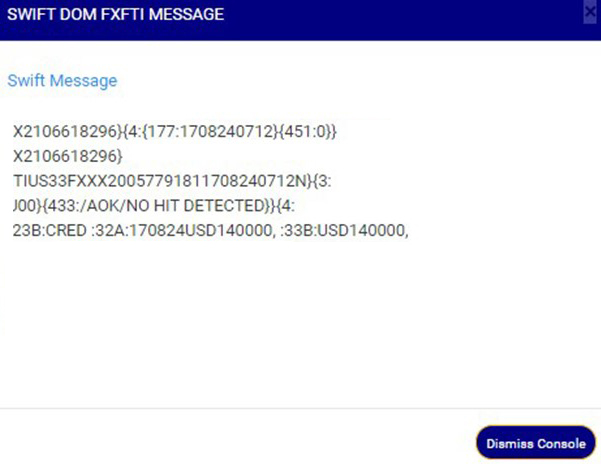
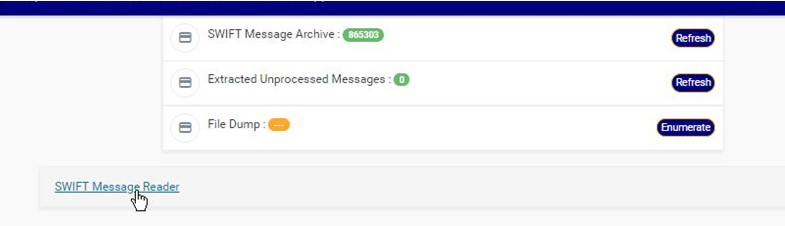
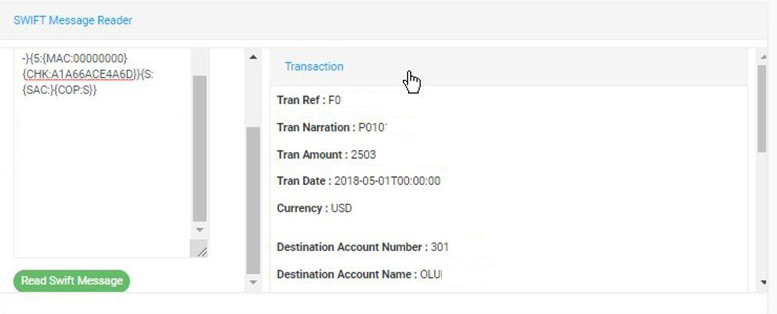
SWIFT Message types come in a format that cannot be interpreted by layman, hence the need for a SWIFT message reader (SWIFT message translator). The SWIFT console has a message reader. The Compliance Planet SWIFT message reader processes MT102 and MT103 only. These message types are category 1 messages -Customer Payments and Cheques. Here is how to translate a SWIFT message.
STEP 1: Click on ‘SWIFT Message Reader’ as in fig. 30.4a below.
(fig. 30.4a)

(fig. 30.4b)
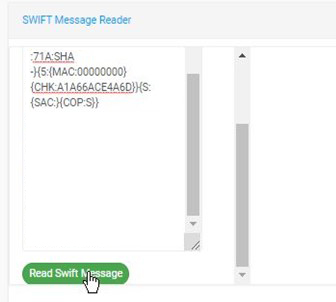
STEP 2: Paste the MT102 or MT103 message to be translated on the left side of the console. See an example in fig. 30.4c.
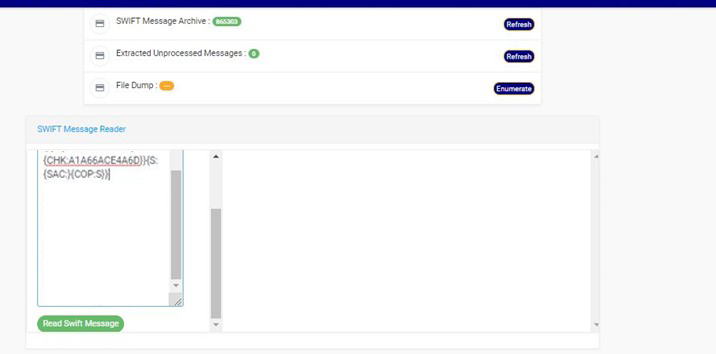
(fig. 30.4c)
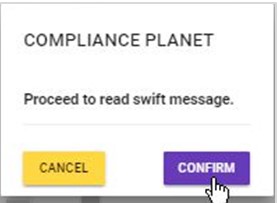
STEP 3: Click on ‘Read SWIFT Message’ as in fig. 30.4d to translate the message.
(fig. 30.4d)
(fig. 30.4e)

(fig. 30.4f)
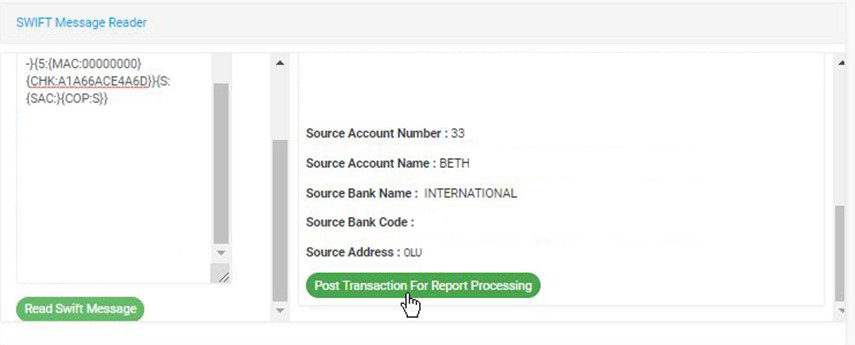
STEP 4: Click on the transaction folder(s) as in fig. 30.4g to view the message(s).

(fig. 30.4g)
(fig. 30.4h)
(fig. 30.4i)
(fig. 30.4j)

(fig. 30.4k)
For further enquiries :
Tel +234(0) 816 555 9818
Email solutions@efuelite.com
Web http://solutions.efuelite.com
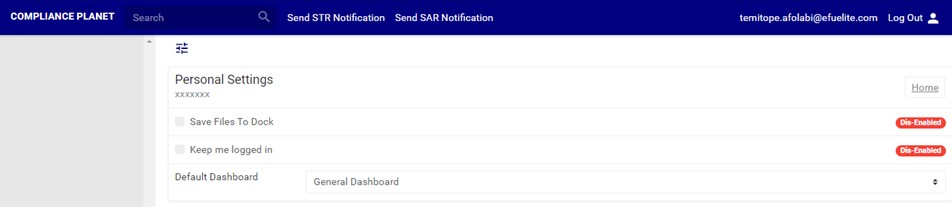
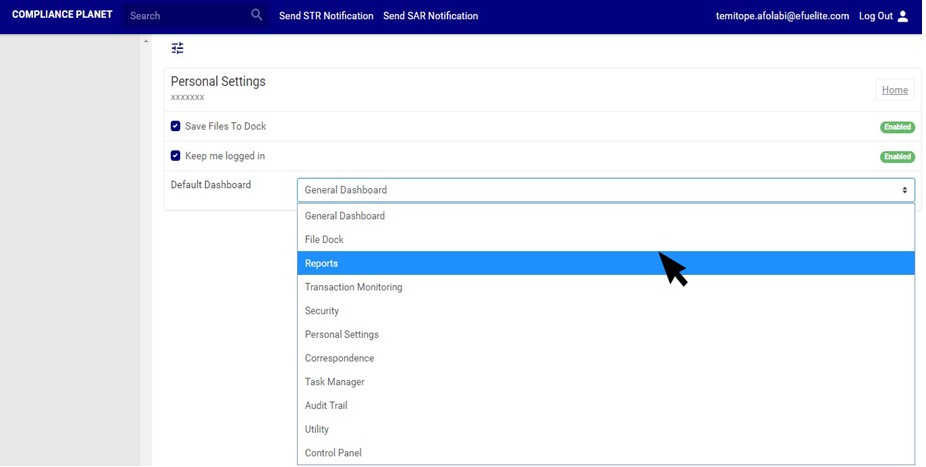
This section provides a guide on how to make personal settings on the Compliance Planet, with step-by-step instructions and pictures.
The operations available in this section pertain to;
Follow the steps outlined below to view or change your personal settings,

(fig. 29.1b)
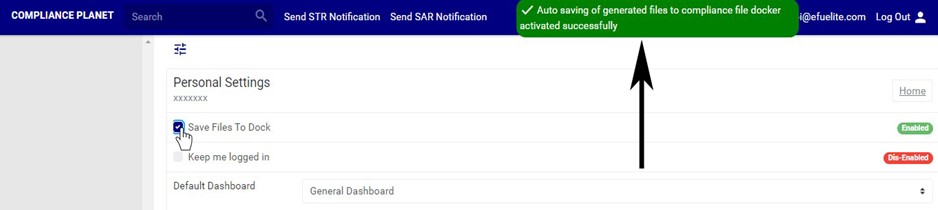
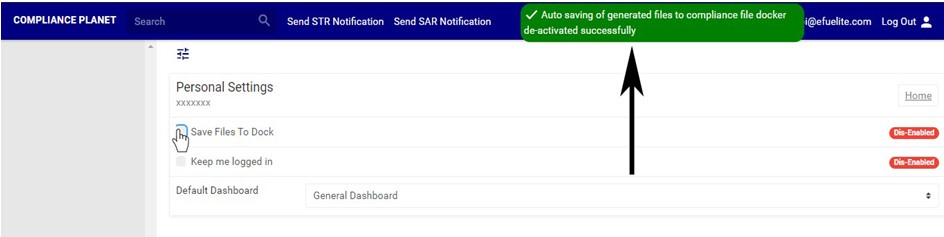
This refers to enabling or dis-enabling the auto-saving of generated files to the Compliance planet software file dock. To activate or deactivate auto-save for generated files to the file dock, click the ‘SAVE FILES TO FILE DOCK’ checkbox.
(fig. 29.2a)
(fig. 29.2b)
This refers to enabling or dis-enabling the automatic login of your account credentials on the Compliance Planet. To activate or deactivate the automatic login of your account whenever you open the Compliance Planet on your computer, click on the ‘KEEP ME LOGGED IN’ checkbox.
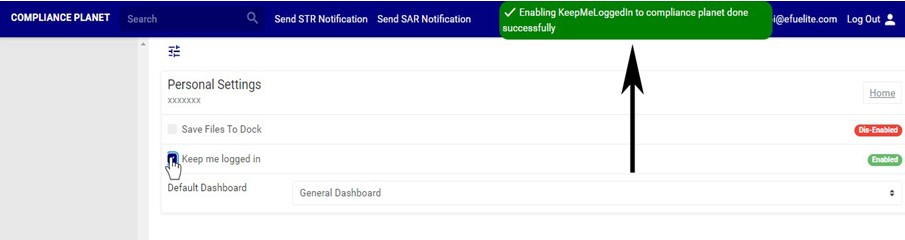
(fig. 29.3a)
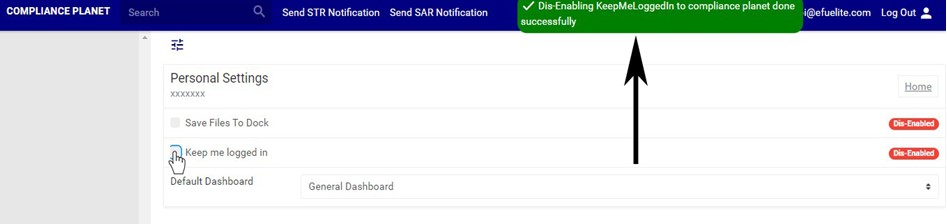
(fig. 29.3b)
(fig. 29.3c)
For further enquiries :
Tel +234(0) 816 555 9818
Email solutions@efuelite.com
Web http://solutions.efuelite.com
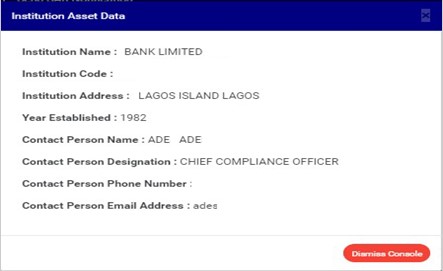
In this section, Institution asset data includes the name of the institution, the institution code, address, year of establishment and contact person details. This section provides a guide on how to perform operations as regards institution asset data on the Compliance Planet, with step-by-step instructions and pictures.
To view the institution asset data;
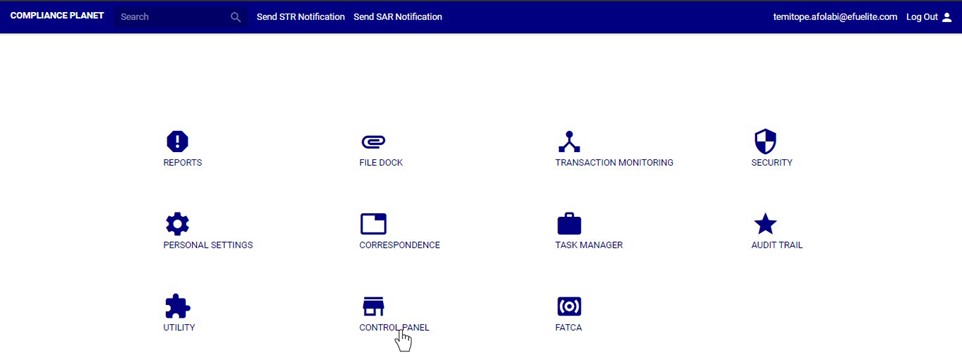
STEP 1: From the main dashboard, click ‘CONTROL PANEL’ as in fig 27.1a below
(fig. 27.1a)
STEP 2: Click on ‘INSTITUTION ASSET DATA VIEW’ on the left hand side menuas in fig. 27.1b below.
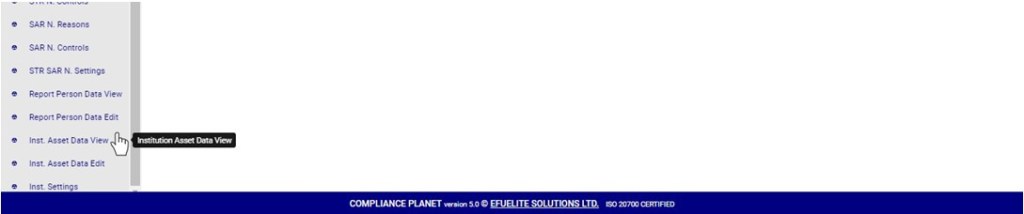
(fig. 27.1b)
(fig. 27.1c)
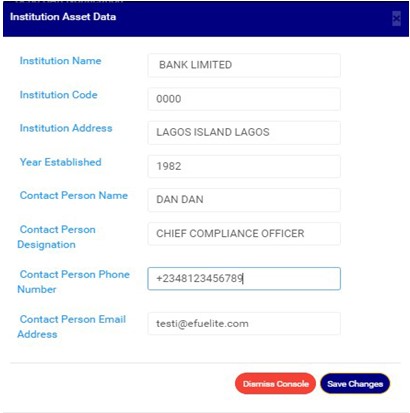
To make changes to the institution asset data,
STEP 1: From the left hand side menu, click on ‘INSTITUTION ASSET DATA EDIT’ as in fig 27.2a below.

(fig. 27.2a)
(fig. 27.2b)
STEP 2: Click on ‘Save Changes’ as shown in fig. 27.2c to save the changes or click on ‘Dismiss console’ to discard changes or new details entered on the console.

(fig. 27.2c)

(fig. 27.2d)
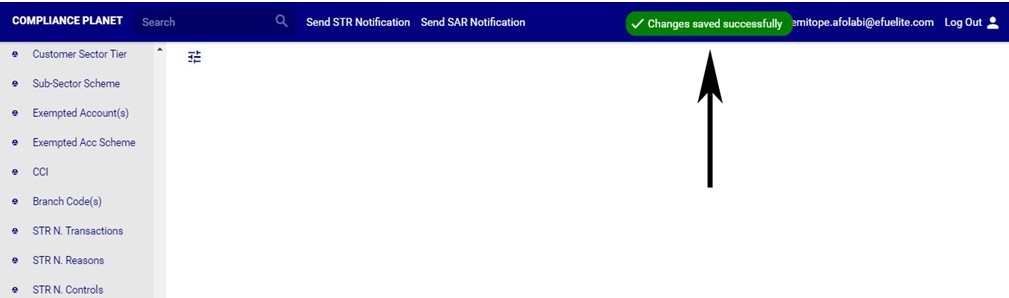
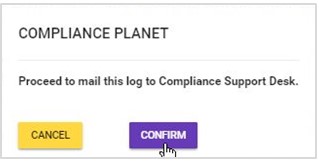
STEP 3: Click on ‘CONFIRM’ to proceed or ‘CANCEL’ to discontinue. A notification as in fig. 21.2e below will be displayed at the top of the page when the operation is complete.
(fig. 27.2e)
For further enquiries :
Tel +234(0) 816 555 9818
Email solutions@efuelite.com
Web http://solutions.efuelite.com
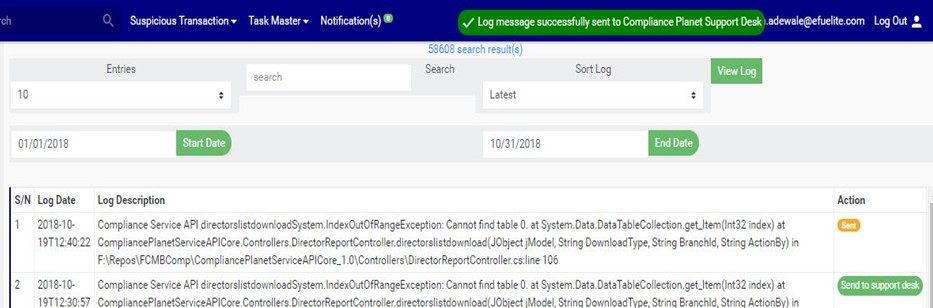
The Action log provides a list of activities or actions that were carried out successfully and completed on the Compliance Planet software in chronological order at any time. Here is how to view an action log for any period of time.
NOTE: Only the Supreme Administrator can carry out this operation
STEP 1: Click on ‘Action log’ on the audit trail page as in fig. 28.4a

(fig. 28.4a)

(fig. 28.4b)

(fig. 28.4c)
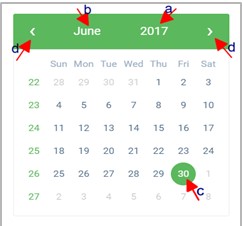
STEP 2: Click on the ‘Start Date’ button. This will display a calendar below the date. See fig. 28.4d for an example.
(fig. 28.4d)

(fig. 28.4e)
STEP 3: Click on the ‘End Date’ button to specify the end date. This displays a calendar below the date box. See fig. 28.4f for an example.
(fig. 28.4f)
STEP 4: Click on ‘View Log’ as in fig. 28.4g to view the services.

(fig. 28.4g)
(fig. 28.4h)

(fig. 28.4i)
(fig. 28.4j)

(fig. 28.4k)

(fig. 28.4l)
For further enquiries :
Tel +234(0) 816 555 9818
Email solutions@efuelite.com
Web http://solutions.efuelite.com
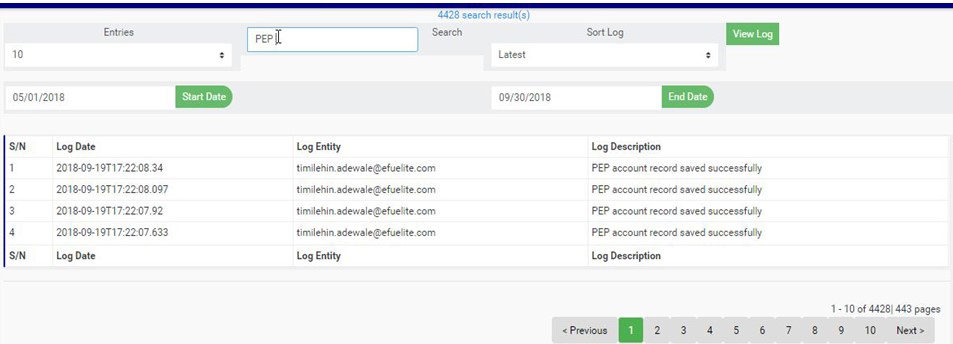
The service log keeps a record of the Compliance Planet software services forming a logical path linking a sequence of operations on the software. The service log provides a list of services that have affected an operation in a sequential order. It is used to trace the services that have affected the contents of a record.
NOTE: Only the Supreme Administrator can carry out this operation
Here is how to view a service log;
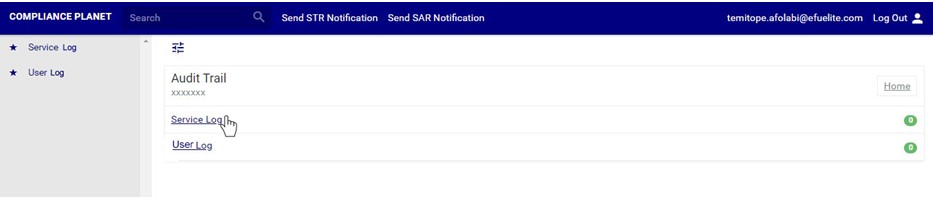
STEP 1:From the main dashboard, click ‘AUDIT TRAIL’ as shown in fig 28.2a below
(Fig 28.2a)

(fig. 28.2b)
STEP 1: Click on ‘Service log’ on the audit trail page as shown in fig.28.3a. below.
(fig. 28.3a)

(fig. 28.3b)

(fig. 28.3c)
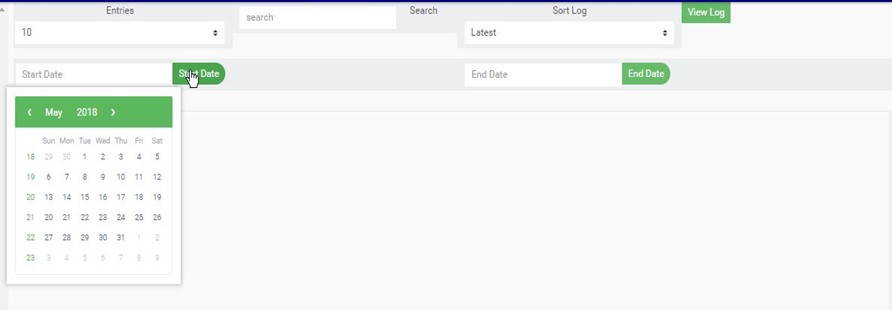
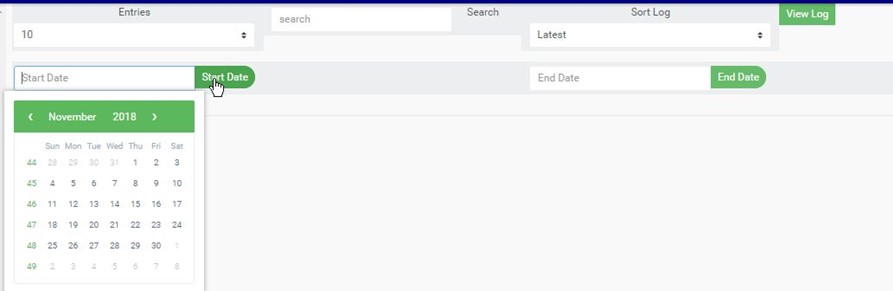
STEP 2: Click on the ‘Start Date’ button this displays a calendar just below the date box. See fig. 28.3d for an example.
(fig. 28.3d)
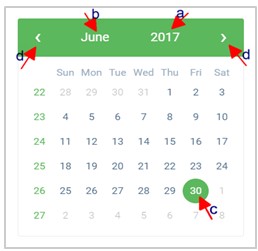
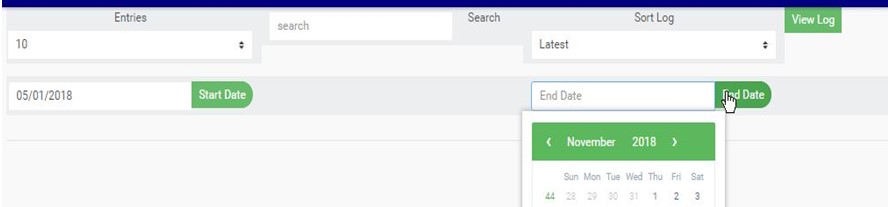
STEP 3: Click on the ‘End Date’ button to specify the end date, this also displays a calendar below the date box. See fig. 28.3f for an example.
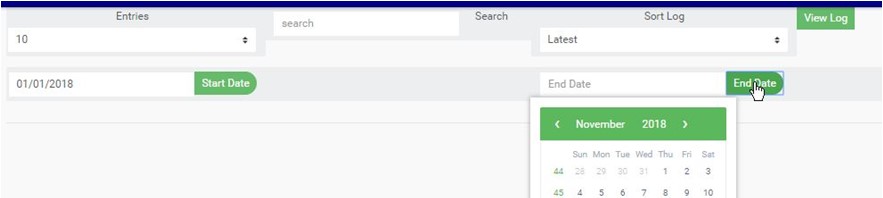
(fig. 28.3f)
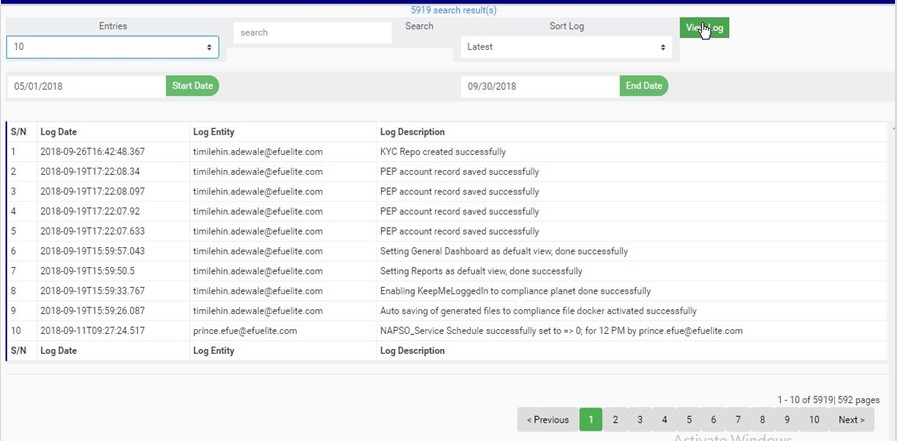
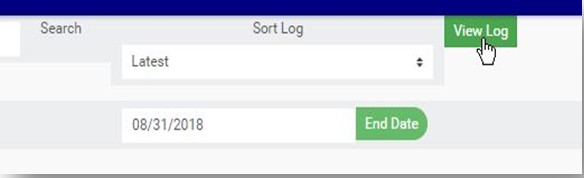
STEP 4: Click on ‘View Log’ as in fig. 28.3g below to view the services.
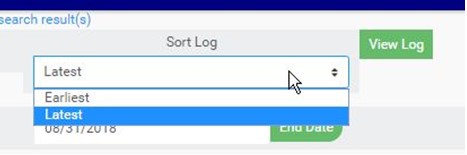
(Fig. 28.3g)

(fig. 28.3h)
(fig. 28.3i)

(fig. 28.3j)
(fig. 28.3k)

(fig. 28.3l)

(fig. 28.3m)
(fig. 28.3n)
.
(fig. 28.3o)
For further enquiries :
Tel +234(0) 816 555 9818
Email solutions@efuelite.com
Web http://solutions.efuelite.com
This section provides a guide on how to view the Audit trail, that is, the track of services or actions on the Compliance Planet, with step-by-step instructions and pictures.
An audit trail is a record that provides a documentary evidence of the sequence of activities, processes and services that have affected a specific operation or procedure on the Compliance Planet at any time in a chronological order. This record of system activities and services enables the reconstruction and examination of the sequence of events and operations on the planet and/or changes.
The audit trail menu houses features that provide information on the occurrence of the compliance planet services and significant actions carried out successfully on the compliance planet. The audit trail section comprises of;
NOTE: Only the Supreme Administrator can carry out this operation
To get an audit trail,

(Fig 28.2a)

(fig. 28.2b)
For further enquiries :
Tel +234(0) 816 555 9818
Email solutions@efuelite.com
Web http://solutions.efuelite.com
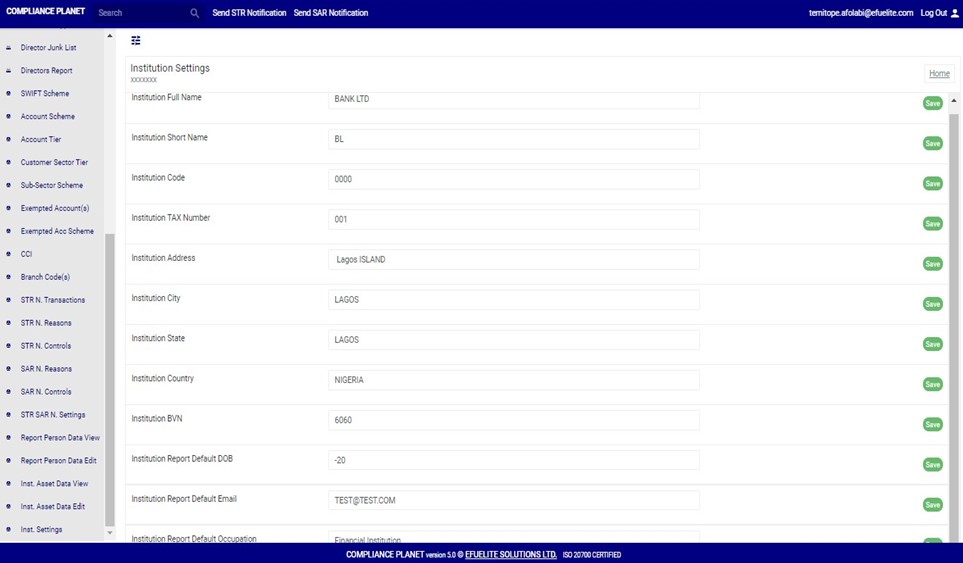
In this section you can edit the bio-data of the institution, this includes; the full and short name of the institution, the institution code, tax number, Bvn,address, year of establishment, default email and default occupation. This section provides a guide on how to perform operations as regards institution settings on the Compliance Planet, with step-by-step instructions and pictures.
NOTE: Only the Supreme Administrator can carry out this operation
STEP 1: From the main dashboard, click ‘CONTROL PANEL’ as in fig 27.3a below
(fig. 27.3a)
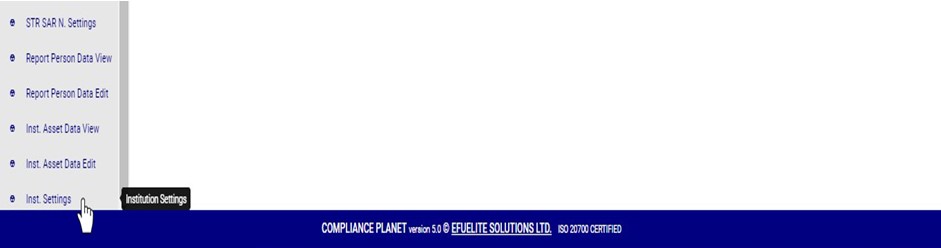
STEP 2: Click on ‘INSTITUTION SETTINGS’ on the left hand side menuas in fig. 27.3b below.
(fig. 27.3b)
(fig. 27.3c)
STEP 3: Click on any of the textboxes to edit it. See an example in fig. 27.3d below.

(fig. 27.3d)
STEP 4: Click on the green “SAVE” button at the right end of the row to update that specific field. See an illustration in fig. 27.3e below.
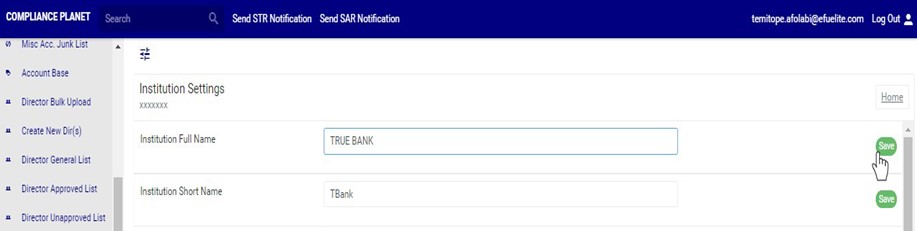
(fig. 27.3e)

(fig. 27.3f)
For further enquiries :
Tel +234(0) 816 555 9818
Email solutions@efuelite.com
Web http://solutions.efuelite.com
