How to Carry Out Policy Listing on Customer Risk Assessment in Compliance Planet Anti Money Laundering/Core Banking Finance Software

STEP 1: From app dashboard, click “CUSTOMER RISK ASSESSMENT” as in the image below.

The above action will display a page as seen in the image below.

STEP 2: Click “POLICIES” to display the policy list as shown below.

Entries: Number of records to see on a page.

View Type: This option allows you to switch between active and inactive policies.

Search: This helps you search for a specific policy.

When any of the above filters is changed, click on the View button to see the result.

The data representation of the table columns is explained below;

Name: The name of the policy.

Risk level: The risk level of the policy.

Account: The number of accounts picked by the policy.

Status: The status of the policy(active or inactive).

There are three action buttons on each row with different functions as explained below;

Details: This displays all the parameters entered during policy creation. To edit these parameters, you must reset the policy.

Duplicate: This allows you to make a copy of the policy. The copy becomes inactive and is added to the inactive list.

Reset: This deletes all the records that the policy has picked.

For further enquiries: 
Tel: +234(0) 816 555 9818
Email: solutions@efuelite.com 
Web: http://solutions.efuelite.com

How to Create Customer Risk Assessment Policy In Compliance Planet Anti Money Laundering/Core Banking Finance Software

STEP 1: From the app dashboard, click “CUSTOMER RISK ASSESSMENT” as in image below.

The above action will display a page as seen in the image below.

STEP 2: Click “NEW POLICY” as in the image below.

STEP 3: Fill in the details as seen in the image above.

There are eight stages in creating a customer risk assessment Policy.

  1. On stage 1, fill in the basic details of the policy (Policy name and description) as displayed in the image below.
  2. On stage 2 to stage 5, activate the desired risk rating nodes and set their risk rating score as displayed in the images.

STEP 6: This stage enables you to add users who will receive policy alert notifications for the policy you created, as shown in the image below.

STEP 7: This stage allows you to activate or deactivate the policy.

STEP 8: This stage displays the summary of the policy, which includes:

  1. The policy score that the system automatically calculates across all active nodes of the policy.
  2. The policy risk level.
  3. The policy status (Active or inactive).
  4. The active nodes (these are nodes that were activated between stages 2 and 5).
  5. The inactive nodes (These are nodes that were not activated between stage 2 and stage 5).

For further enquiries: 
Tel: +234(0) 816 555 9818
Email: solutions@efuelite.com 
Web: http://solutions.efuelite.com

How to Set the Global Risk Rating Levels on Customer Risk Assessment in Compliance Planet Anti Money Laundering/Core Banking Finance Software

The risk rating panel helps to set the Global risk rating on the software.

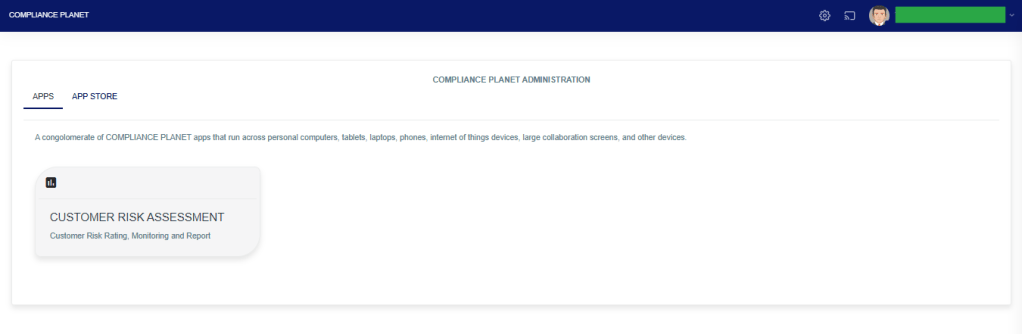
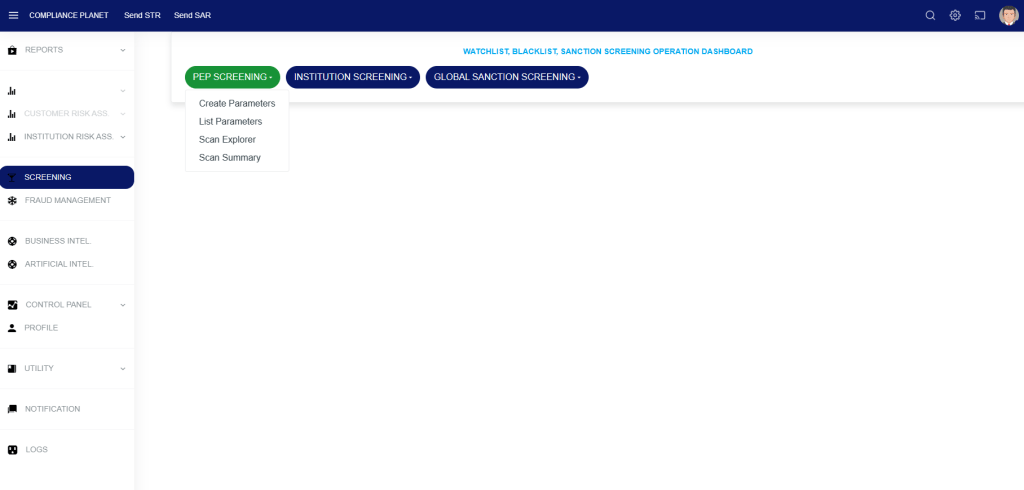
STEP 1: From the app dashboard, click “CUSTOMER RISK ASSESSMENT” as in the image below.

The above action will display a page as seen in the image below.

STEP 2: Click on “RISK LEVEL PANEL” as in the image below.

Enter the risk rating for the various risk rating level. This includes the lower bound and Upper bound for the various risk rating levels.

  1. The lower bound for the low risk level must be 1.
  2. The upper bound for the high risk level must be 100.
  3. Every other bound across the different risk rating levels must be consecutive. i.e If the upper bound for the low risk level is 39, then the lower bound for the medium risk level must be 40. If the upper bound for the medium risk level is 69, then the lower bound for the high risk level must be 70.

Click on the “Save” button to save the risk rating.

For further enquiries: 
Tel: +234(0) 816 555 9818
Email: solutions@efuelite.com 
Web: http://solutions.efuelite.com

How to Carry Out Manual Risk Rating Operation On Customer Risk Assessment In Compliance Planet Anti Money Laundering/Core Banking Finance Software

The manual Risk rating helps to manually risk rate an account of a customer either as a high , medium or low risk.

STEP 1: From the app dashboard, click on “CUSTOMER RISK ASSESSMENT” as in the image below.

The above action will display a page as seen in the image below.

STEP 2: Click on “MANUAL RISK RATING” as in the image below.

  1. Enter the customer’s account number in the “Account Number” field. This must be a valid account number in the system.
  2. Click on the “Risk Level” drop-down and select the desired risk level (High, Low or Medium).
  3. Click on the “Save” button.

For further enquiries: 
Tel: +234(0) 816 555 9818
Email: solutions@efuelite.com 
Web: http://solutions.efuelite.com

Data Upload for Automatic Scanning in Compliance Planet Anti Money Laundering/Core Banking Finance Software for Political Exposed Persons (PEP)

The bulk upload helps in uploading more than one scan parameter into the system for the automatic scan.

Note: This operation requires the Administrator or Auditor’s permission.

How to Prepare the Scan Parameters in an Excel File

STEP 1: Open an excel sheet as seen in the image below. This must be the first sheet(Sheet1) in the excel workbook.

STEP 2: Fill in the scan parameters in the first column (column A) as seen in the image below.

The excel sheet should not have column names(Start inputting the scan parameters from row 1).

These scan parameters can be either a name, phone number, email address, ID Number, or BVN.

Note: The first, last and middle name must be in the same column with a space in between them (Column A).

STEP 3: Fill in the scan parameter category in the second column (column B) as seen in the image below.

The software accepts four different parameter categories(Name, Email address, Phone Number, ID Number, and BVN).

1. When a scan parameter is a name, the category should be NAME

2. When a scan parameter is a phone number, the category should be PHONE

3. When a scan parameter is an email address, the category should be EMAIL

4. When a scan parameter is a BVN, the category should be BVN

5. When a scan parameter is an ID Number, the category should be ID

STEP 4: Fill in the REASON for the data upload in the third column (column C) as seen in the screenshot below. This can be “PEP”, “WATCHLIST” etc.

STEP 5: Fill in the PEP Status in the fourth column (column D) as seen in the screenshot below. This column is optional.

Save the excel file and proceed to the Compliance Planet AML software.

How to Upload the scan parameters in the Compliance Planet Software

STEP 6: From the left-hand side menu, click “SCREENING” as seen below.

STEP 7: From the top menu, click “PEP Screening”, this action will display a dropdown menu as seen in the image below. From the dropdown menu, click “Create Parameters”.

STEP 8: On the NEW SCREENING PARAMETERS page, click on the “Bulk Upload” button to select the excel file which you have earlier filled with the scan parameters.

STEP 9: Click on the Save button.

STEP 10: Click on the CONFIRM button to begin the upload process.