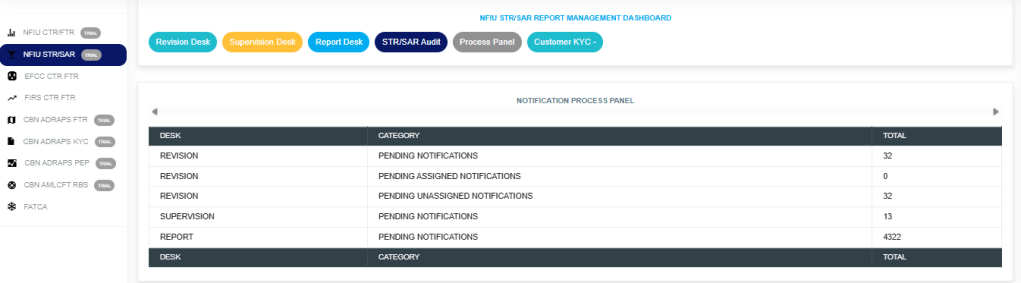
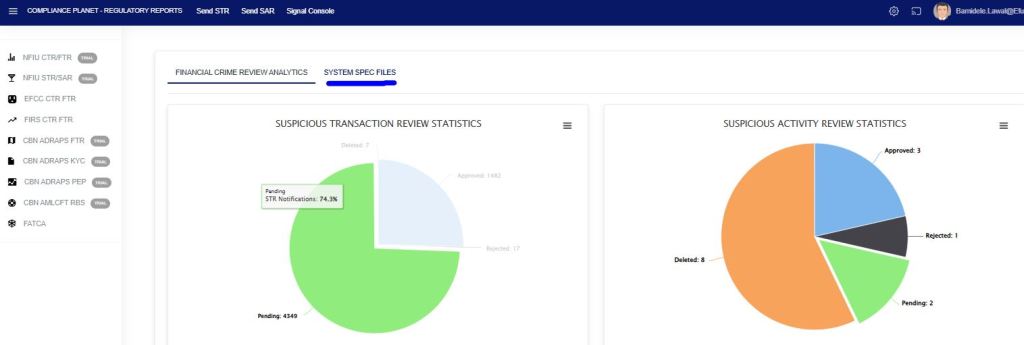
The STR/SAR notification process panel gives information about Pending Notifications (i.e. notifications that are yet to be attended to) on STR/SAR revision, supervision and report desk.
Note: Only persons assigned right(s) to ‘view STR/SAR reports’ will be able carry out this operation.
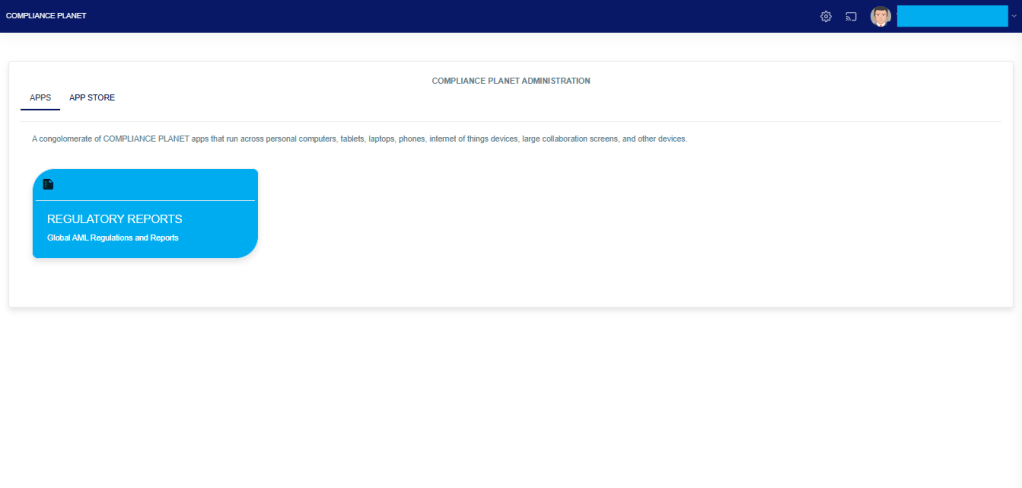
From the app dashboard, click on “REGULATORY REPORTS” as displayed in the image below.
This will display a drop-down, as shown in image below. The drop-down menu lists the report types available on the Compliance Planet software.
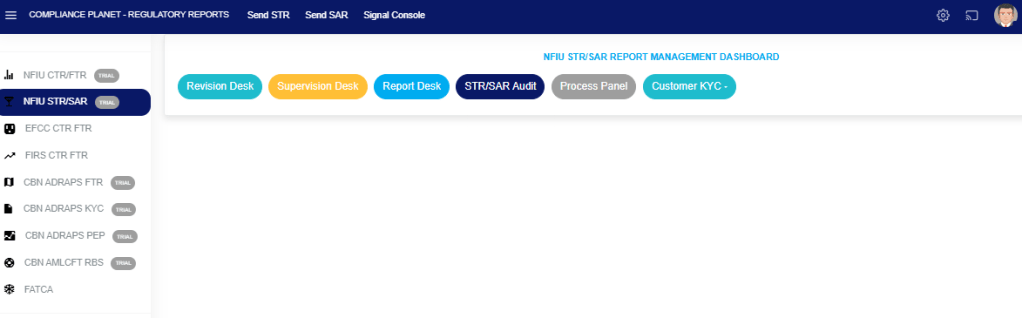
Click ‘NFIU STR/SAR’ on the drop-down list and display the STR/SAR page as displayed in the image below.
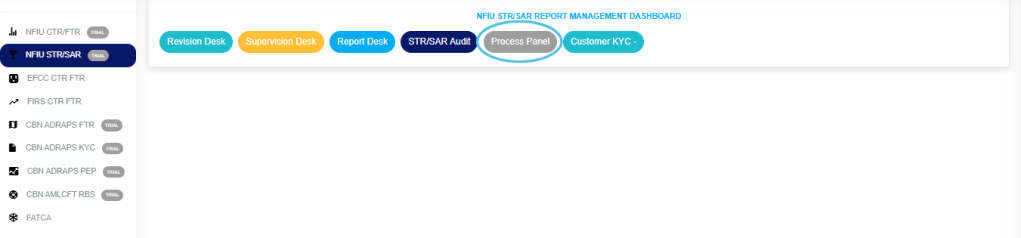
STEP 1: From the top menu, Click “Process Panel” as in the image below.
The above action will display the Notification Process Panel Page as shown below.
On the page the software gives information of total revision desk pending Notifications, revision desk pending assigned notifications, revision desk pending assigned notifications, supervision desk pending notifications and reporting desk pending notifications.
The ‘APPROVED LIST’ page provides a list of all corporate account directors’ information that have been verified and approved by the financial institution .Here also; details of corporate account director can be viewed, edited, deleted and disapproved, either individually or in bulk. Here are steps on how to make use of the features on the Approved list page.
NOTE: Only person(s) profiled as deputy Admin will be able to carry out this operation.
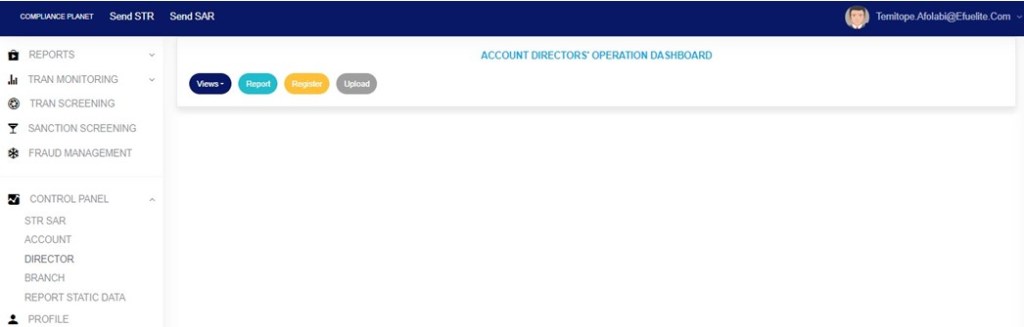
From the left hand side menu, Click ‘Control panel’ as in fig. 10.1a.
Fig 10.1a
This will display a drop down as in Fig 10.1b below.
Fig 10.1b
Click ‘DIRECTOR’ on the drop down list. See an example in Fig 10.1c below.
Fig 10.1c
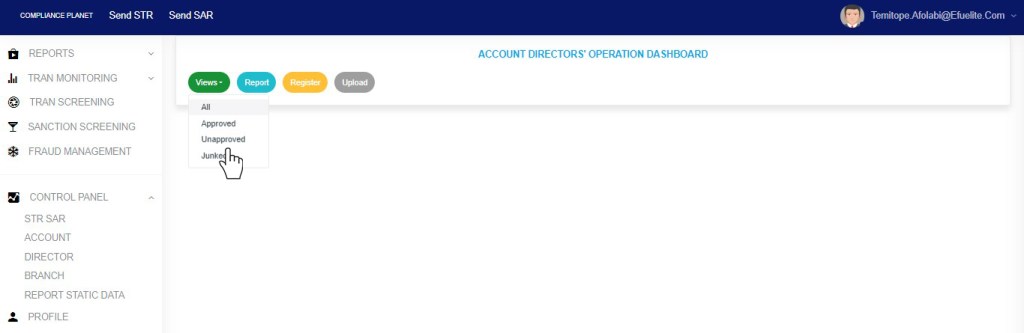
This will display the ACCOUNT DIRECTORS OPERATIONS dashboard as in Fig 10.1d below
Fig 10.1d
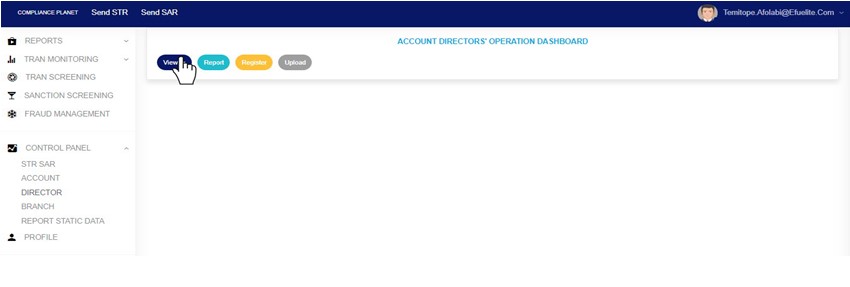
From the top menu, Click ‘View’ as shown in fig. 10.5a below
(fig. 10.5a)
This will display a dropdown as in fig 10.5b below
STEP 2: Click “Approved” from the drop-down list as in fig 10.5b below
Fig 10.5b
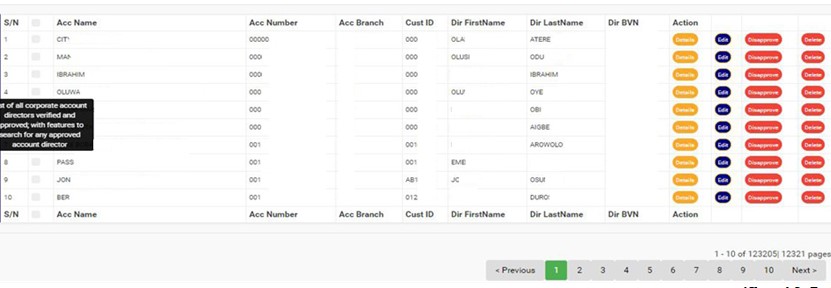
This will display a page listing out the director information that has been verified and approved. See fig. 10.5c below for an example.
(fig. 10.5c)
At the bottom-right corner of the page, the software gives information about the number of pages of the approved director list, with the page numbers written out. The page numbers are buttons to go to each page. By clicking on any page number, the software takes you to that particular page. Click on ‘NEXT’ to go to the next page or click on ‘PREVIOUS’ to go to the page before the current page.
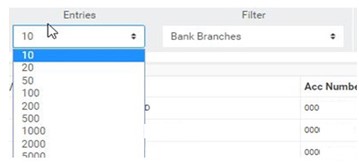
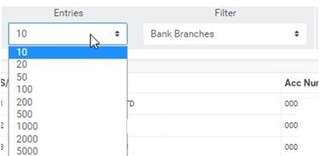
Adjust the number of approved account directors you want to see per page by clicking on the ENTRIES box as in fig. 10.5d below.
(fig. 10.5d)
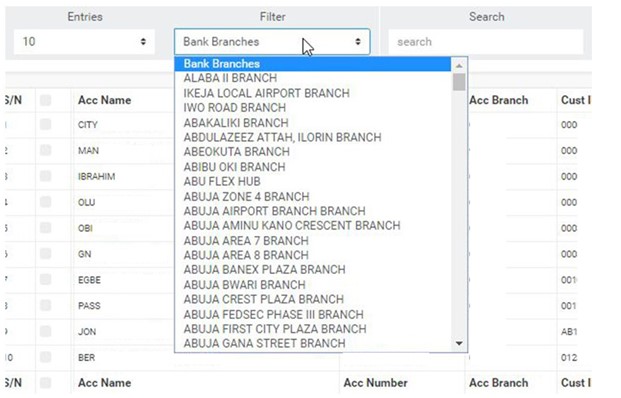
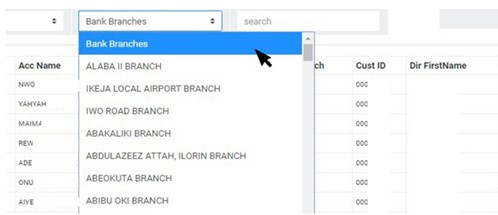
To see approved director information of corporate accounts for any of the branches, select the branch name from the filter box as seen in fig. 10.5e below. The default list is always for all branches of the institution.
(fig. 10.5e)
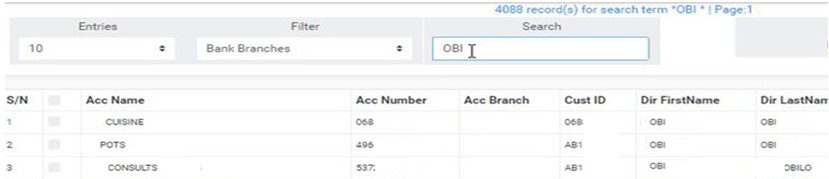
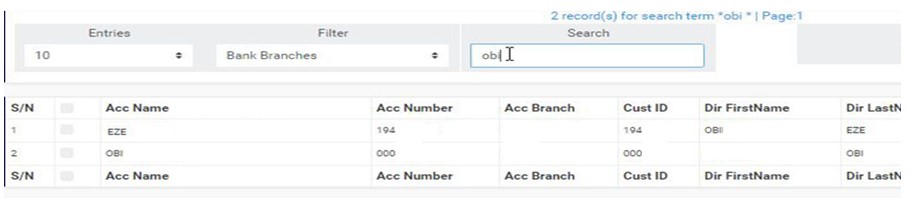
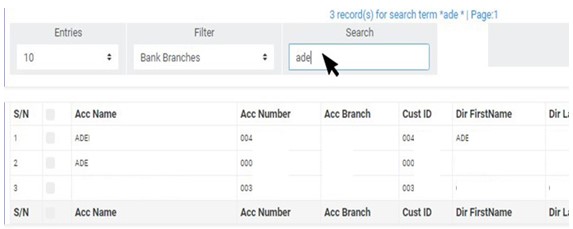
Search for a corporate account director information by the account name, account number, director’s first name, last name or director’s BVN in the search box. See an example of a search in fig. 10.5f below. Search results will appear as you type in the search box.
(fig. 10.5f)
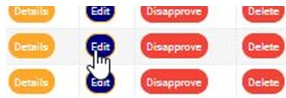
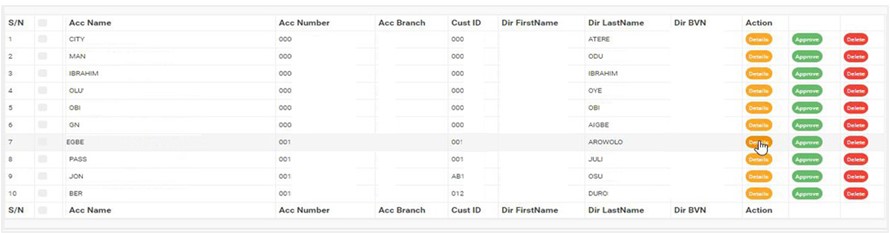
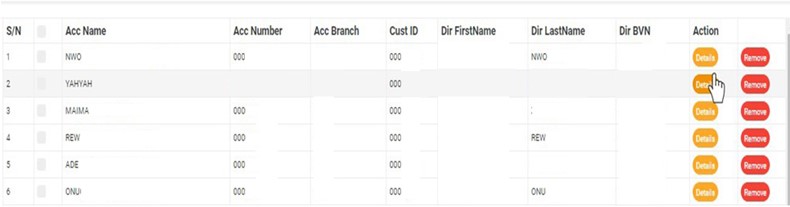
On this page, each director information on the list has four (4) action buttons. These buttons are used for individual operations of the respective director information in the list. They are;
‘DETAILS’ button,
‘EDIT’ button
‘DISAPPROVE’ button and
‘DELETE’ button
Here is how to make use of the action buttons.
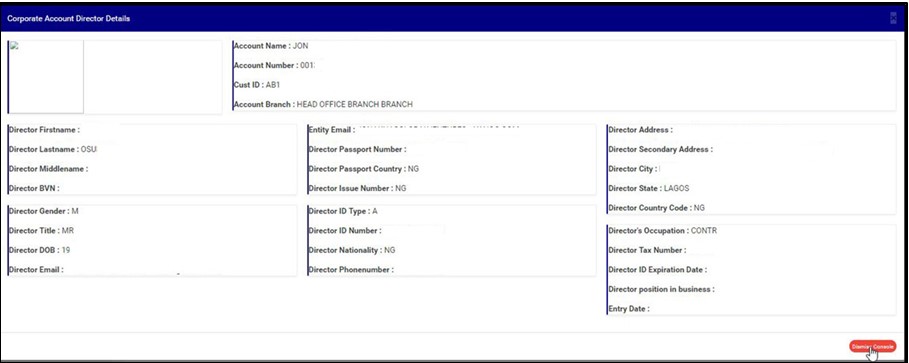
Click on ‘DETAILS’ as in fig. 10.5f below to view the details of a corporate account director.
(fig. 10.5f)
This will display a Corporate Account Director Details console as in fig. 10.4g below. After viewing, click on ‘DISMISS CONSOLE’ (as shown below) to close the console.
(fig. 10.5g)
To make changes to the details of a director, click on ‘EDIT’ as shown in fig. 10.5h below.
Note; Only person(s) profiled as deputy Admin will be able to carry out this operation.
(fig. 10.5h)
This will display an ‘Edit Corporate Account Director’ console where you can edit the previously saved director information and also, add other details in the fields that are yet to be filled. Note that the account number, account name, account branch, customer ID and BVN cannot be changed. See an example of the console in fig. 10.5i.
(fig. 10.5i)
Click on ‘SAVE’ to make the changes permanent.
This displays a confirmation console to confirm you want to make the changes. Click on ‘CONFIRM’ as shown in fig. 10.5j to proceed or ‘CANCEL’ to go back to the ‘Edit Corporate Account Director’ console.
(fig. 10.5j)
By clicking on ‘CONFIRM’, the console will be closed. When the changes have been saved, a notification will be displayed at the top of the page as seen in fig. 10.5k below.
(Fig. 10.5k)
To disapprove director information that was previously verified and approved, click on ‘DISAPPROVE’ as shown in fig. 10.5l below.
NOTE: Only person(s) profiled as supreme Admin will be able to carryout this operation.
(fig. 10.5l)
This displays a confirmation console to confirm your request to DISAPPROVE the director information. Click on ‘CONFIRM’ to proceed or ‘CANCEL’ to stop action. See fig. 10.5m for an example.
(fig. 10.5m)
When the disapproval is successful, a notification will be displayed at the top of the page as in fig. 10.5n, the director information will be removed from the approved list page and added to the unapproved list of corporate director information.
(fig. 10.5n)
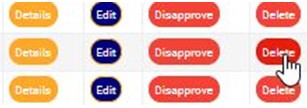
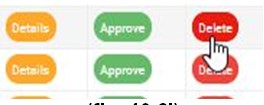
To delete any of the corporate account director information, click on ‘DELETE’ as shown in fig. 10.5o below.
NOTE: Only person(s) profiled as deputy supreme Admin and assigned right(s) to “view directors list” and “disapprove director” will be able to carry out this operation.
(fig. 10.5o)
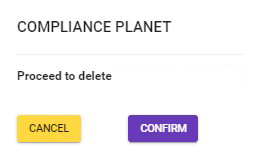
This displays a confirmation console to confirm your request to delete the director information. Click on ‘CONFIRM’ to proceed with the delete or ‘CANCEL’ to stop action. See fig. 10.5p for an example.
(fig. 10.5p)
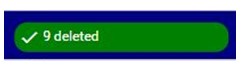
When the delete is done, a notification as in fig. 10.5q will be displayed at the top of the page, the deleted account director information will removed from the general list and the approved list and added to the Account Directors Junk List.
(fig. 10.5q)
Bulk Operations
At the top-right area of the Approved List page, there are features to carry out bulk treatment of more than one account director information together. As shown in fig. 10.5r below, these features are;
‘Download Excel’ button
‘Disapprove Selected’ button and
‘Delete Selected’ button
To carry out any bulk operation,
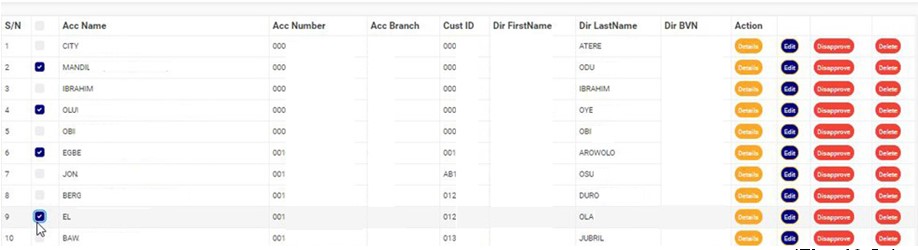
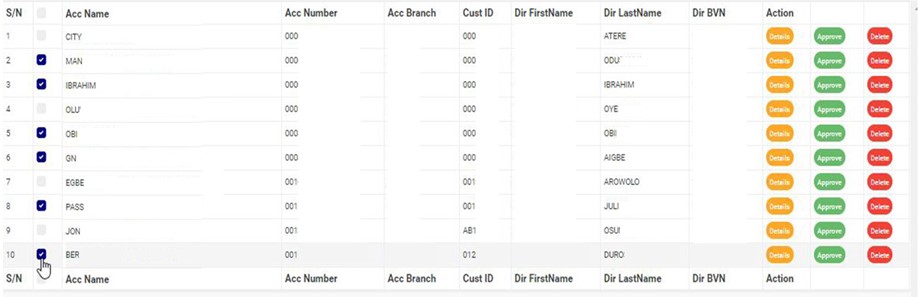
Select the corporate account director information to be treated. Select the account director information by clicking on their checkboxes. See fig. 10.5s below for an example.
(Fig. 10.5s)
To select or deselect all the accounts, click on the checkbox on the table title bar, that is, the checkbox between ‘S/N’ and ‘ACC NAME’. See fig. 10.5t for an example.
(fig. 10.5t)
After making your selection, Click “Operations” button as shown in fig 10.5u below
(fig. 10.5u)
This will display a dropdown as in Fig 10.5v below
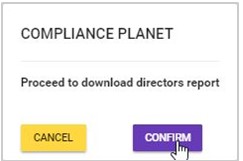
By clicking on the ‘Download Excel’ button, an excel file filled with the details of selected approved account director information will be downloaded to your computer.
Click on the ‘DOWNLOAD EXCEL’ button as seen in fig. 10.5w below.
NOTE Only person(s) profiled as deputy supreme Admin and assigned right(s) to “view directors list” and “download excel report” will be able to carryout this operation.
(fig. 10.5w)
This displays a confirmation console as in fig. 10.5x below. Click on ‘CONFIRM’ to proceed with the download or ‘CANCEL’ to discontinue.
(fig. 10.5x)
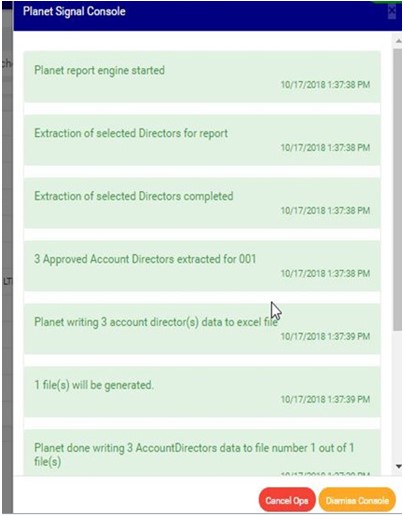
The signal console shows ongoing processes as in fig. 10.5y below and a notification will be displayed at the top of the page when the file download is complete.
(fig. 10.5y)
To close the signal console, click on its ‘DISMISS CONSOLE’ button;
To terminate the ongoing processes, click on ‘CANCEL OPS’.
This displays a confirmation console, Click on ‘CONFIRM’ as seen in fig. 10.5z below to proceed.
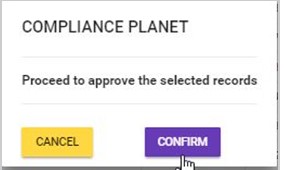
By clicking on the ‘Disapprove Selected’ button, all the selected director information will be disapproved and moved to the Account Directors Unapproved List on the planet.
NOTE only person(s) profiled as deputy supreme Admin and assigned right(s) to “view directors list” and “Disapprove directors (Bulk)” will be able to carryout this operation.
Here is how to make a bulk disapproval.
Click on the ‘DISAPPROVE SELECTED’ button as seen in fig. 10.5aa below.
(fig. 10.5aa)
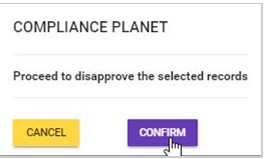
This displays a confirmation console to confirm your request to DISAPPROVE the director information. Click on ‘CONFIRM’ to proceed or ‘CANCEL’ to stop action. See fig. 10.5ab for an example.
(fig. 10.5ab)
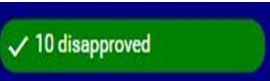
When the disapproval is successful, a notification will be displayed at the top of the page as in fig. 10.5ac below. Then, the director information will be removed from the approved list page and added to the unapproved list of corporate director information.
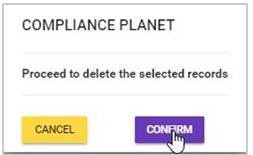
By clicking on the ‘Delete Selected’ button, all the selected director information will be removed from the general list and the approved list, and added to the account directors’ junk list.
NOTE only person(s) profiled as deputy supreme Admin and assigned right(s) to “view directors list” and “Disapprove directors (Bulk)” will be able to carryout this operation.
Click on the ‘DELETE SELECTED’ button as seen in fig. 10.5ad below.
(fig. 10.5ad)
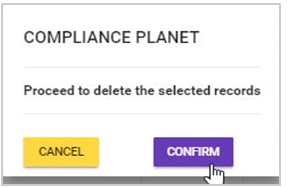
This displays a confirmation console as in fig. 10.5ae below. Click on ‘CONFIRM’ to proceed with the delete or ‘CANCEL’ to discontinue.
(fig. 10.5ae)
A notification will be displayed at the top of the page when the bulk delete is successful. See fig. 10.5af below for an example.
The ‘UNAPPROVED LIST’ page provides a list of all corporate account directors’ information that are yet to be verified and/or approved by the financial institution. Information that were previously verified and approved but have been disapproved again will also appear here.
Note only persons profiled as a ‘Deputy Supreme Admin’ with right to ‘view account directors’ will be able to view unapproved account directors list.
Here are steps on how to make use of the features on the ‘Unapproved list’ page.
From the left hand side menu, Click ‘Control panel’ as in fig. 10.1a.
Fig 10.1a
This will display a drop down as in Fig 10.1b below.
Fig 10.1b
Click ‘DIRECTOR’ on the drop down list. See an example in Fig 10.1c below.
Fig 10.1c
This will display the ACCOUNT DIRECTORS OPERATIONS dashboard as in Fig 10.1d below
Fig 10.1d
From the top menu, Click ‘View’ as shown in fig. 10.6a below
(fig. 10.6a)
This will display a dropdown as in fig 10.6b below
STEP 2: Click “Unapproved” from the drop-down list as in fig 10.6b below
Fig 10.6b
This displays a page listing out the director information that has not been verified and approved by the institution. See fig. 10.6c below for an example.
(fig. 10.6c)
At the bottom-right corner of the page, the software provides information about the number of pages of the list, with the page numbers written out. The page numbers are buttons to go to each page. By clicking on any page number, the software takes you to that particular page. Click on ‘NEXT’ to go to the next page or click on ‘PREVIOUS’ to go to the page before the one you are viewing at that moment.
Adjust the number of unapproved account director information you want to see per page by clicking on the ENTRIES box as in fig. 10.6d below.
(fig. 10.6d)
To see the unapproved director information of corporate accounts for any of the branches, select the branch name from the filter box as shown in fig. 10.6e below. The default list is always for all branches of the institution.
(fig. 10.6e)
Search for a corporate account director information by the account name, account number, director’s first name, last name or director’s BVN in the search box. See an example of a search in fig. 10.6f below. Search results will appear as you input a character in the search box.
(fig. 10.6f)
On this page, each director information on the list has three (3) action buttons. These buttons are used for individual operations of the respective director information in the list. They are;
‘DETAILS’ button,
‘APPROVE’ button and
‘DELETE’ button
Here is how to make use of the action buttons.
Click on ‘DETAILS’ as in fig. 10.6g below to view the details of the unapproved corporate account director.
Note only persons profiled as a Deputy Supreme Admin with right to view account directors will be able to view unapproved account directors list.
(fig. 10.6g)
This displays a Corporate Account Director Details console as in fig. 10.6h below. After viewing, click on ‘DISMISS CONSOLE’ (as shown below) to close the console.
(fig. 10.6h)
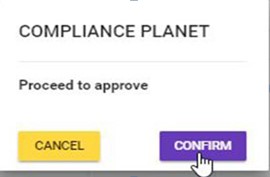
To approve a directors’ information, click on ‘APPROVE’ as shown in fig. 10.6i below.
Note: Only persons profiled as a Deputy Supreme Admin with right to “view account directors” and “disapprove directors” will be able to carry out this operation.
(fig. 10.6i)
This displays a confirmation console as in fig. 10.6j to confirm your request to APPROVE that director information. Click on ‘CONFIRM’ to proceed or ‘CANCEL’ to stop action..
(fig. 10.6j)
When the approval is successful, a notification will be displayed at the top of the page as in fig. 10.6k below. The director information will be removed from the ‘Unapproved list’ page and added to the ‘Approved list’ of corporate director information.
(fig. 10.6k).
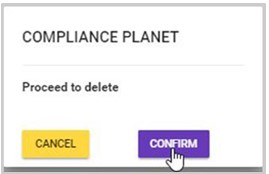
To delete any of the corporate account director information, click on ‘DELETE’ as shown in fig. 10.6l below.
Note only persons profiled as a Deputy Supreme Admin with right to “view account directors” and “delete directors” will be able to carry out this operation.
(fig. 10.6l)
This displays a confirmation console as in fig. 10.6m to confirm your request to delete the unapproved director information. Click on ‘CONFIRM’ to proceed with the delete or ‘CANCEL’ to stop action.
(fig. 10.6m)
When the delete is done, a notification as in fig. 10.6n will be displayed at the top of the page; the deleted account director information will removed from the general list and the unapproved list and added to the Account Directors Junk List.
(Fig. 10.6n)
Bulk Operations
Also, there are features to carry out bulk treatment of more than one account director information together at the top-right area of this page. These features are;
‘Download Excel’ button
‘Approve Selected’ button and
‘Delete Selected’ button
To carry out any bulk operation, select the corporate account director information to be treated first. Select the account director information by clicking on their checkboxes. See fig. 10.6o below for an example.
(fig. 10.6o)
To select/deselect all the accounts, click on the checkbox on the table title bar, that is, the checkbox between ‘S/N’ and ‘ACC NAME’. See fig. 10.6p for an example.
(fig. 10.6p)
After making your selection, Click “Operations” button as shown in fig 10.6q below
(fig. 10.6q)
This will display a dropdown as in Fig 10.6r below
(fig. 10.6r)
A. Bulk Download
By clicking on the ‘Download Excel’ button, an excel file filled with the details of the selected unapproved account director information will be downloaded to your computer.
NOTE: Only persons profiled as a Deputy Supreme Admin with right to “view account directors” and “download report (excel)” will be able to carry out this operation.
Click on the ‘DOWNLOAD EXCEL’ button as seen in fig. 10.6s below.
(fig. 10.6s)
This displays a confirmation console as in fig. 10.6t below. Click on ‘CONFIRM’ to proceed with the download or ‘CANCEL’ to discontinue.
(fig. 10.6t)
The signal console shows ongoing processes as in fig. 10.6u below and a notification will be displayed at the top of the page when the download is complete.
(fig. 10.6u)
To close the signal console, click on its ‘DISMISS CONSOLE’ button;
Terminate ongoing processes by clicking on ‘CANCEL OPS’.
This displays a confirmation console, click on ‘CONFIRM’ to proceed. A notification will also be displayed at the top of the page when the cancellation is successful.
By clicking on the ‘Approve Selected’ button, all the selected director information will be approved and moved to the Account Directors ‘Approved List’ on the software.
Note: Only persons profiled as a Deputy Supreme Admin with right to “view account directors” and “approve directors (bulk)” will be able to carry out this operation.
Here is how to make a bulk approval.
Click on the ‘APPROVE SELECTED’ button as seen in fig. 10.6v below.
(fig. 10.6v)
This displays a confirmation console as in fig. 10.6w to confirm your request to APPROVE the selected director information. Click on ‘CONFIRM’ to proceed or ‘CANCEL’ to stop the action.
(fig. 10.6w)
When the approval is successful, a notification will be displayed at the top of the page as in fig. 10.6x below. Then, the director information will be removed from the ‘Unapproved list’ and added to the ‘Approved list’ of corporate director information.
By clicking on the ‘Delete Selected’ button, all the selected director information will be removed from the general list and the unapproved list, and added to the account directors’ junk list.
Note: Only persons profiled as a Deputy Supreme Admin with right to “view account directors” and “delete director (bulk)” will be able to carry out this operation.
Click on the ‘DELETE SELECTED’ button as seen in fig. 10.6y below.
(fig. 10.6y)
This displays a confirmation console as in fig. 10.6z below. Click on ‘CONFIRM’ to proceed with the delete or ‘CANCEL’ to discontinue.
(fig. 10.6z)
A notification will be displayed at the top of the page when the bulk delete is successful. See fig. 10.6aa below for an example.
The ‘JUNK LIST’ page provides a list of all corporate account directors information, approved or unapproved, that were deleted from the general list, approved list or unapproved list.
NOTE: Only person(s) profiled as deputy supreme Admin and assigned right(s) to “view directors list” will be able to carryout this operation.
From the left hand side menu, Click ‘Control panel’ as in fig. 10.1a.
Fig 10.1a
This will display a drop down as in Fig 10.1b below.
Fig 10.1b
Click ‘DIRECTOR’ on the drop down list. See an example in Fig 10.1c below.
Fig 10.1c
This will display the ACCOUNT DIRECTORS OPERATIONS dashboard as in Fig 10.1d below
Fig 10.1d
From the top menu, Click ‘View’ as shown in fig. 10.7a below
(fig. 10.7a)
This will display a dropdown as in fig 10.7b below
Click “Junked” from the drop-down list as in fig 10.7b below
Fig 10.7b
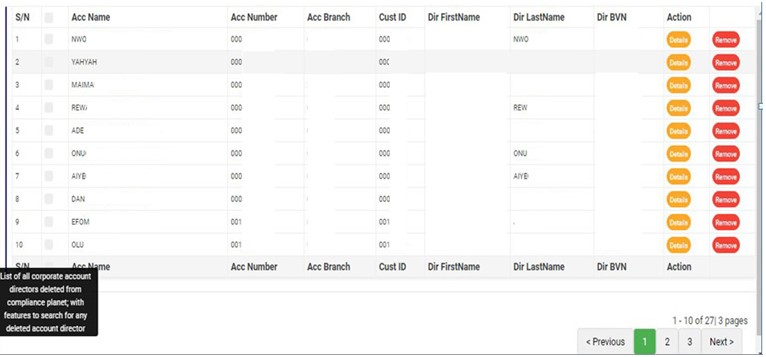
This displays a page listing out the director information that were deleted from the general list, approved list and unapproved list. See fig. 10.7c below for an example.
(fig. 10.7c)
At the bottom-right corner of the page, the software provides information about the number of pages of the junk list, with the page numbers written out. The page numbers are buttons to go to each page. By clicking on any page number, the software takes you to that particular page. Click on ‘NEXT’ to go to the next page or click on ‘PREVIOUS’ to go to the page before the one you are viewing at that moment.
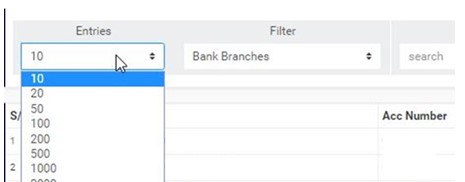
Adjust the number of the account director information you want to see per page by clicking on the ENTRIES box as in fig. 10.7d below.
(fig. 10.7d)
To see deleted director information of corporate accounts for any of the branches, select the branch name from the filter box as shown in fig. 10.7e below. The default list is always for all branches of the institution.
(fig. 10.7e)
Search for a corporate account director information by the account name, account number, director’s first name, last name or director’s BVN in the search box. See an example of a search in fig. 10.7f below. Search results will appear as you input a character in the search box.
(fig. 10.7f)
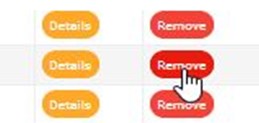
Each corporate account director information on the junk list has two (2) action buttons; the ‘DETAILS’ button and the ‘REMOVE’ button. These buttons are used for the treatment of the respective director information on the list. Here is how to make use of the action buttons.
Click on ‘DETAILS’ as in fig. 10.7g below to view the details of the deleted corporate account director.
(fig. 10.7g)
This displays a ‘Corporate Account Director Details’ console as in fig. 10.7h below.
(Fig. 10.7h)
After viewing, click on ‘DISMISS CONSOLE’ (as shown below) to close the console.
To restore director information back to the general list, click on ‘REMOVE’ as shown in fig. 10.7i below. This is the reversal of the ‘delete’ action that was previously carried out on that particular director information.
(fig. 10.7i)
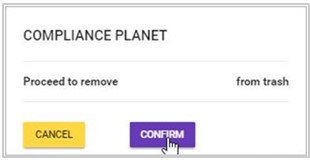
This displays a confirmation console as in fig. 10.7j to confirm your request to REMOVE that director information from the junk list (trash). Click on ‘CONFIRM’ to proceed or ‘CANCEL’ to stop action.
(fig. 10.7j)
When the removal is done, a notification will be displayed at the top of the page as in fig. 10.7k below. The director information will be removed from the ‘Junk list’ and added back to the ‘General list’ and ‘Approved list’ or ‘Unapproved list’ of corporate director information.
(fig. 10.7k)
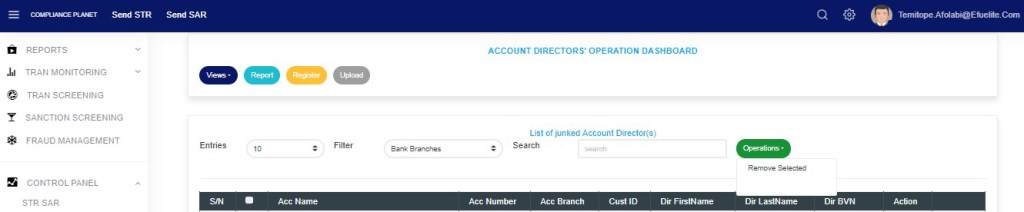
Bulk Removal
To carry out bulk removal, select the corporate account director information to be treated. Select the account director information by clicking on their checkboxes. See fig. 10.7l below for an example.
(fig. 10.7l)
To select/deselect all the accounts, click on the checkbox on the table title bar, that is, the checkbox between ‘S/N’ and ‘ACC NAME’. See fig. 10.7m for an example.
(fig. 10.7m)
After making your selection,Click “Operations” button as in fig 10.7n below.
(fig. 10.7n)
This will display a drop-down as in Fig 10.7o below
(fig. 10.7o)
Click on the ‘REMOVE SELECTED’ button as seen in fig. 10.7p below.
By clicking on ‘Remove Selected’, all the selected director information will be removed from the junk list, and added back to the account directors’ general list. Director information that has been approved previously will also be added back to the approved list, while unapproved information will be added to the unapproved list. Here is how to make a bulk removal.
(fig. 10.7p)
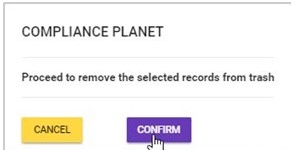
This displays a confirmation console as in fig. 10.7q to confirm your request to REMOVE the selected director information. Click on ‘CONFIRM’ to proceed or ‘CANCEL’ to stop the action.
(fig. 10.7q)
When the removal is done, a notification will be displayed at the top of the page as in fig. 10.7r below. Then, the director information will be removed from the ‘Junk list’.
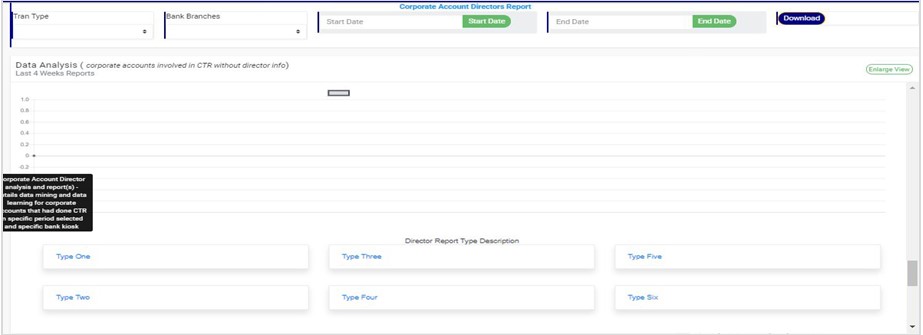
This operation entails the analysis of corporate accounts involved in currency transactions but do not have director information. Here, the various types of director reports can be downloaded. Here are steps for generating analyses for the corporate accounts without director information and downloading the various report types.
NOTE: Only person(s) profiled as deputy supreme admin can carry out this operation.
From the left hand side menu, Click ‘Control panel’ as in fig. 10.1a.
Fig 10.1a
This will display a drop down as in Fig 10.1b below.
Fig 10.1b
Click ‘DIRECTOR’ on the drop down list. See an example in Fig 10.1c below.
Fig 10.1c
This will display the ACCOUNT DIRECTORS OPERATIONS dashboard as in Fig 10.1d below
Fig 10.1d
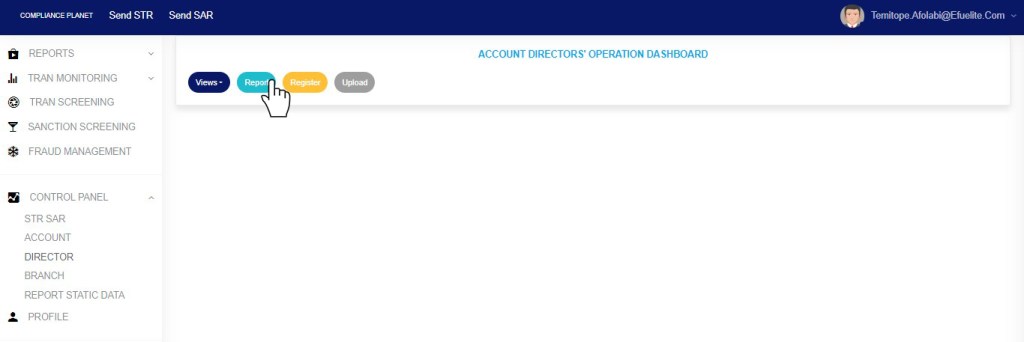
STEP 1:From the top menu, Click ‘Report’ as shown in fig. 10.8a below
(fig. 10.8a)
This will display a page as shown in fig. 10.8b below.
(fig. 10.8b)
How to Download Corporate Account Reports
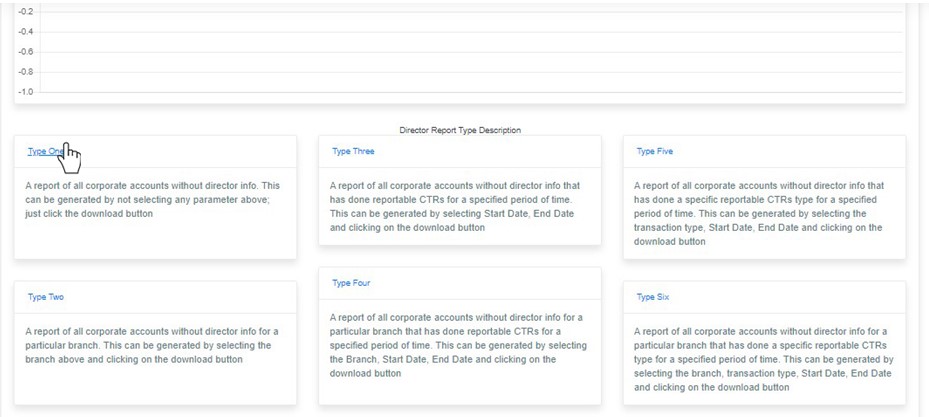
This section is a guide on downloading the various report types. If you do not know the distinguishing features of each report type, you are advised to read the directions on the Director Report type description.
To view any Director Report type description click on the type you want to view as in fig. 10.8c below before selecting any option or feature on this page.
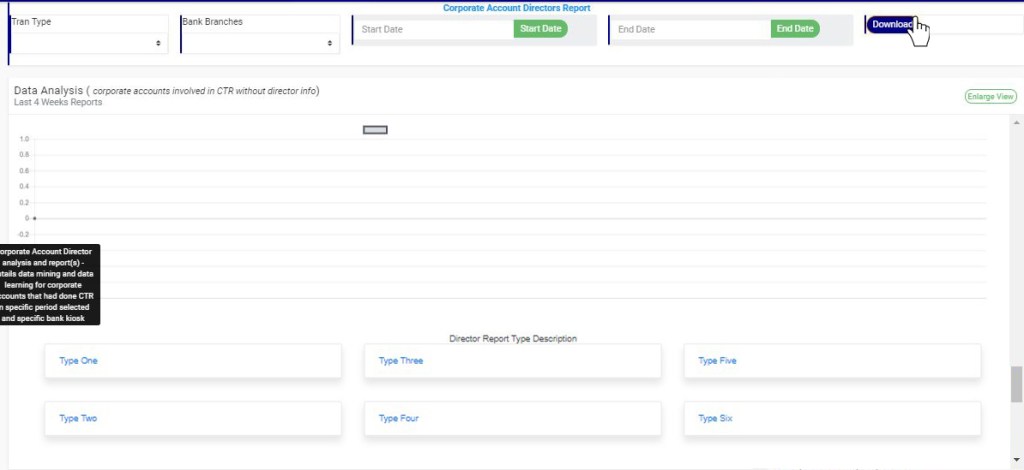
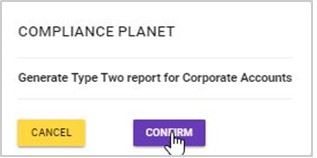
This is a report of all the corporate accounts involved in CTR without director information. To download this report, just click on the ‘DOWNLOAD’ button only. See an example in fig. 10.8d below.
(fig. 10.8d)
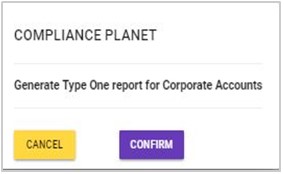
This displays a confirmation console as seen in fig. 10.8e. Click on ‘CONFIRM’ to proceed with the download or ‘CANCEL’ to discontinue.
(fig. 10.8e)
The signal console shows ongoing processes as in fig. 10.8f below. Once download is complete, a notification will be displayed at the top of the page.
This is a report of all the corporate accounts involved in CTR without director information for a particular branch of the financial institution. Here is how to download this report.
STEP 1: Select branch name from the ‘BANK BRANCHES’ box as in fig. 10.8g below.
(fig. 10.8g)
STEP 2: Click on ‘DOWNLOAD’ to download type two report. This displays a confirmation console as seen in fig. 10.8h. Click on ‘CONFIRM’ to proceed with the download or ‘CANCEL’ to discontinue.
(fig. 10.8h)
The signal console shows ongoing processes (as in fig. 10.8f for type one) and a notification will also displayed at the top of the page when download is complete.
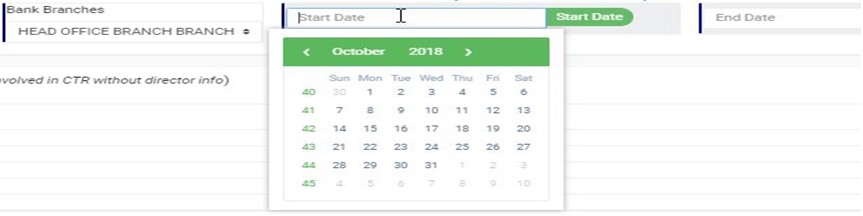
This is a report of all the corporate accounts involved in CTR without director information within a specified period of time. Here is how to download this report.
STEP 1: Select the ‘START DATE’ and ‘END DATE’ from the date boxes to specify period for which you want to download report. The start date and end date refer to the beginning and the end of the period respectively. See fig. 10.8i below for an example.
(fig. 10.8i)
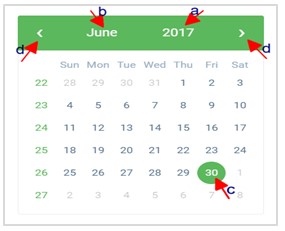
Take a look at the arrows labelled a to d in fig. 10.8j to learn how to operate a calendar.
Click on the given year to change it to your year of choice.
Click on the given month to change it to your month of choice.
Then, click on the date of the month.
You can also click on the angle brackets on the calendar [ ‘<’ or ‘>’ ] to go backward or forward.
(fig. 10.8j)
STEP 2: Click on ‘DOWNLOAD’ to download type three report. This displays a confirmation console as seen in fig. 10.8k. Click on ‘CONFIRM’ to proceed with the download or ‘CANCEL’ to discontinue.
(fig. 10.8k)
The signal console shows ongoing processes (as in fig. 10.8f for type one) and a notification will be displayed at the top of the page when download is complete.
This is a report of all the corporate accounts involved in CTR without director information for a particular branch within a specified period of time. Here is how to download this report.
STEP 1: Select branch name from the ‘BANK BRANCHES’ box as in fig. 10.8l below.
(fig. 10.8l)
STEP 2: Select the ‘START DATE’ and ‘END DATE’ from the date boxes to specify the period; the start date and end date being the beginning and the end of the period respectively. See fig. 10.8m below for an example.
(fig. 10.8m)
Take a look at the arrows labelled a to d in fig. 10.8n to learn how to operate a calendar.
Click on the given year to change it to your year of choice.
Click on the given month to change it to your month of choice.
Then, click on the date of the month.
You can also click on the angle brackets on the calendar [ ‘<’ or ‘>’ ] to go backward or forward.
(fig. 10.8n)
STEP 3: Click on ‘DOWNLOAD’ to download the type four report. This displays a confirmation console as seen in fig. 10.8o. Click on ‘CONFIRM’ to proceed with the download or ‘CANCEL’ to discontinue.
(fig. 10.8o)
The signal console shows ongoing processes (as in fig. 10.8f for type one) and a notification will be displayed at the top of the page when download is complete too.
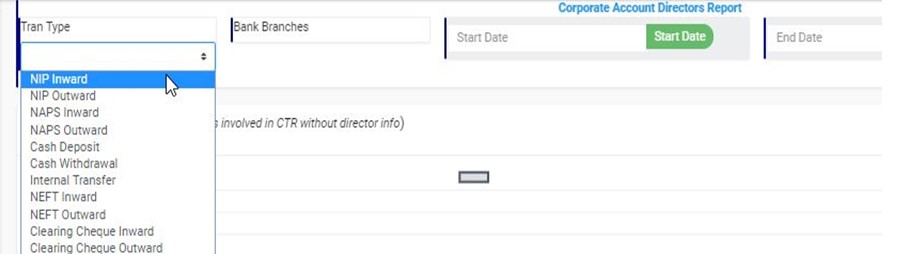
This is a report of all the corporate accounts without director information that were involved in a specific currency transaction type within a specified period of time. Here is how to download this report.
STEP 1: Select the transaction type from the ‘TRAN TYPE’ box as in fig. 10.8p below.
(fig. 10.8p)
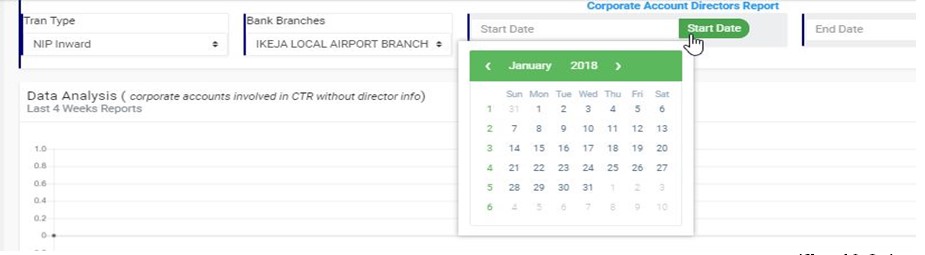
STEP 2: Select the ‘START DATE’ and ‘END DATE’ from the date boxes to specify the period; the start date and end date being the beginning and the end of the period respectively. See fig. 10.8q below for an example.
(fig. 10.8q)
Take a look at the arrows labelled a to d in fig. 10.8r to learn how to operate a calendar.
Click on the given year to change it to your year of choice.
Click on the given month to change it to your month of choice.
Then, click on the date of the month.
You can also click on the angle brackets on the calendar [ ‘<’ or ‘>’ ] to go backward or forward.
(fig. 10.8r)
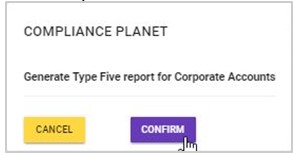
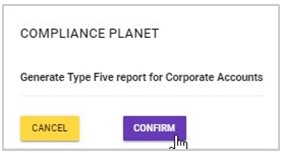
STEP 3: Click on ‘DOWNLOAD’ to download the type five report. This displays a confirmation console as seen in fig. 10.8s. Click on ‘CONFIRM’ to proceed with the download or ‘CANCEL’ to discontinue.
(fig. 10.8s)
The signal console shows ongoing processes (as in fig. 10.8f) and a notification will be displayed at the top of the page when the download is complete too.
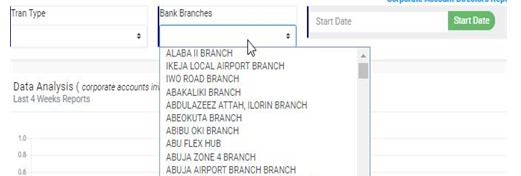
This is a report of all the corporate accounts without director information for a particular branch that were involved in a particular currency transaction type within a specified period of time. Here is how to download this report.
STEP 1: Select the transaction type from the ‘TRAN TYPE’ box as in fig. 10.8t below.
(fig. 10.8t)
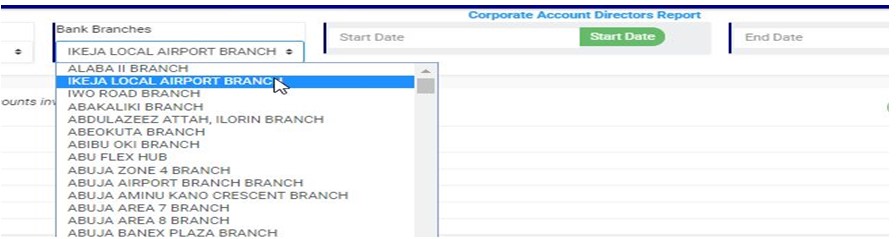
STEP 2: Select branch name from the ‘BANK BRANCHES’ box as in fig. 10.8u below.
(fig. 10.8u)
STEP 3: Select the ‘START DATE’ and ‘END DATE’ from the date boxes to specify the period; the start date and end date being the beginning and the end of the period respectively. See fig. 10.8v below for an example.
(fig. 10.8v)
STEP 3: Click on ‘DOWNLOAD’ to download the type six report. This displays a confirmation console as seen in fig. 10.8w. Click on ‘CONFIRM’ to proceed with the download or ‘CANCEL’ to discontinue.
(fig. 10.8w)
The signal console showing ongoing processes (as in fig. 10.8f for type one) will be displayed and a notification will be displayed at the top of the page when the download is complete also.
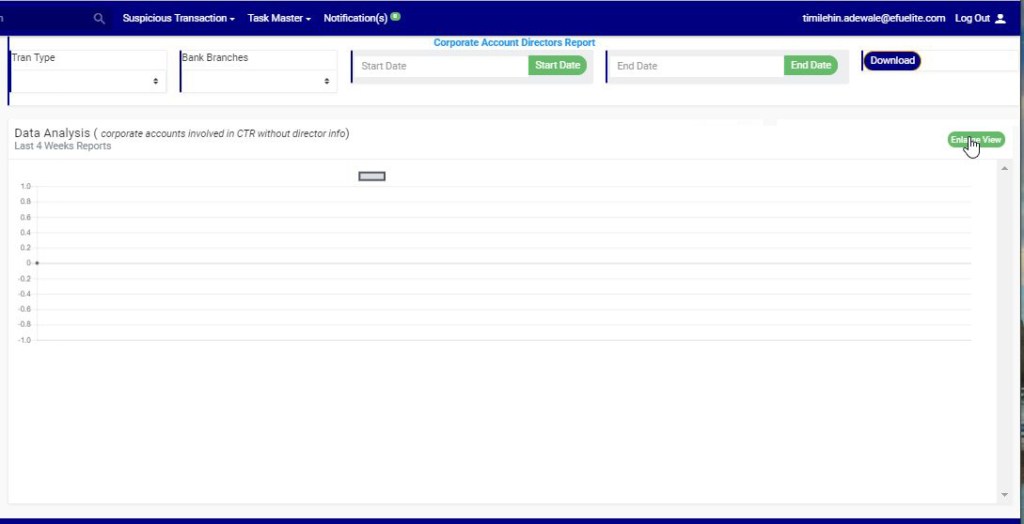
10.8.2 How to Analyse Corporate Accounts
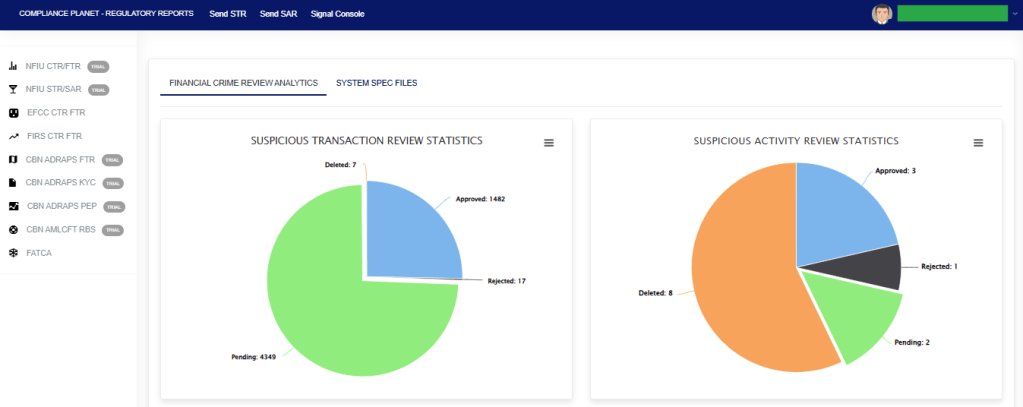
The Compliance Planet software, through the graph on the director report page, offers an analysis of CTRs involving corporate accounts without director information for the past four (4) weeks. On opening the director report page, the graph will automatically show an analysis of all transactions involving corporate accounts without director information during the last four weeks. If there are no analysis as in fig. 10.8x below, it means during the last four weeks, there were no transactions involving corporate accounts without director information.
(fig. 10.8x)
To get a bigger view of the graph, click on ‘ENLARGE’ as shown in fig. 10.8x above. See fig. 10.8y for an enlarged view of the graph. Click on ‘DISMISS’ to close the enlarged view.
When a Notification is given final approval, the Notification will move to the ‘REPORT OFFICER APPROVED NOTIFICATION(S)’ list and ‘APPROVED NOTIFICATION(S) PENDING DOWNLOAD’ list. Here, the notification can be downloaded, and details of the Notification can also be viewed. Notifications can also be downloaded under the ‘APPROVED NOTIFICATION(S) DOWNLOADED’ list. A Notification can be downloaded as many times as you desire. The generated STR/SAR will be in the XML file type. See the steps below to download an STR/SAR.
From the app dashboard, click on “REGULATORY REPORTS” as displayed in the image below.
This will display a drop-down, as shown in image below. The drop-down menu lists the report types available on the Compliance Planet software.
Click ‘NFIU STR/SAR’ on the drop-down list and display the STR/SAR page as displayed in the image below.
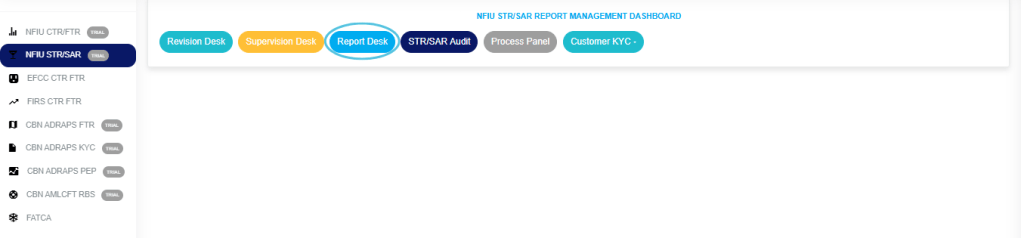
STEP 1: Click on “REPORT DESK” as displayed in the image below.
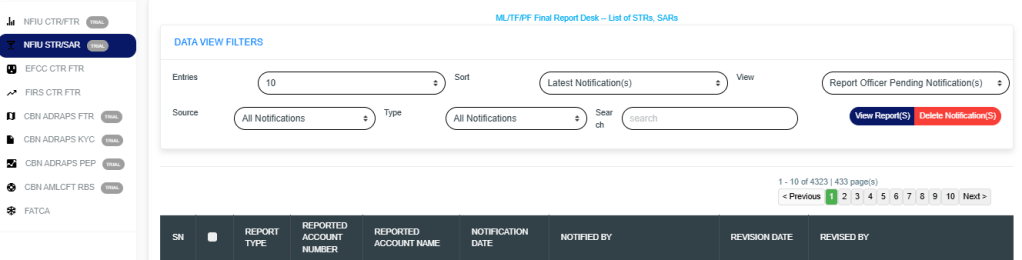
The above action will display the FINAL REPORT DESK PAGE as seen in the image below. Then select the “DATA VIEW FILTERS”.
Click on the “ENTRIES” box to increase the number of Notifications you want to see per page.
Click on the “SORT” box to sort the notifications either by alphabetical order or from the latest to the earliest notifications or vice-versa as shown.
Click on the “VIEW” box to see notifications classified according to the stage of processing they have gotten to.
Click on the “SOURCE” box to select either All Notifications, Digital Surveillance Notification or Manually Filled Notifications.
Click on the “TYPE” box to select either All Notification, Suspicious Transaction Notification and Suspicious Activity Notification.
Click on the “SEARCH” box to search for a particular notification by typing in the customer’s name or account number concerned. More details below.
Click on the “VIEW REPORTS” button after selecting the class of Notification(s) from the VIEW box. This is to view the notifications from any of the selected class. This button is at the top-right corner of the page.
Click on the “DELETE NOTIFICATIONS” to delete notifications.
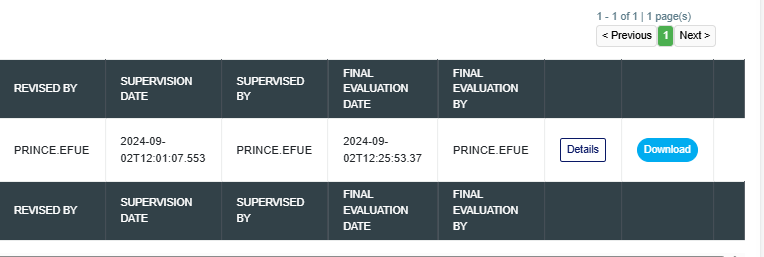
STEP 2: Click on the “VIEW” box on the reporting desk page and select ‘REPORT OFFICER APPROVED NOTIFICATION(S)’ or ‘APPROVED NOTIFICATION(S) PENDING DOWNLOAD.’ All approved Notifications will be displayed in the ‘REPORT OFFICER APPROVED NOTIFICATION(S) list irrespective of their download status. Notifications that have been downloaded previously will appear in the ‘APPROVED NOTIFICATION(S) DOWNLOADED’ list, while those yet to be downloaded at all will appear in the ‘APPROVED NOTIFICATION(S) PENDING DOWNLOAD’ list. See an example in the image below.
Click on ‘VIEW REPORTS’ to see the Notifications as in the image below.
STEP 3: To see details of an STR/SAR Notification, click on ‘DETAILS’. It is the button at the end of each Notification row. To download an STR/SAR, click ‘DOWNLOAD.’ This button is next to the ‘DETAILS’ button. See the image below.
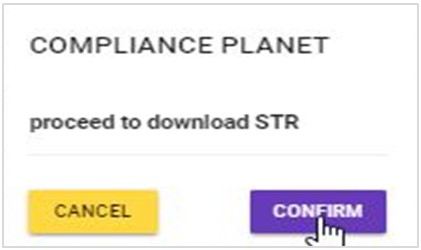
By clicking on the ‘DOWNLOAD’ button, a confirmation console—shown in the image below—will appear on your screen. Click “CONFIRM” to proceed with the download, or “CANCEL” if you choose not to download the notification.
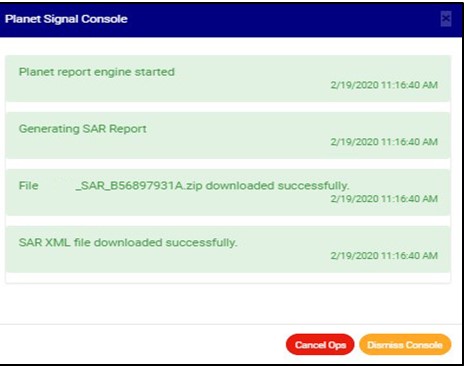
The signal console shows ongoing processes, as shown below.
After successful download, the Notification will move from the ‘APPROVED NOTIFICATION(S) PENDING DOWNLOAD’ list to the ‘APPROVED NOTIFICATION(S) DOWNLOADED’ list but still remain in the REPORTING OFFICER APPROVED NOTIFICATION(S) list.
The final step is to submit the downloaded STR/SAR XML to the NFIU GOAML portal.
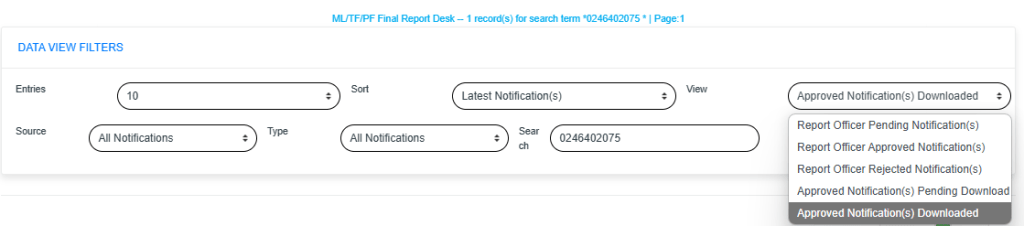
You can check the download history of a notification by selecting ‘APPROVED NOTIFICATION(S) DOWNLOADED’ in the VIEW box, which is still on the reporting desk page. Then, click VIEW REPORTS to see a page, as shown in the image below.
As seen in the image below, the Notifications have three buttons at the end of their rows. These are the ‘DETAILS’ button, the ‘DOWNLOAD’ button, and the ‘DOWNLOAD HISTORY’ button.
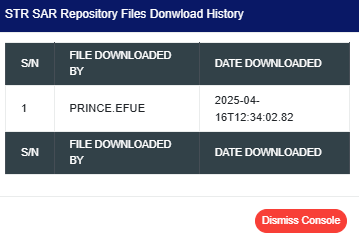
Click on ‘DOWNLOAD HISTORY’ to see information about the date(s) the notification was downloaded and who downloaded it. See the cursor on the ‘DOWNLOAD HISTORY’ button in the image below.
➔ by clicking the “DOWNLOAD HISTORY” button will display a console, as shown in the image below. To close the console after viewing it, click “DISMISS CONSOLE”, as illustrated in the example.
NOTE: You have to be profiled as an ‘Auditor’ and ‘report evaluation officer’ on report desk with rights to EDIT to carry out this operation.
From the app dashboard, click on “REGULATORY REPORTS” as displayed in the image below.
This will display a drop-down, as shown in image below. The drop-down menu lists the report types available on the Compliance Planet software.
Click ‘NFIU STR/SAR’ on the drop-down list and display the STR/SAR page as displayed in the image below.
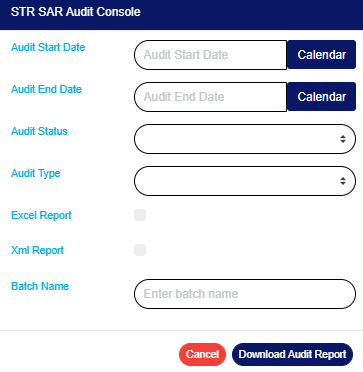
STEP 1: From the top menu, click “STR/SARAudit” as in image below.
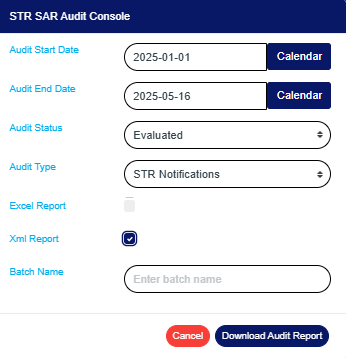
This above action will display an “STR SAR AUDIT CONSOLE” as shown below.
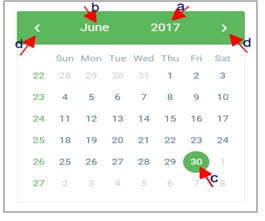
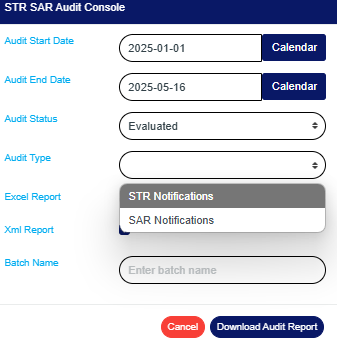
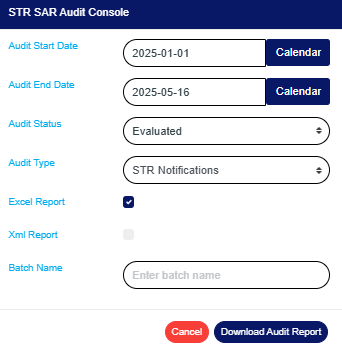
STEP 2: Click on “AUDIT START DATE“and“AUDIT END DATE” to specify the beginning and the end of the period (respectively) for which you want to generate report. A calendar drops below the date box.
Take a look at the arrows labelled a – d in image above to study the calendar.
Click on the given year to change it to your year of choice.
Click on the given month to change it to your month of choice.
Then, click on the date of the month.
You can also click on the angle brackets on the calendar ‘<’ or ‘>’ to go backward or forward.
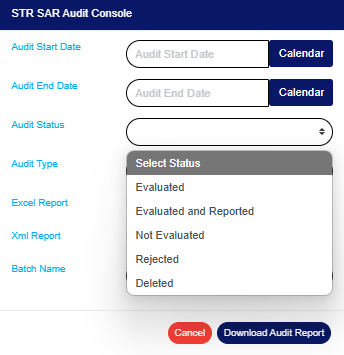
STEP 3: Click on “AUDIT STATUS“to select the status of the report(s) you want to audit i.e. Evaluated, Evaluated and reported, Not Evaluated, Rejected or deleted reports. See an example in Fig below.
STEP 4: Click on “AUDIT TYPE“to select the type of notification audit report you want to download i.e. STR Notifications or SAR notifications. See an example in the image below.
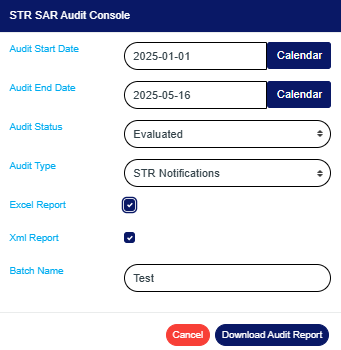
STEP 5: Tick the “Excel Report“checkbox to export your report to Excel file format or“XML REPORT” to export reports to XML. Note you can tick one or the two check boxes. This is illustrated in the images below.
STEP 6: Fill in the name of your report in the “BATCH NAME” box. The report name should be any title of your choice for easy identification later on. See image for an example.
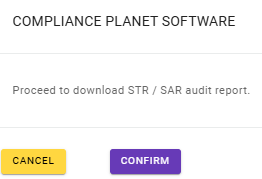
STEP 7: Click on the “DOWNLOAD AUDIT REPORT” button to generate report. If you want to cancel schedule, click on the “CANCEL” button. These buttons are at the bottom-right corner of the console. (See image above). A console will be displayed like in the image below if you choose to process report.
Click on “Confirm” to continue.
Click on “Cancel” If you want to make changes to the settings of your report, like changing the date or selecting/deselecting an Audit type, etc.The software will take you back to the Audit console.
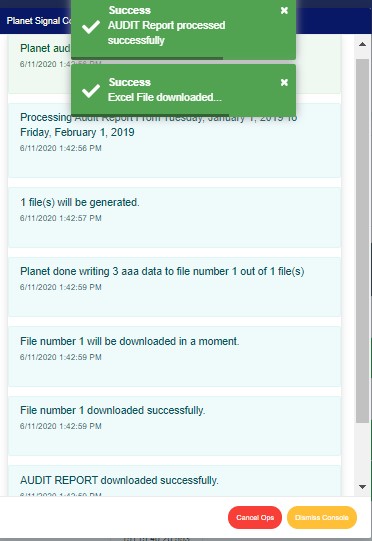
The signal console shows ongoing processes. An example of a signal console is in the image below.
Terminate ongoing operations by clicking “CANCEL OPS“.
To minimize signal console, click on “DISMISS CONSOLE“.
You can view the audit trail for a particular transaction on any of the three desks i.e. the revision, supervision or reporting desk by double clicking the Account name or Account number as in the image below.
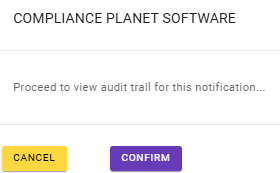
This will display a confirmation console as shown below. Click ‘confirm’ to proceed or ‘cancel’ to close the console.
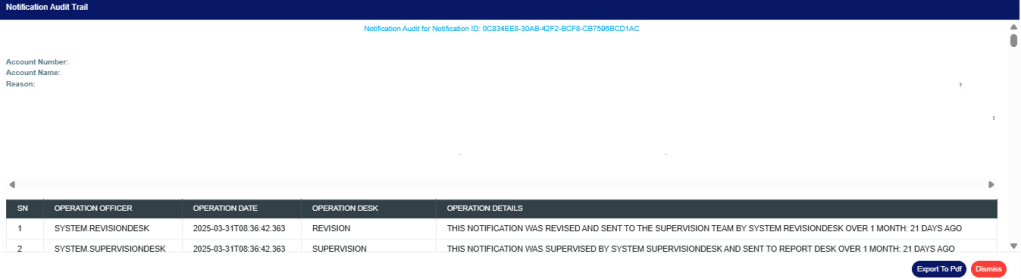
Clicking ‘confirm’ will display a ‘STR/SAR Audit Trail’ console as in the image below. The console shows detail of every action taken on the notification from the time it was sent to the current state of the notification.
Click on ‘Dismiss Console’ to close the console or click ‘Export to PDF’ to download the data as a PDF file.
Clicking on ‘export to pdf’ will display a notification at the top of the page as in the image below and a file will be downloaded to your computer.
The compliance planet software allows you to schedule your AML/CFT RBS report ahead of time. You can manually schedule and download AML RBS reports.
NOTE: Only person(s) assigned right to ‘process RBS Report’ can carry out these operation(s)
Here is how to do this:
From the app dashboard, click on “REGULATORY REPORTS” as displayed in the image below.
This will display a drop-down, as shown in image below. The drop-down menu lists the report types available on the Compliance Planet software.
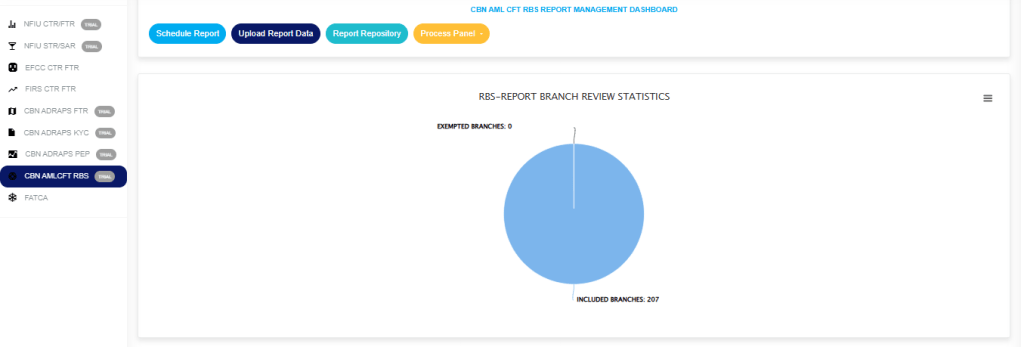
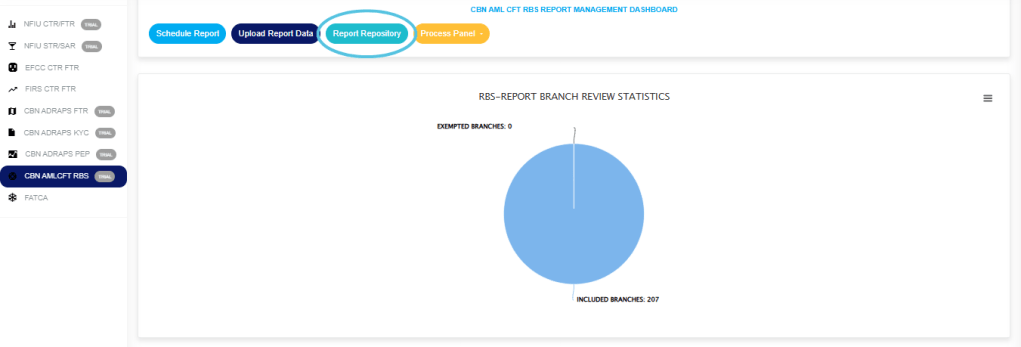
Click “CBN AML/CFT RBS” on the drop-down list and display the RBS REPORT BRANCH REVIEW STATISTICS Page as displayed in the image below.
STEP 1: From the top menu click on ‘Schedule report’ as in fig. 7.3a below.
(fig. 7.3a)
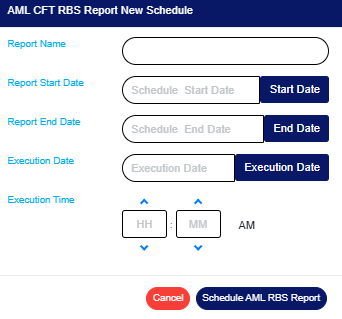
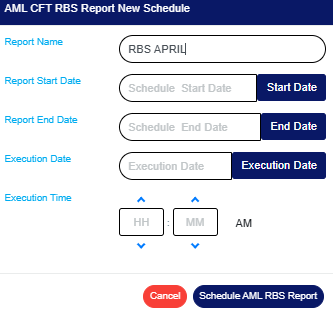
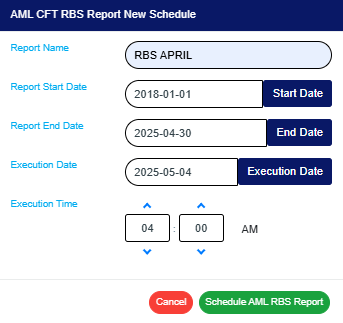
This displays a manual AML RBS scheduler as in fig. 7.3b.
(fig. 7.3b)
STEP 2: Fill in the name of your report in the “REPORT NAME“box. The report name should be any title of your choice for easy identification later on. See fig. 7.3c for an example.
(fig. 7.3c)
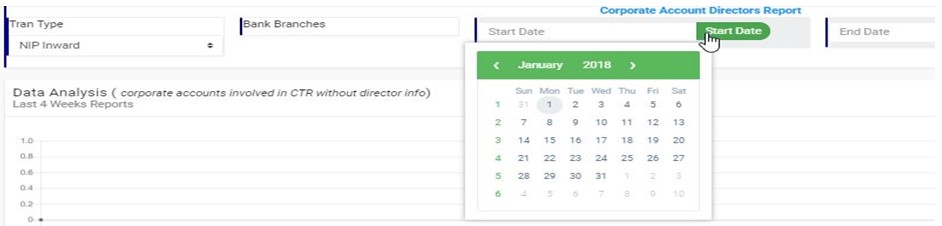
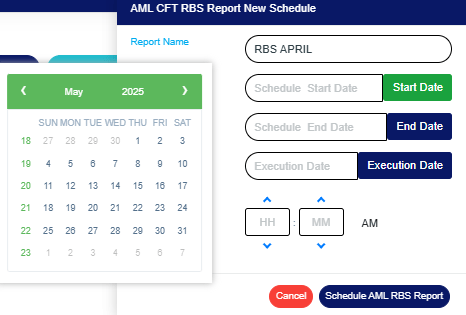
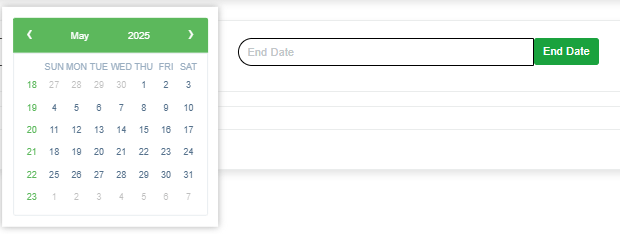
STEP 3: Click on the “ START DATE” and” END DATE” buttons to choose the date range of the report you want to generate. The software will display a calendar console as in fig 7.3d and Fig 7.3e below for you to set the report start date and end date respectively.
(fig. 7.3d)
(fig. 7.3e)
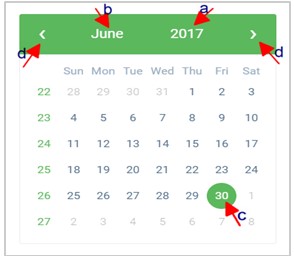
➔ Take a look at the arrows labelled a to d in fig. 7.3f for a description of how the calendar works.
a. Click on the given year to change it to your year of choice.
b. Click on the given month to change it to your month of choice.
c. Then, click on the day of the month.
d. You can also click on the angle brackets on the calendar [ ‘<’ or ‘>’ ] to go backward or forward.
(fig. 7.3f)
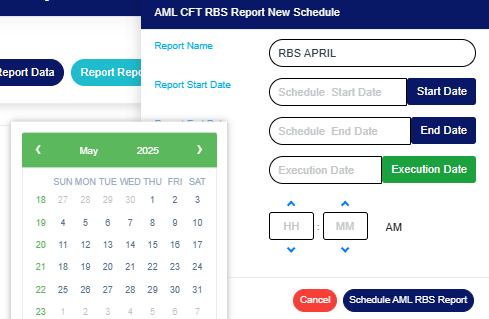
STEP 4: Click on the “EXECUTION DATE“button to specify the date you want the report to be processed as shown in fig. 7.3g below. The calendar works the same way.
(fig. 7.3g)
STEP 5: Set the report “EXECUTION TIME“by filling in the ‘hour’ and the ‘minute’ you want the report to be processed. Click on the arrows to select a number or input the number in the box as in fig. 7.3h
(fig. 7.3h)
There’s a button next to the hour and minute boxes used for switching between AM and PM. Click on it to specify PM or AM. See an example in fig. 7.3i below.
(fig. 7.3i)
STEP 6: Click on ‘SCHEDULE AML RBS REPORT’ as in fig. 7.3j below to create your report or ‘CANCEL’ to close the console. These buttons are at the bottom-right corner of the console.
(fig. 7.3j)
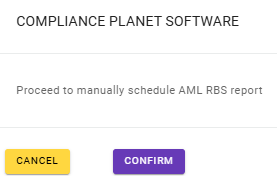
This will display a confirmation console as in fig. 7.3k. Click on ‘CONFIRM’ to schedule the report or ‘CANCEL’ to go back to the scheduler.
(fig. 7.3k)
When report has been successfully scheduled for processing, a notification will be displayed at the top of the page. See fig. 7.3l for an example.
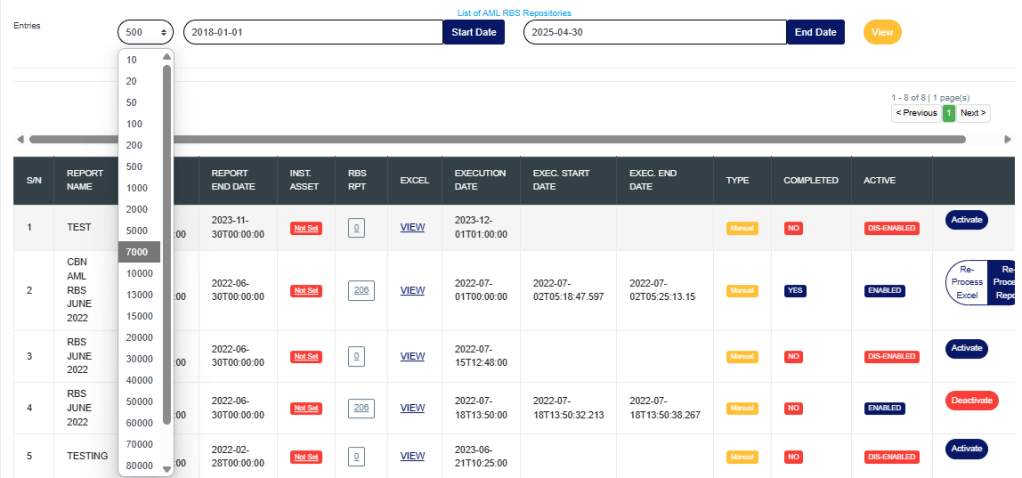
The Compliance planet software keeps a record list of all AML RBS reports that have been manually scheduled. Here is how to find your scheduled AML RBS reports and make use of other features on the page.
NOTE: Only person(s) assigned right to ‘view RBS Report’ can carry out these operation(s)
From the app dashboard, click on “REGULATORY REPORTS” as displayed in the image below.
This will display a drop-down, as shown in image below. The drop-down menu lists the report types available on the Compliance Planet software.
Click “CBN AML/CFT RBS” on the drop-down list and display the RBS REPORT BRANCH REVIEW STATISTICS Page as displayed in the image below.
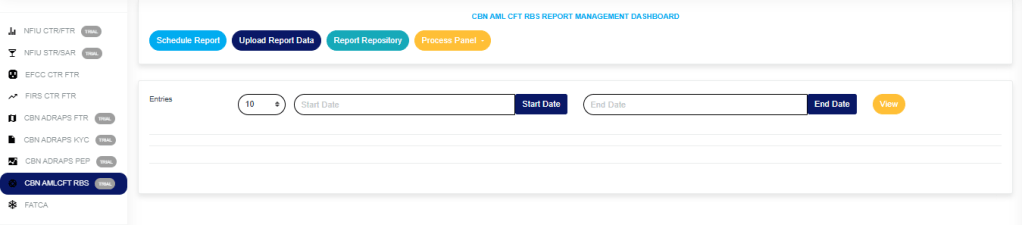
STEP 1: From the top menu click on ‘Report Repository’ as in fig.7.4a below.
(fig. 7.4a)
This displays a page as in fig. 7.4b. On this page you can view list of Risk Based Supervision Reports that have been previously scheduled when you specify a start date and end date for a period.
(fig. 7.4b)
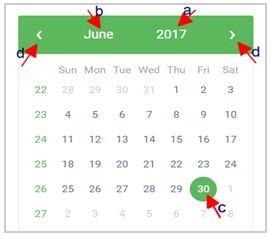
STEP 2: Click on the “START DATE“button/box and the “END DATE“button/box to specify the beginning and the end of the period for which the reports you want to see have been scheduled for. Fig. 7.4c and fig. 7.4d are examples on setting a Start Date and an End Date.
(fig. 7.4c)
(fig. 7.4d)
Take a look at the arrows labelled a – d in fig. 7.4e to study learn of how to use the calendar.
Click on the given year to change it to your year of choice.
Click on the given month to change it to your month of choice.
Then, click on the date of the month.
You can also click on the angle brackets on the calendar [ ‘<’ or ‘>’ ] to go backward or forward.
(fig.7.4e)
For instance, to see AML RBS reports scheduled for dates between JANUARY 2025 and APRIL 2025, the start date and end date would be 2025/01/01 and 2025/01/01 respectively. See an example in fig. 7.4f below.
(fig. 7.4f)
STEP 3: Click on ‘VIEW’ as in fig. 7.4g to see the reports. This is an orange button at the top-right area of the page.
(fig. 7.4g)
The software will make a search and the reports that were scheduled for that period you have entered in the date boxes will be displayed. See the results of the example in fig. 7.4h.
(fig. 7.4h)
You can make changes to the date you specified earlier. When you change the date entries, click on view to see the reports for the new date range you have just set.
At the Top end and Bottom end of the page, the software gives information about the number of pages of your result, with the page numbers written out. Click on any page number to go to that particular page. Click on “NEXT” to go to the next page or click on “PREVIOUS” to go to the page before the current page.
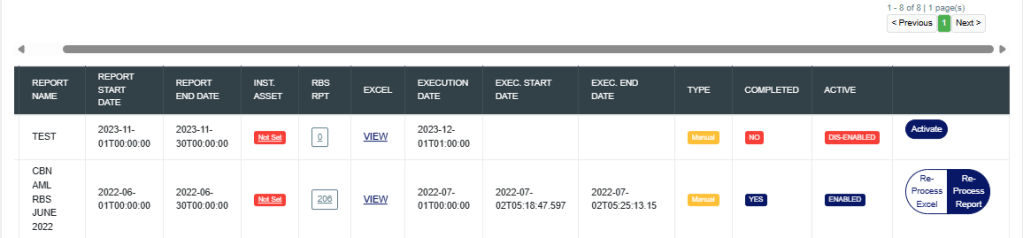
For each report on the AML RBS list, the software will provide information on the report name, report start date and end date, institution asset data has been set or not, the number of the institution’s branches involved, the report execution date and time, the report execution start date and end date, the type of report, a comment on whether the processing of the report has been completed or not and the processing status (for reports that have not been processed). Each report has a button to view the download history of Excel files the software has exported report information into.
Adjust the number of reports you want to see per page by clicking on the “ENTRIES” box as in fig. 7.4i.
(fig.7.4i)
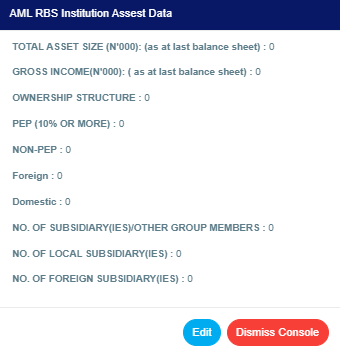
Click on a report’s ‘Inst. Asset’ comment as in fig. 7.4j to view and/or edit the institution asset data. The institution asset data refers to the name, code, address and number of assets of an institution.
(fig. 7.4j)
This displays the ‘AML RBS Institution Asset Data’ console as in fig. 7.4k below. This console provides information on the institution’s asset size, gross income, ownership structure, number of subsidiaries or other group members, local subsidiaries, foreign subsidiaries and other information.
(fig. 7.4k)
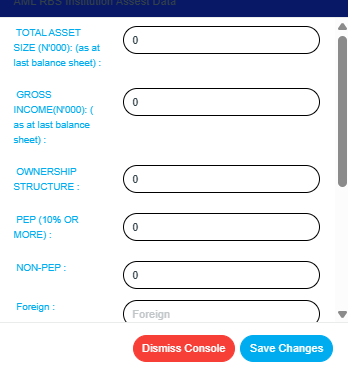
Click on ‘EDIT’ to modify any of the information displayed. See fig. 7.4l.
Fill the details and click on ‘Save changes’ to update the information.
NOTE: Only Persons assigned right(s) to ‘Edit RBS reports’ can EDIT Institution asset data
(fig. 7.4l)
A confirmation console as in fig. 7.4n will be displayed. Click on ‘CONFIRM’ to proceed or ‘CANCEL’ to discontinue.
(fig. 7.4n)
Click on a report’s ‘RBS Rpt’ number to see the details of the branches included in the report.
(fig. 7.4o)
This displays a console will be displayed as in fig. 7.4p below.
(fig. 7.4p)
See the following steps (a – c) on how to make use of the features on this page.
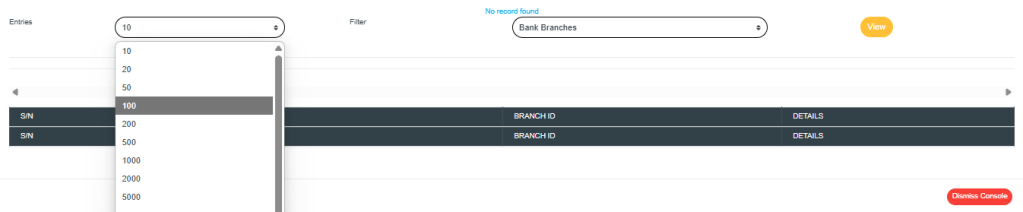
Click on the ‘ENTRIES’ box as in fig. 7.4q below to adjust the number of branches you want to see per page.
(fig. 7.4q)
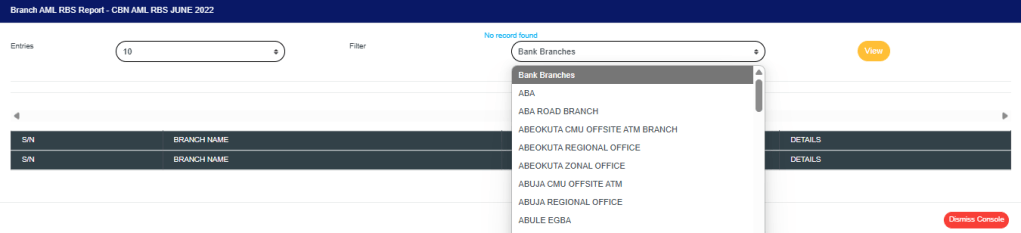
Click on the ‘FILTER’ box to select a bank branch as in fig. 7.4r below.
(fig. 7.4r)
After selecting the bank branch of your choice, click on VIEW as in fig. 7.4s.
(fig. 7.4s)
Click on ‘VIEW’ under the ‘Excel’ column of a report as shown in fig. 7.4t to see its excel file download history.
(fig. 7.4t)
This display an AML RBS excel file repository’ console as in fig. 7.4u. This page gives information about the users that have downloaded the excel file
(fig. 7.4u)
Click on the file name to download the file.
NOTE: Only person(s) assigned right to ‘view RBS Report’ and ‘download RBS Report’ can carry out these operation(s)
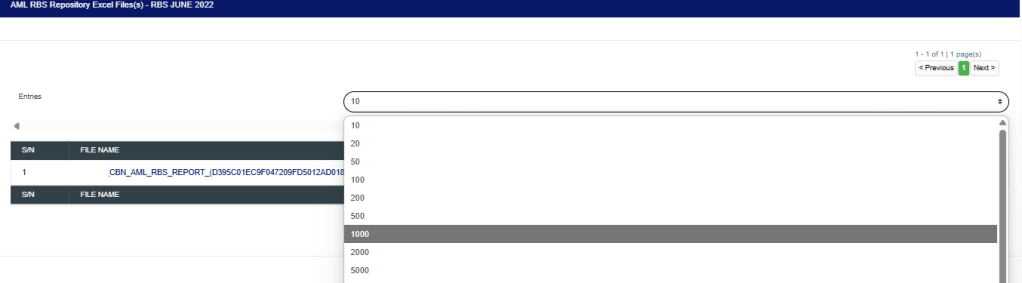
Click on the ‘ENTRIES’ box as in fig. 7.4v to adjust the number of Excel files you want to see per page.
(fig. 7.4v)
Click on ‘file download history’ as shown in fig 7.5u above to see the record of those that downloaded the file. See an example of the download history console below
Also on the AML RBS Repository list page, at the end of each report row, the software shows if the processing of the report is enabled or dis-enabled under the ‘ACTIVE’ column.
For reports that have been completed, their status will read, ENABLED. See fig. 7.4x for an instance.
(fig. 7.4x)
For reports that have not been completed, there will be an extra button next to their ACTIVE status. This button is used to ACTIVATE or DEACTIVATE the processing of the report. Also see fig. 7.4w above.
Click on Activate to enable the processing of report. This turns the status bar of the report to green with an ‘ENABLED’ inscription. See fig. 7.4y and fig. 7.4z for an example.
(fig. 7.4y)
(fig. 7.4z)
A notification will be displayed at the top of the page when activation is successful. See fig. 7.4aa for an example.
Click on Deactivate to disable the processing of the report. This turns the status bar to red with a ‘DIS-ENABLED’ inscription. See fig.7.4ab and fig. 7.4ac to see the result of deactivating a report also.
(fig. 7.4ab)
(fig. 7.4ac)
A notification will be displayed at the top of the page when deactivation is successful. See fig. 7.4ad for an example.
(fig. 7.4ad
NOTE: Only person(s) profiled and assigned right(s) to ‘Edit RBS Report’ will be able to activate or de-activate a report
This menu was created because the AML CFT RBS report schema encompasses lots of data from various sectors of the institution. We are aware that some of these sectors may not have their monthly report data automated; hence this menu is used for the upload of such data once it is made available. This involves selecting a file filled with manually prepared sector data, and uploading its details to be included in a particular AML RBS report.
NB: When there is a manual data to be uploaded for a particular scheduled report, all manual data upload for all sectors must be completed before the report schedule is activated to be processed.
Here is how to upload an AML RBS report data:
NOTE: Only person(s) with right(s) to process RBS Reports will be able to carry out this operation
From the app dashboard, click on “REGULATORY REPORTS” as displayed in the image below.
This will display a drop-down, as shown in image below. The drop-down menu lists the report types available on the Compliance Planet software.
Click “CBN AML/CFT RBS” on the drop-down list and display the RBS REPORT BRANCH REVIEW STATISTICS Page as displayed in the image below.
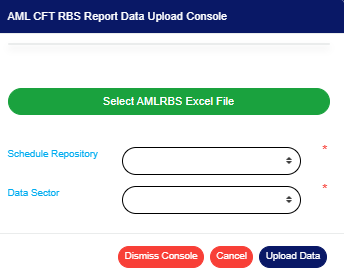
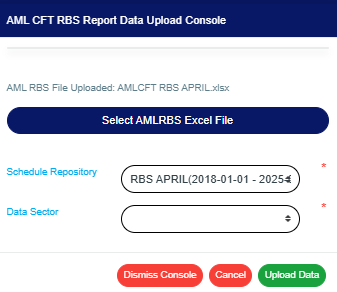
STEP 1: From the top menu, click on” Upload Report Data” as in fig.7.5a below.
(fig. 7.5a)
A console as in fig. 7.5b will be displayed.
(fig. 7.5b)
STEP 2: Click on ‘SELECT AML RBS EXCEL FILE’ as in fig. 7.5c to choose an AML RBS Excel file from your computer. This file should contain the details to be uploaded and it should be according to the compliance planet’s file specification for uploading AML RBS report data.
(fig. 7.5c)
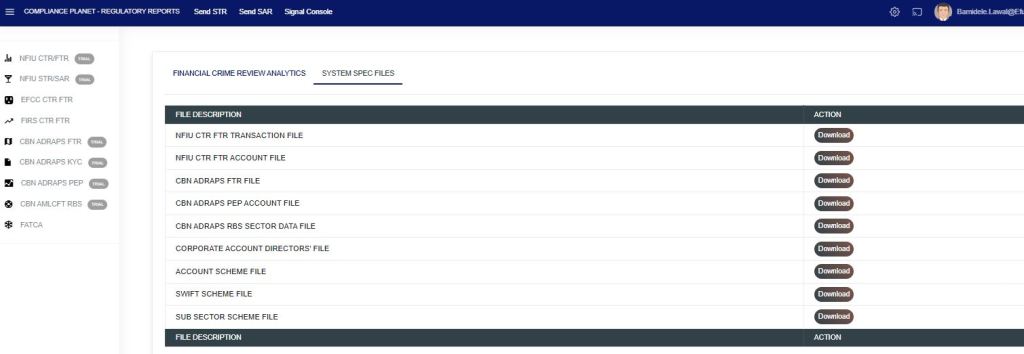
If you do not have the file specification for uploading RBS data, You can download it from the “SYSTEM DATA SPEC FILES” on the software home page as shown in fig. 7.5 below to download an excel file with the required specification.
(fig. 7.5)
An excel file will be downloaded to your computer with pre-filled titled columns under which the details will be entered. Open the file, fill in the required details of the RBS data and save the changes to the file. Renaming the file on your computer is optional. Go back to the software and click on ‘Select AML RBS Excel File’ to select the file.
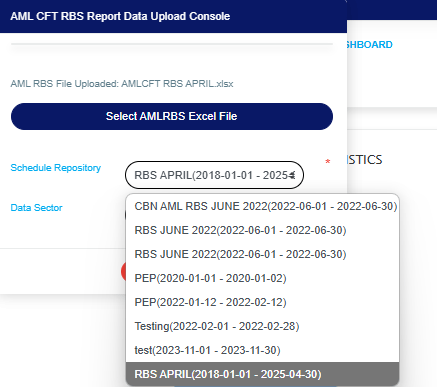
The console will add the title of the file, that is, the file name, after selecting the file for upload. See fig. 7.5d to see an example of how the console looks like when you select a file from your computer.
(fig. 7.5d)
STEP 3: Click ‘Schedule Repository’ box to select the AML RBS report that the uploaded data will be attached to. See fig.7.5e for an example.
(fig. 7.5e)
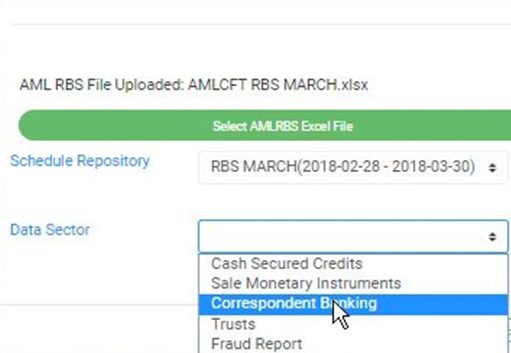
STEP 4: Select the Data Sector from the ‘DATA SECTOR’ box. Data sector refers to the different sections from where data is needed as represented in the AML/CFT RBS report schema. See fig. 7.5f for an example.
(fig. 7.5f)
STEP 5: Click on ‘UPLOAD DATA’ to upload details in the selected excel file on the compliance planet. This button is at the bottom-right corner of the console as shown in fig. 7.5g below.
(fig. 7.5g)
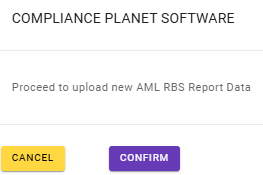
STEP 3: Click on ‘CONFIRM’ as in fig. 7.5h to proceed with the upload or ‘CANCEL’ to discontinue and return to the upload console.
(fig. 7.5h)
A notification will be displayed at the top of the page as seen in fig. 7.5i
(fig. 7.5i)
While the processing is on, you can cancel the upload by clicking on ‘CANCEL’ or close the upload console by clicking on ‘DISMISS CONSOLE’.
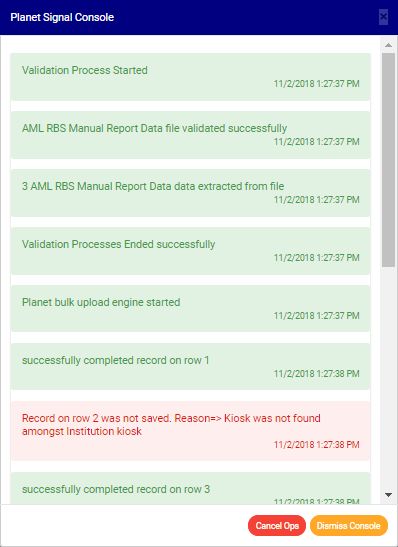
The signal console will show ongoing processes as shown in fig. 7.5j below.
(fig. 7.5j)
Terminate ongoing processes by clicking on ‘Cancel Ops.
Click on ‘Dismiss Console’ to close the signal console.
When upload is complete, an ‘AML RBS Report Data Upload’ report will be downloaded to your computer. It is an excel file that will provide information on the number of uploaded records, processed records, saved records, duplicate records and exempted records. It will also give information on unsuccessful data upload, with reason(s) why upload was not successful. The reason will give you hints on correction(s) to be made in the file before uploading the data again.