The Compliance Planet Anti Money Laundering/Core Bank Finance Software has several policy groups under Transaction/Fraud Monitoring to handle a wide range of monitoring scenarios.
Below are the different policy categories and their explanation.
UNUSUAL SINGLE TRANSACTION VALUE This policy category allows the creation of transaction/fraud monitoring rules to monitor single transaction inflow and/or outflow over a specified period. This policy category allows setting dynamic periods from account inception, account age (moving period of account birth date), etc. It will provide instant signals when customer transaction thresholds change.
UNUSUAL TRANSACTION VOLUME This policy category facilitates the creation of transaction/fraud monitoring rules to track inflows and outflows that surpass a predetermined threshold based on the total volume of transaction activity over a set timeframe. It provides real-time alerts for any potentially suspicious customer transaction counts or volumes.
UNUSUAL CUMULATIVE TRANSACTION VALUE This policy category enables the formulation of transaction/fraud monitoring rules to track inflows and outflows that exceed a defined threshold based on the total accumulated transaction value over a designated period. The policy generates immediate alerts when there is a notable change in the customer’s transaction threshold behavior.
UNUSUAL CREDIT/DEBIT TRANSACTION RATIO This policy category enables the creation of transaction/fraud monitoring rules to track inflows and outflows that exceed a designated credit/debit ratio above the total cumulative transaction, both inflows and outflows, over a specific time frame. It also allows for configuring adaptable periods, from the account’s creation to its current age, based on the account’s start date. The system provides immediate notifications when there are alterations in the customer’s transaction behavior.
UNUSUAL SINGLE CUMULATIVE RATIO TRANSACTION VALUE This policy category allows the creation of transaction/fraud monitoring rules to track inflows and outflows that exceed a defined percentage above the total cumulative transaction values, either inflow or outflow, accumulated over a specific past timeframe. It introduces the ability to set flexible monitoring periods, from the account’s inception, its current age, and other customizable intervals. It provides immediate alerts for unusual or potentially fraudulent customer transaction patterns.
The Policy Alert Explorer helps to display alerts triggered by the various policies created on the system.
STEP 1: From the left-hand side menu, click “TRAN MONITORING” as in Fig 2a below, which then displays a drop-down.
FIG 1a
STEP 2: Click on “POLICIES ALERTS EXPLORER”
Entries: select the number of records you want to see from the policy.
Search: The user is to input a policy name to filter down and search for a specific policy.
Enter a start and end date to view the result.
Click on the “View” button to see the alerts.
To further filter down the results, click on the “Threshold” drop-down and select the desired threshold. For example, if 3 is selected, only alerts for accounts that have been picked 3 times or above across policies will be displayed.
To export the result to Excel, click on the “Export To Excel” button.
This section provides a guide on how to use the TM Case Manager feature on the Compliance Planet Anti-Money Laundering/Core Banking Finance Software, complete with step-by-step instructions and illustrations.
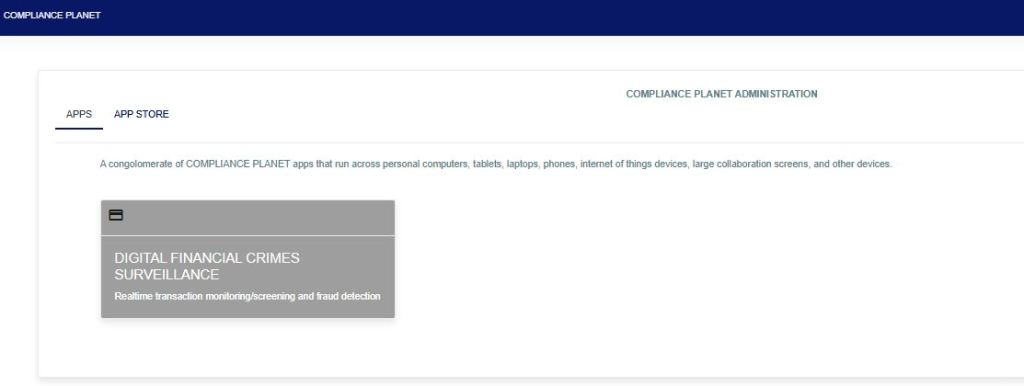
STEP 1: From the app dashboard, click “DIGITAL FINANCIAL CRIMES SURVEILLANCE” as in Fig. a below.
FIG a
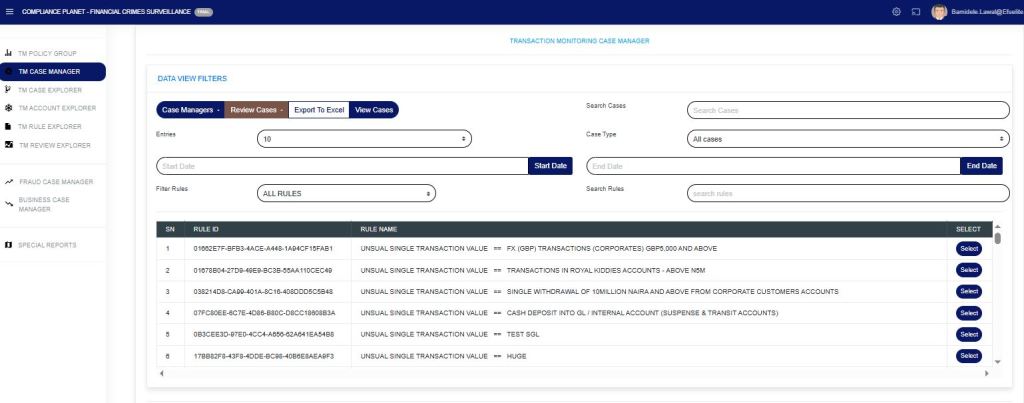
STEP 2: From the left-hand side menu, click “TM Case Manager” as in Fig. b below to display the “Data View Filters“.
FIG b
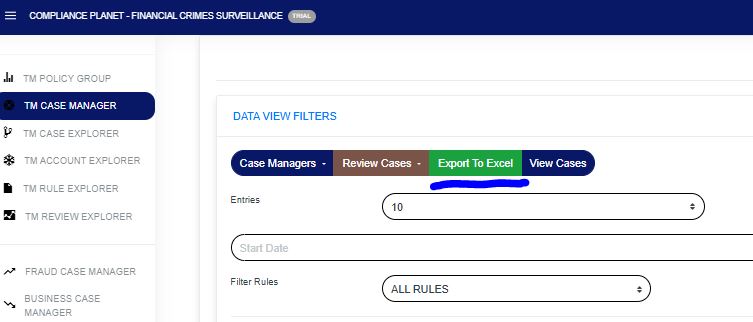
STEP 3: Then click “Data View Filters” to show a menu window that displays all the menus: Case Managers, Review Cases, Export to Excel, View Cases, Search Cases, Entries, Case Type, Start Date & End Date, Filter Rules, and Search Rules as in Fig. C below.
FIG c
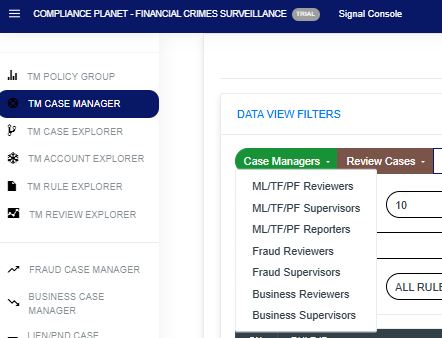
STEP 4: Click on “Case Managers” as in Fig. D below to display a drop-down of all the case managers.
ML/TF/PF Reviewers: TM policy rule that needs further review, which has been sent to the STR Review desk.
ML/TF/PF Supervisors: TM policy rule that needs further review, which has been sent to the STR Supervision desk.
ML/TF/PF Reporters: TM policy rule that needs further review, which has been sent to the STR Report desk.
Fraud Reviewers: A TM policy rule that requires further review has been sent to the Fraud Review desk in the event of suspected fraud.
Fraud Supervisors: TM policy rule that needs further review, which has been sent to the Fraud Supervision in case of fraud suspicion.
Business Reviewers: TM policy rule that requires business reviews not for reporting but for institutional sanity. e.g., staff account used for betting.
Business Supervisors: The TM policy rule that needs further review requires business supervision.
Fig d
STEP 5: Click on “Review Cases” to further enhance the review of policy rule case(s), as in Fig. E below, to display a drop-down of all the review cases.
Close case (manually) as ML/TF/PF reported STRs: when an alert(s) from the case manager has been treated on STR and filed externally, this menu needs to be selected so that the system will not regard such alert(s) as pending alert on the visualization dashboard.
Close case as ML/TF/PF monitoring false-positive alert: when an alert(s) is/are extracted and has a number of transactions and not all the alert(s) is/are meant for STR review(s), those not for STR review(s) is/are removed by selecting this option.
Close case as Fraud monitoring false-positive alert: alerts(s) not meant for STR review(s) are removed by selecting this option.
Close case as Business monitoring false-positive alert: alerts(s) not meant for STR review(s) are removed by selecting this option.
Whitelist account(s) in Rule: whitelisting in a rule allows accounts to be marked as closed from pending cases in that rule.
Whitelist account(s) in Policy: whitelisting in policy applies to all rules under a specific policy group.
Whitelist account(s) in Global Monitoring: Whitelisting in Global Monitoring ensures that accounts are exempt from alerts across all policy categories.
Place account(s) on PND: This places an account(s) on PND to avoid fraud.
Place lien on account(s) alert: This is to place a freeze/hold on account(s) alert.
NB: Whitelisting account(s) from a rule, policy, or global does not mean the account(s) will not be monitored, but they will not pop up as a pending case awaiting review. It will show as closed in the whitelist, and pick the review details where the account(s) were first whitelisted, and put them in an Excel file. For example, when you whitelist an account(s) in a rule, policy, or globally, from the start date entered in the case manager, the account(s) will be marked as whitelisted.
Fig e
STEP 6: Click on “Export to Excel” as in Fig. f below to carry out further analysis on a downloaded rule.
Fig f
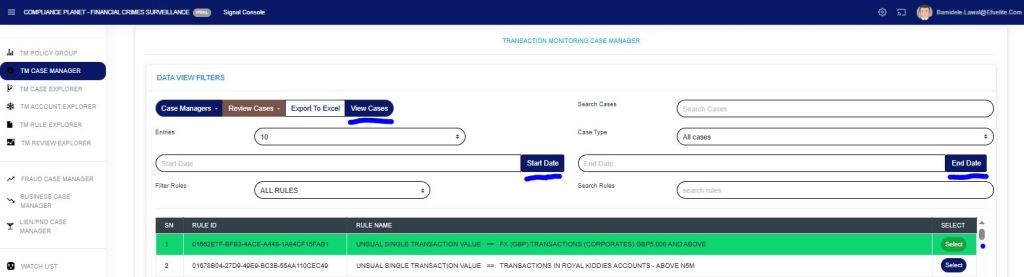
STEP 7: To view rule cases, select the policy rule by clicking on the “select button” to highlight, input the start date and end date, then click on “View Cases” as in Fig. g below.
Fig g
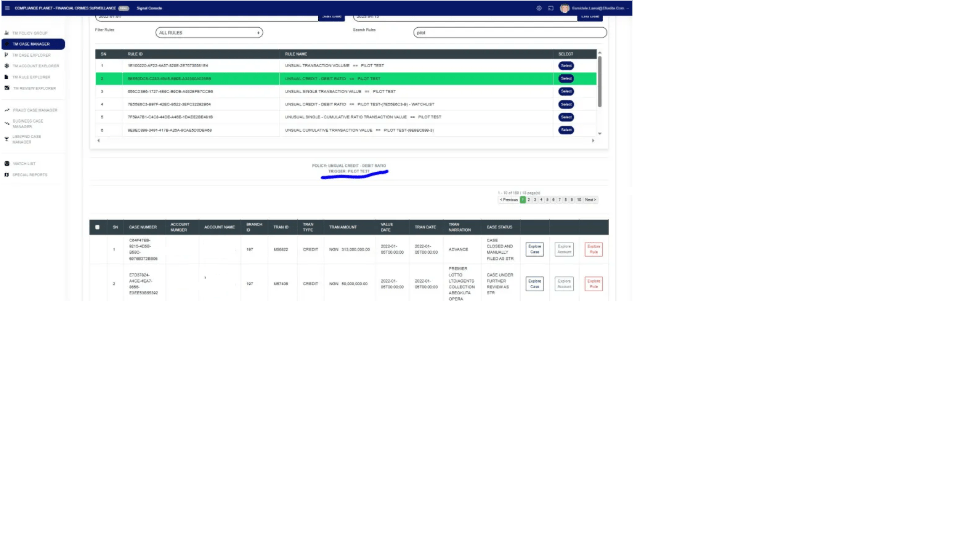
Then the lower part of the page now displays the policy rule name and all the information regarding the account, as seen in the figure below. Each rule can be viewed in the Explorer case, the Explorer account, or the Explorer rule.
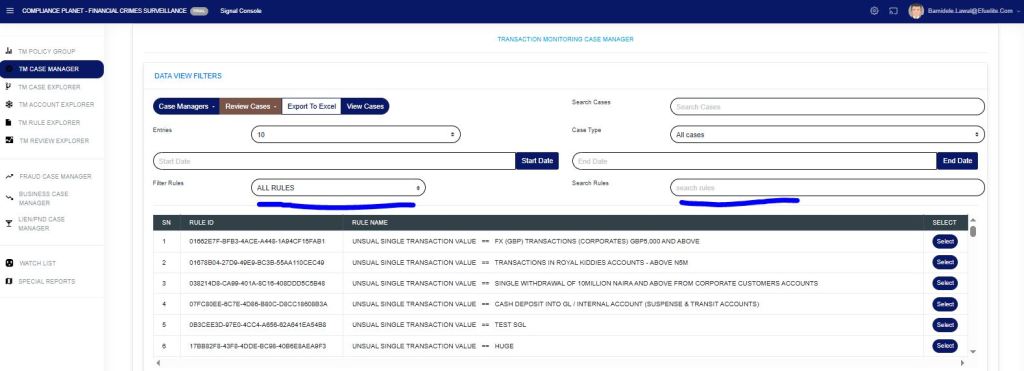
As in the figure below, the Filter Rule menu gives a drop-down of: All rules, Rules Deployed by me, or Rules Assigned to me.
The Search rule menu allows searching for a particular rule. A phrase can also be used to search for rule(s) with such a phrase.
STEP 1: From the app dashboard, click “DIGITAL FINANCIAL CRIMES SURVEILLANCE” as in Fig. 8a below.
Fig 8a
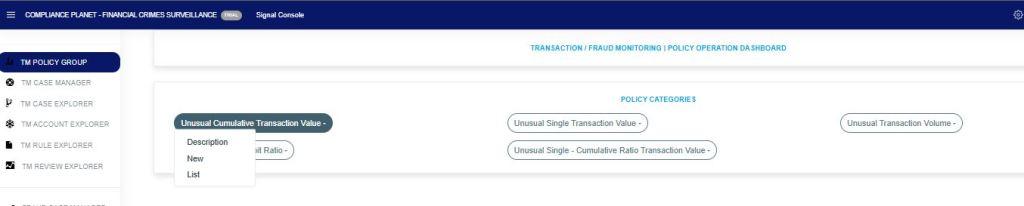
STEP 2: From the left-hand side menu, click “TM POLICY GROUP” as in Fig. 8b below.
Fig 8b
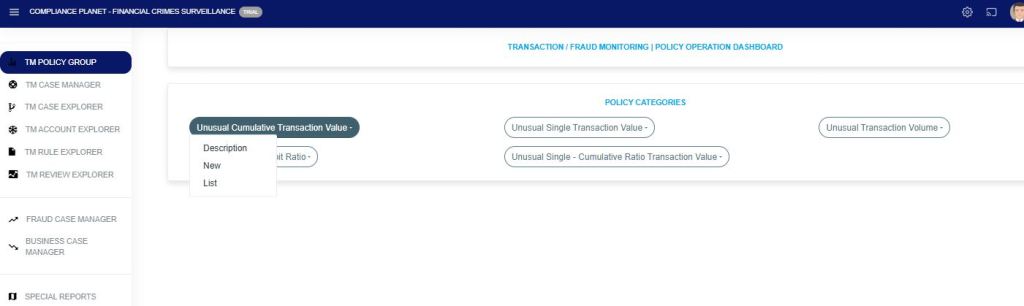
STEP 3: Click on the desired group policy from the “Policy Categories“. This will display a drop-down as shown in Fig. 8c below. Click on “List” to see the active/inactive policies under the selected policy category.
FIG 8c
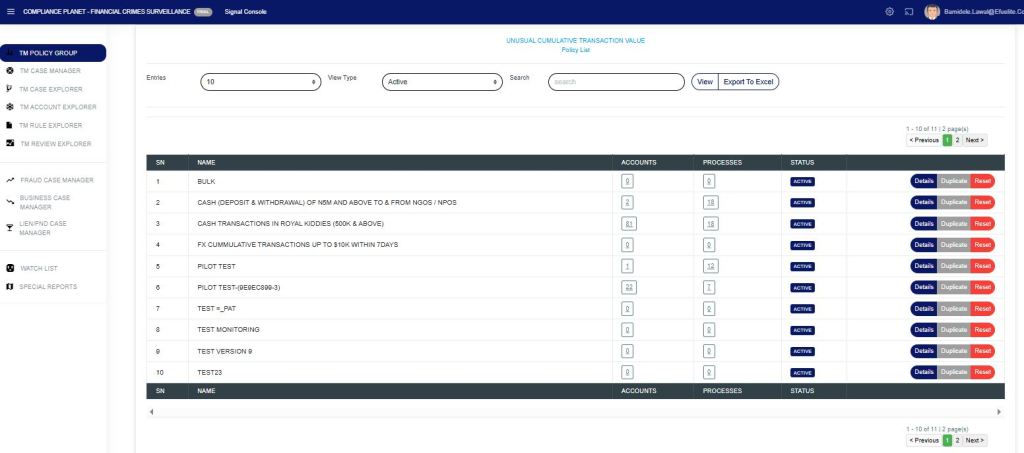
STEP 4: The above displays the list of policies as in fig. 8d below.
FIG 8d
Entries: Number of records to see on a page.
View Type: This option allows you to switch between Active and Inactive policies.
Search: This helps you search for a specific policy.
View: This feature allows you to view all listed policies or a specific policy by inputting a search phrase for the policy.
Export to Excel: Click on the button to export the records on the screen to Excel.
When any of the above filters is changed, click on the View button to see the result.
The data representation of the table columns is explained below;
Name: The name of the policy.
Account: The number of accounts picked by the policy.
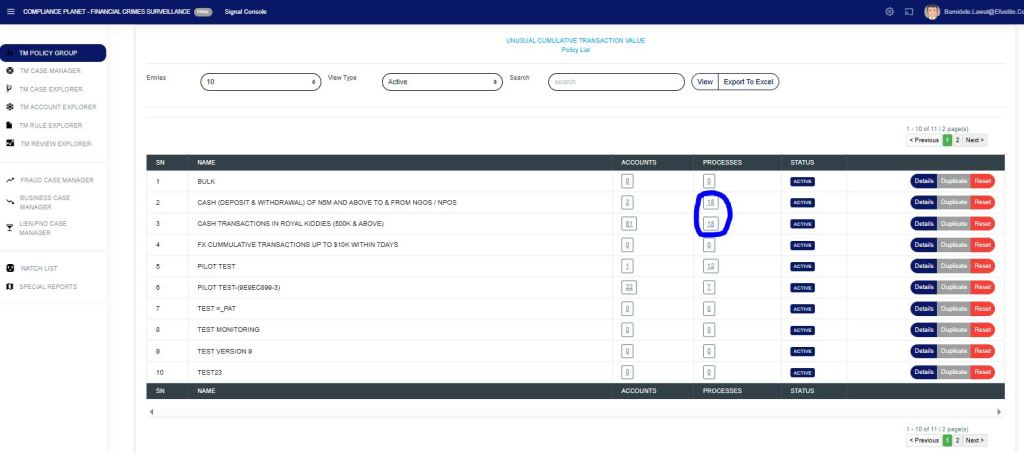
Processes: The number of times the policy has been processed, as in Figure 8e below.
Fig 8e
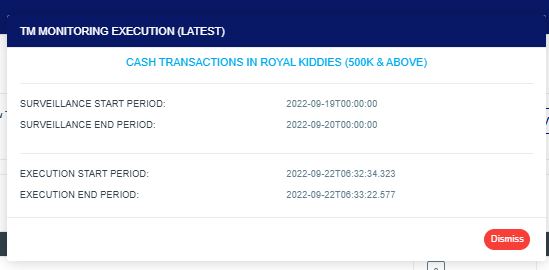
When you click on the process number, this displays the Surveillance Start and End Date (the span of the policy, either 24 hours (1 day) or 48 hours (2 days), and so on). The Execution Start and End Period shows the last period the policy was processed, including the start date with time and the end date with time, as shown in Fig. 8f below.
Fig 8f
Status: The status of the policy (active or inactive).
There are three action buttons on each row with different functions as explained below;
Details: This displays all the parameters entered during the policy creation. This can be edited and saved with the parameters.
Duplicate: This allows you to make a copy of the policy. The copy becomes inactive and is added to the inactive list.
Reset: This deletes all the records that the policy has picked.
TM policy is a set of instructions or parameters by which we want the Compliance Planet to monitor transaction(s). The TM policy group creation process in the Compliance Planet Anti-Money Laundering/Core Banking Finance software is designed to be dynamic, allowing users to set custom flows and parameters.
Steps to creating “New Policy” from POLICY GROUP are described below.
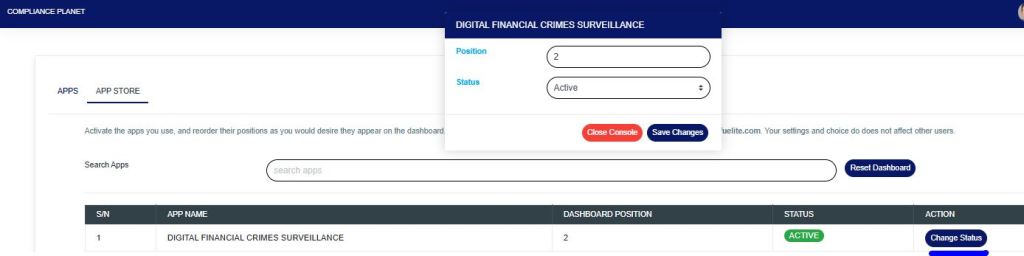
STEP 1: From the app store, click “DIGITAL FINANCIAL CRIMES SURVEILLANCE” and select change status as in Fig. 5.1b below.
FIG 5.1b
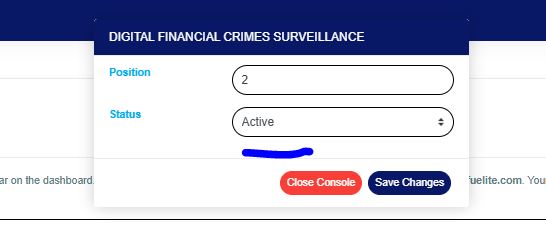
From the window, change status to “ACTIVE” as in Fig. 5.1.1b below.
FIG 5.1.1b
The app would be reflected in the “APP dashboard” as shown in Fig. 5.1.2b below.
FIG 5.1.2b
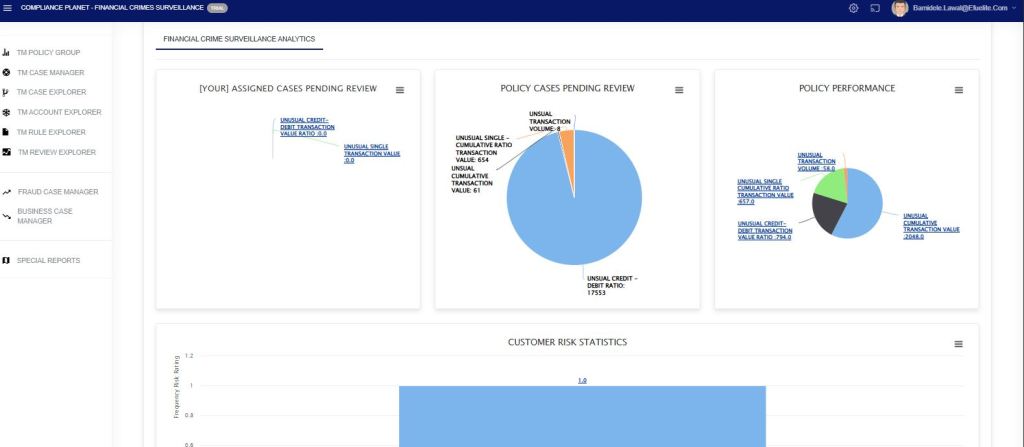
STEP 2: Click on “DIGITAL FINANCIAL CRIMES SURVEILLANCE” and the app displays the menu page that shows different graphical representations as in Fig. 5.1.3b below.
FIG 5.1.3b
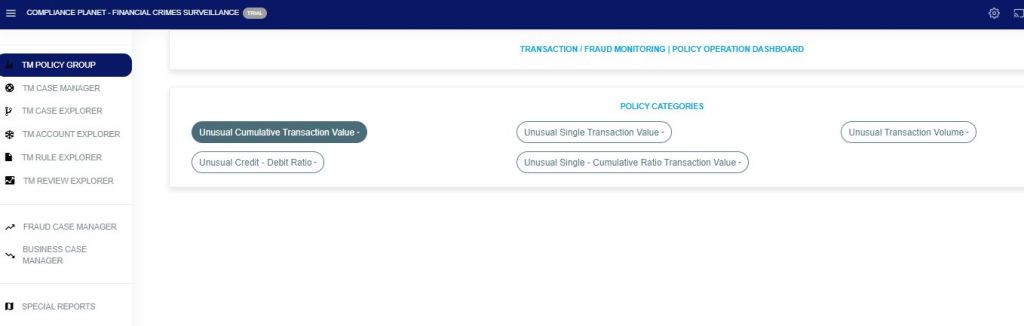
From the left-hand side, the first menu “TM POLICY GROUP” displays all the policy categories as shown in fig.5.1c
FIG 5.1c
STEP 3: Click on the desired group policy from the “POLICY CATEGORIES” in fig. 5.1d. This displays a dropdown menu.
From the drop-down menu, click on “New.” This will display the policy creation page.
FIG 5.1d
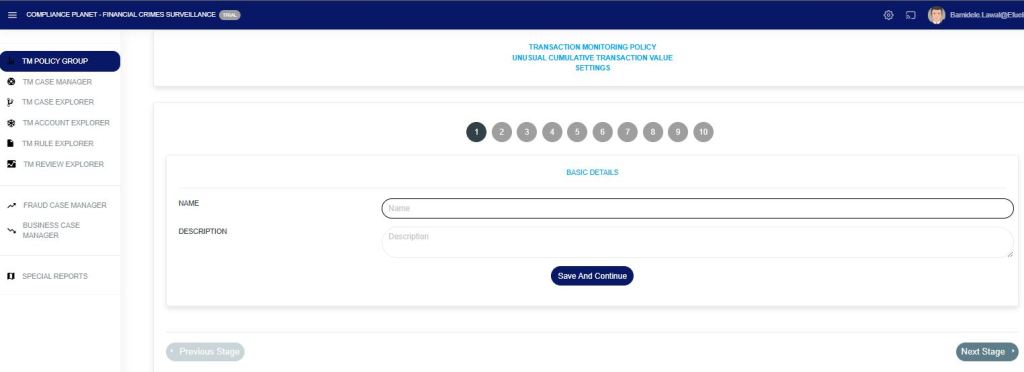
STAGE 1: Fill in the Basic details required as in FIG 5.1e.
Name: Fill in the policy name.
Description: Fill in the policy description.
Click on the “Save and Continue” button. This will save this stage and take you to the next stage.
FIG 5.1e
STAGE 2: This is the policy filter stage. Fill in the fields according to your policy rule.
FIG 5.1f
BVN: Enter the BVN(s) in the field provided. To input multiple BVNs, separate each one with a comma (,).
ACCOUNT: Enter the ACCOUNT NUMBER(s) in the field provided. To input multiple ACCOUNT NUMBERS, separate each one with a comma (,).
ACCOUNT SCHEME (included): Click on the dropdown to select the ACCOUNT SCHEMES you want to include.
ACCOUNT SCHEME (not included): Click on the dropdown to select the ACCOUNT SCHEMES you want to exclude.
SUBSECTOR SCHEME (included): Click on the dropdown to select the SUBSECTOR SCHEMES you want to include.
SUBSECTOR SCHEME (not included): Click on the dropdown to select the SUBSECTOR SCHEMES you want to exclude.
BRANCHES (included): Click on the dropdown to select the BRANCHES you want to include.
BRANCHES (not included): Click on the dropdown to select the BRANCHES you want to exclude.
INCLUSIVE NARRATION: Enter keywords in the transaction narration to be included, separating them with a pipe (aml|compliance|planet|).
EXCLUSIVE NARRATION: Enter keywords in the transaction narration to be excluded, separating them with a pipe (aml|compliance|planet|).
TRAN. TYPE: Click the dropdown and select the transaction type. It can be either credit, debit, or both credit and debit.
TRAN. CURRENCY: Click the dropdown and select the currency for the transaction.
TRAN INDUCED TYPE: Click the dropdown and select the transaction induced type.
TRAN SECTOR: Click the dropdown and select the transaction sector.
ACCOUNT OWNERSHIP: Click the dropdown and select the account ownership type.
ACCOUNT TIER: Click the dropdown and select the account tier type. It can be either Tier 1, Tier 2, or Tier 3.
ACCOUNT STATUS: Click the dropdown and select the account status. It can be either all accounts, accounts that are still open, or accounts that are closed.
ACCOUNT PRODUCT TYPE: Click the dropdown and select the account product type. It can be either Individual accounts or corporate accounts.
CUSTOMER TYPE:Click the dropdown and select the customer type.
BLACKLISTED BVN: Turn on the button if you want to filter only BVNs that are on the blacklist.
TRACK TRAN LOCATION: Turn on the button to view or enable tracking of the geographical location where each transaction occurred.
PRE-CLASSIFIED ACCOUNT RISK LEVEL: Click and select the risk level assigned to the account before applying the policy. It can be either low, medium, or high.
POST CLASSIFIED ACCOUNT RISK LEVEL: Click and select the updated risk level after applying the policy. It can be either low, medium, or high.
Click on the “Save and Continue” button. This will save this stage and take you to the next stage.
Note: The mandatory fields are “Tran Currency” and “Tran Type“.
STAGE 3: From (Fig. 5.1g), select the transaction amount alert type from the “Tran Amount Alert type” drop-down. Depending on the alert type chosen, an amount field will be displayed where the transaction amount needs to be entered.
Click on the “Save and Continue” button. This will save this stage and take you to the next stage.
fig 5.1g
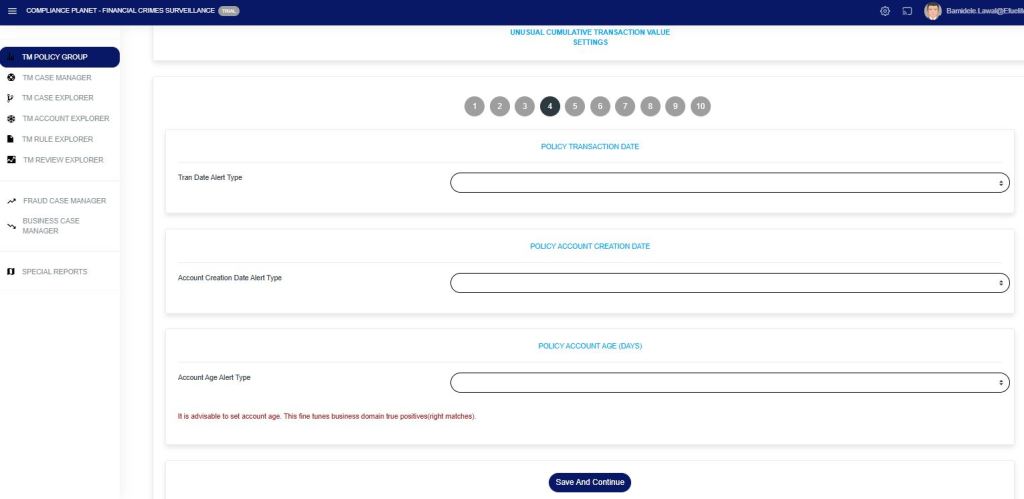
STAGE 4: This stage sets the Tran Date Alert Type, Account Creation Date Alert Type, and Account Age Alert Type
fig 5.1h
Tran Date Alert Type: Click on the dropdown and select the transaction date alert type. Raise alert for *Transaction date earlier than* – This option allows you to select a date; an alert will be raised for any transaction that occurred before the specified date. Raise Alert for *Transaction Date Later Than* – This option allows you to select a date; an alert will be raised for any transaction that occurred after the specified date. Raise Alert for *Transaction Date within this Date Range* – This option allows you to select a date range; alerts will be raised for transactions that fall within the specified period. Depending on the alert type selected, a date field will be displayed where the transaction date needs to be entered.
Account Creation Date Alert Type (Optional): Click on the dropdown and select the account creation date alert type. Raise Alert for *Accounts Created on Exact Date* – This option allows you to select a specific date; alerts will be raised for accounts created on that exact day. Raise Alert for *Accounts Created Before* – This option allows you to select a date; alerts will be raised for any account created before the chosen date. Raise alert for *Accounts created date later than* – This option allows you to select a date; alerts will be raised for accounts created after the specified date. Raise alert for *Accounts created date within this date range* – This option allows you to select a date range; alerts will be raised for accounts created within the specified period. Depending on the alert type selected, a date field will be displayed where the account creation date needs to be entered.
Account Age Alert Type: Click on the dropdown and select the account age alert type. This helps to monitor accounts created within a particular period, e.g., 48 hours (2 days) or a week (7 days). Raise alert for *exact account age* – This option allows you to select a specific age in days; an alert will be raised for accounts that match the specified age. Raise alert for *Account age lesser than* – This option allows you to specify an age threshold; alerts will be raised for accounts with an age less than the specified threshold. Raise alert for *Account age greater than* – This option allows you to select an age threshold; alerts will be raised for accounts older than the specified number of days. Raise alert for *Account age within this date range* – This option allows you to select a Lower and higher age threshold (in Days); alerts will be raised for accounts that fall within the specified age range.
Note: This Account Age Alert Type is a dynamic parameter that changes over time, regardless of the current date.
Click on the “Save” button for each section to save the changes for that section. Click the “Continue” button to proceed to the next stage.
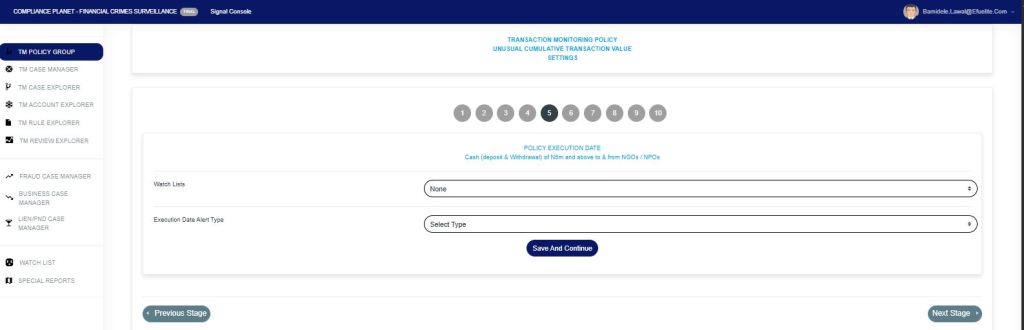
STAGE 5: The “Watch List” is to specifically monitor account (s) that have been profiled on the watch list menu that bridges the policy rule.
The “Execution Date alert type” sets a specific date or a date range for when the policy will be executed.
Click the drop-down and select the execution date alert type. Depending on the alert type chosen, a date field will be displayed where the execution date needs to be entered.
Click on the “Save and Continue” button. This will save your progress at this stage and take you to the next stage.
fig 5.1i
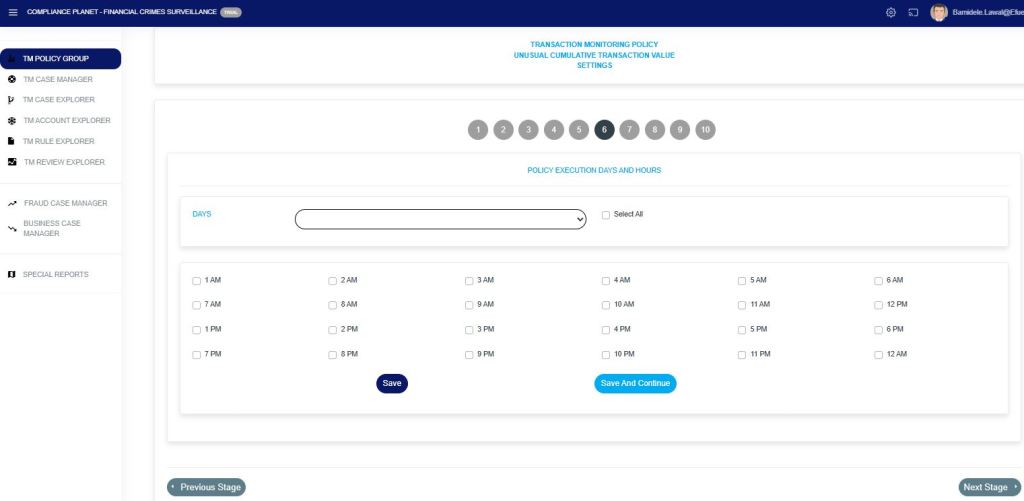
STAGE 6: From (Fig. 5.1j). This step sets the hour(s) of the weekdays on which the policy will be executed. To change the days, click on the “Days” drop-down and select the desired weekday. After editing the hours for a weekday, click on the “Save” button to save the changes for that day.
Note: By default, all the hours for the weekdays are checked (active).
Click on the “Save and Continue” button. This will save this stage and take you to the next stage.
fig 5.1j
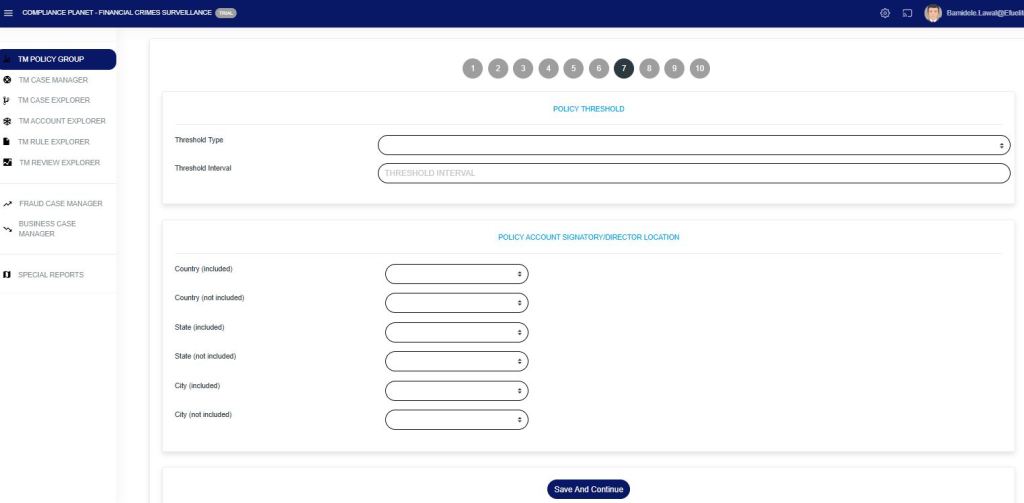
STAGE 7: From (5.1K). This step sets the “threshold type” and the “threshold interval” of the policy to be executed.
To narrow down the policy to only accounts whose signatory or director ID is from a particular country, state, or city, then make use of the drop-downs under the “POLICY ACCOUNT SIGNATORY/DIRECTOR LOCATION” section by selecting country/state/city.
Click on the “Save and Continue” button. This will save this stage and take you to the next stage.
5.1K
STAGE 8: From (Fig. 5.1l). This stage allows the addition/removal of users who will receive notifications for this policy.
Click on the “Save and Continue” button. This will save this stage and take you to the next stage.
fig 5.1l
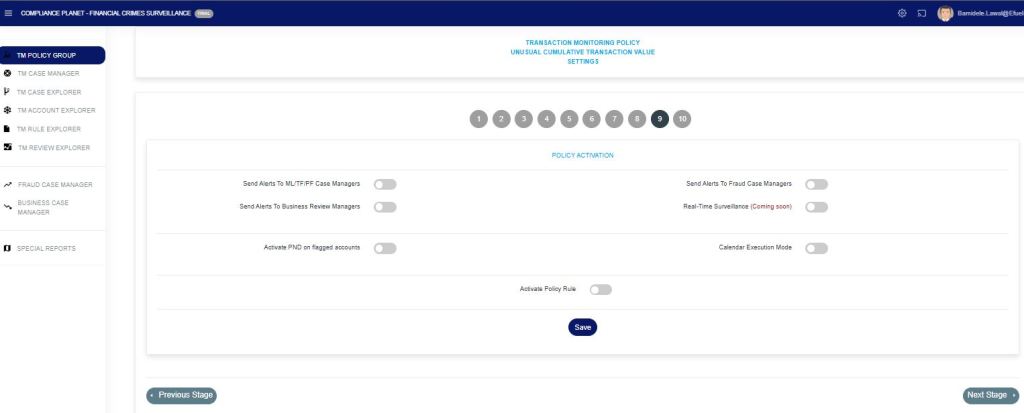
STAGE 9: From (Fig. 5.1m), there are different buttons for the policy rule created.
Send Alerts to ML/TF/PF Case Manager: If this button is toggled on, the policy sends a notification automatically to the STR case managers.
Send Alerts to Business Review Managers: If this button is toggled on, the policy automatically sends a notification to Business Review Managers.
Send Alerts to Fraud Case Managers: If this button is toggled on, the policy automatically sends a notification to the Fraud Case Managers.
Real-Time Surveillance: This button is toggled on specifically to send notifications for transactions that breach the rule as they occur.
Activate PND on Flagged Accounts: If the alert breaches the PND-flagged account, this button is toggled on. Although this requires integration with the institution’s PND service.
Calendar Execution Mode: This button is toggled on specifically for policy rule(s) that report specific, not business reviews, or AML or Fraud.
Activate Policy Rule: This button is to activate the policy rule that has been created.
Proactive Surveillance: This button is specifically toggled on to monitor transactions in advance and send alerts for suspicious activities before a breach occurs.
Activate Surveillance Notification: This button is toggled on specifically to send real-time notifications whenever surveillance detects a transaction that matches a defined rule.
Day-Time Segment Surveillance: This button is toggled on specifically to monitor and send alerts for rule-breaching transactions that occur during predefined daytime hours.
Click on the “Save and Continue” button. This will save this stage and take you to the next stage.
fig 5.1m
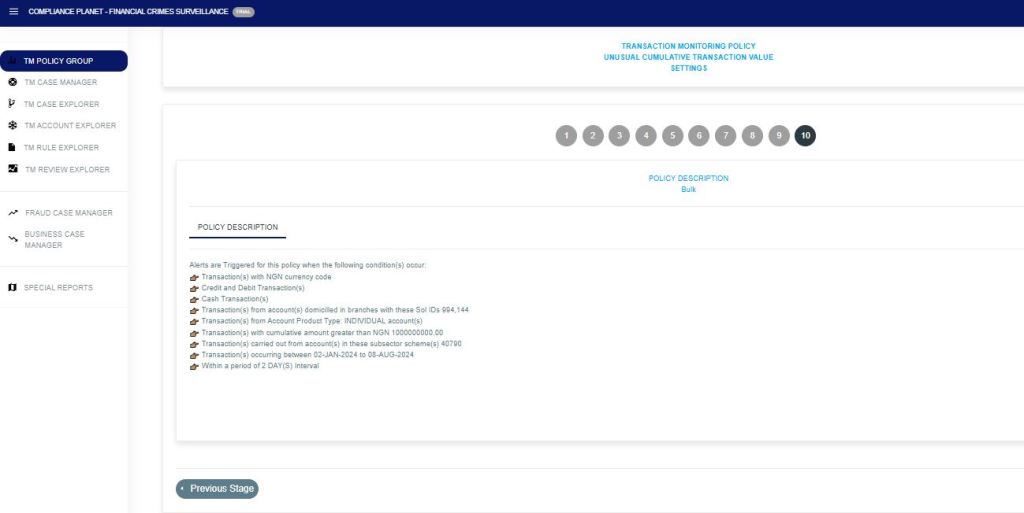
STAGE 10: From (Fig. 5.1n), this stage displays the policy’s target based on the parameters entered from stage 2 to stage 7.
N.B.: You can always go back to any of the stages should you want to change the data, just by clicking on the Particular “Stage number(1-9)” you wish to make changes to.
The policy account explorer helps you to view accounts picked accross the various policies
STEP 1: From the left-hand side menu, click “TRANSACTION/FRAUD MONITORING” as in Fig 2a below.
FIG 2a
Step 2: Click on the “POLICIES ACCOUNT EXPLORER”
Click on the “View” button to see the list of policies and triggers. To view the accounts under a trigger, click on the “Explore Accounts” button for that trigger.
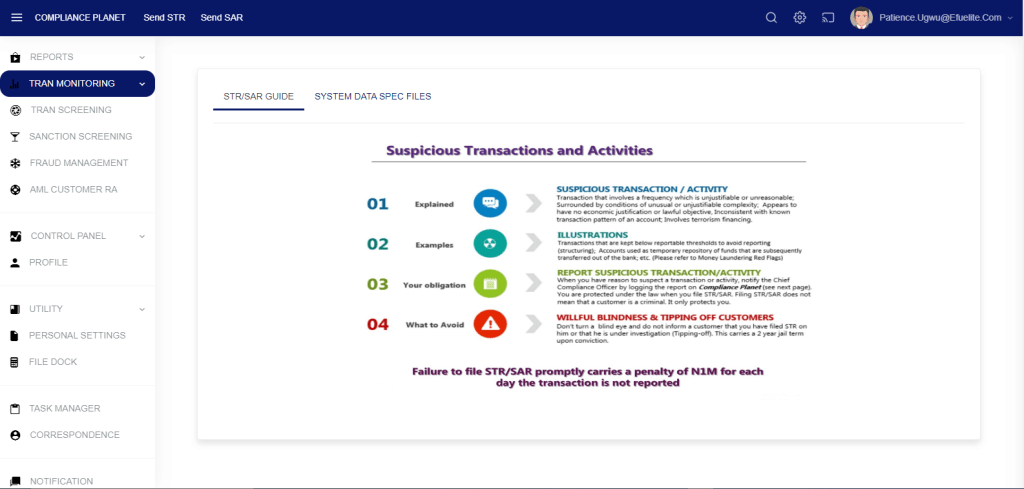
In mitigating the dangers aligned with financial institutions solely relying on manual notification of suspicious transactions and activities, Compliance Planet includes an Artificial Intelligence Service that serves as a real time monitor for the institution. This CP-AIS works with well crafted policies that are deployed into the system (Compliance planet). On breaches to these policies, CP-AIS provides real time alert, signals and reports to appropriate channels as configured on Compliance planet. This module includes features to;